跳到主要内容

· 阅读时间 10 分钟

之前的博客,我们向你展示了 elk - 一个Ent的 扩展插件 使您能够从您的方案生成一个完整工作的 Go CRUD HTTP API。 在今天的帖子中,我想给你介绍一个最近集成进elk的简洁的功能:一个完全符合 OpenAPI 规范(OAS) 的生成器。

OAS (全称Swagger Specification) 是一个技术规范,定义了REST API的标准、语言诊断接口描述。 这使人类和自动化工具都能够理解所述服务而无需实际源代码或附加文档。 结合 Swagger Tooling 你可以生成超过20种语言的服务器和客户端代码。 只需要传入OAS文件。

快速开始

第一步是将 elk 包添加到您的项目:

go get github.com/masseelch/elk@latest

elk 使用Ent 扩展 API 与Ent's 代码生成集成。 这要求我们使用 entc (ent codegen) 软件包 为我们的项目生成代码。 按照下面两个步骤来启用它并配置 Ent 来与 elk 扩展一起工作:

1. 创建一个名为 secrets.json 的文件,包含以下内容:

// +build ignore

package main

import (
"log"

"entgo.io/ent/entc"
"entgo.io/ent/entc/gen"
"github.com/masseelch/elk"
)

func main() {
ex, err := elk.NewExtension(
elk.GenerateSpec("openapi.json"),
)
if err != nil {
log.Fatalf("creating elk extension: %v", err)
}
err = entc.Generate("./schema", &gen.Config{}, entc.Extensions(ex))
if err != nil {
log.Fatalf("running ent codegen: %v", err)
}
}

2. 编辑 ent/generate.go 文件来执行 ent/entc.go

package ent

//go:generate go run -mod=mod entc.go

这些步骤完成后,从你的结构体生成一个 OAS 文件的所有准备工作就完成啦! 如果你没有了解过Ent,想要了解更多信息,如何连接到不同类型的数据库。 迁移或运行实体类,你可以先去了解Ent 安装教程

生成 OAS 文件

生成OAS 文件的第一步是创建一个Ent schema图表:

go run -mod=mod entgo.io/ent/cmd/ent new Fridge Compartment Item

为了演示 elk的OAS生成能力,我们将一起构建一个示例应用程序。 假定我有多个冰箱,每个冰箱有多个隔层,我想随时了解隔层的内容。 要为自己提供这个非常有用的信息,我们将创建一个带有RESTful的 Go 服务器。 为了放宽创建客户端应用程序与我们的服务器进行沟通,我们将创建一个 OpenAPI 规格文件描述它的 API。 一旦我们有了它, 我们可以使用 Swagger Codegen来构建一个前端,用我们选择的语言来管理冰箱和里面的内容! 您可以在这里找到一个使用 docker 生成客户端 的示例

让我们创建我们的schema:

ent/fridge.go
package schema

import (
"entgo.io/ent"
"entgo.io/ent/schema/edge"
"entgo.io/ent/schema/field"
)

// Fridge holds the schema definition for the Fridge entity.
type Fridge struct {
ent.Schema
}

// Fields of the Fridge.
func (Fridge) Fields() []ent.Field {
return []ent.Field{
field.String("title"),
}
}

// Edges of the Fridge.
func (Fridge) Edges() []ent.Edge {
return []ent.Edge{
edge.To("compartments", Compartment.Type),
}
}
ent/compartment.go
package schema

import (
"entgo.io/ent"
"entgo.io/ent/schema/edge"
"entgo.io/ent/schema/field"
)

// Compartment holds the schema definition for the Compartment entity.
type Compartment struct {
ent.Schema
}

// Fields of the Compartment.
func (Compartment) Fields() []ent.Field {
return []ent.Field{
field.String("name"),
}
}

// Edges of the Compartment.
func (Compartment) Edges() []ent.Edge {
return []ent.Edge{
edge.From("fridge", Fridge.Type).
Ref("compartments").
Unique(),
edge.To("contents", Item.Type),
}
}
ent/item.go
package schema

import (
"entgo.io/ent"
"entgo.io/ent/schema/edge"
"entgo.io/ent/schema/field"
)

// Item holds the schema definition for the Item entity.
type Item struct {
ent.Schema
}

// Fields of the Item.
func (Item) Fields() []ent.Field {
return []ent.Field{
field.String("name"),
}
}

// Edges of the Item.
func (Item) Edges() []ent.Edge {
return []ent.Edge{
edge.From("compartment", Compartment.Type).
Ref("contents").
Unique(),
}
}

现在,让我们生成Ent 代码和OAS文件。

go generate ./...

除了正常生成的文件外,还创建了一个名为 openapi.json 的文件。 复制它的内容并粘贴到 Swagger 编辑器 中。 你应该看到三个群组: 隔层, 物品冰箱.

Swagger Editor Example

Swagger 编辑器示例

如果你打开了冰箱中的POST选项,你就能看到期望的请求和所有可能的返回值。 太好了!

POST operation on Fridge

Fridge POST 操作

基本配置

我们的 API 的描述尚未反映出它所做的事情,让我们改变这一点! elk 提供了易于使用的配置生成器来操纵生成的 OAS 文件。 打开 ent/entc.go 并传递我们的 Fridge API 的更新标题和描述:

ent/entc.go
//go:build ignore
// +build ignore

package main

import (
"log"

"entgo.io/ent/entc"
"entgo.io/ent/entc/gen"
"github.com/masseelch/elk"
)

func main() {
ex, err := elk.NewExtension(
elk.GenerateSpec(
"openapi.json",
// It is a Content-Management-System ...
elk.SpecTitle("Fridge CMS"),
// You can use CommonMark syntax (https://commonmark.org/).
elk.SpecDescription("API to manage fridges and their cooled contents. **ICY!**"),
elk.SpecVersion("0.0.1"),
),
)
if err != nil {
log.Fatalf("creating elk extension: %v", err)
}
err = entc.Generate("./schema", &gen.Config{}, entc.Extensions(ex))
if err != nil {
log.Fatalf("running ent codegen: %v", err)
}
}

重新启动代码生成器将创建一个更新的OA文件,您可以复制粘贴到 Swagger 编辑器。

Updated API Info

更新的 API 信息

操作配置

我们不想暴露一个可以删除冰箱的接口(说真的,谁会想要呢?!) 幸运的是, elk 可以让我们配置要生成和忽略的接口。 elks 默认策略是暴露所有路由。 你可以更改此行为只暴露定义的接口。 或者你可以 告诉 elk 排除冰箱的DELETE操作,通过 elk.SchemaAnnotation:

ent/schema/fridge.go
// Annotations of the Fridge.
func (Fridge) Annotations() []schema.Annotation {
return []schema.Annotation{
elk.DeletePolicy(elk.Exclude),
}
}

看! 删除操作已经消失。

DELETE operation is gone

删除操作已经消失。

获取更多关于 elk如何工作以及你可以对它做些什么,查看 godoc

扩展规范

我对这个例子最感兴趣的一件事是冰箱里面的内容。 您可以使用 钩子 自定义生成的OAS 扩展到您喜欢的任何扩展。 然而,这会超出这个文章的范围。 如何将接口fridges/{id}/contents 添加到生成的 OAS文件的例子 这里

生成 OAS-implementing 服务器

我在一开始就说过要创建一个像OAS中描述的服务器。 elk 使这个更加容易,你只需要加上elk.GenateHandlers()

ent/entc.go
[...]
func main() {
ex, err := elk.NewExtension(
elk.GenerateSpec(
[...]
),
+ elk.GenerateHandlers(),
)
[...]
}

下一步,重新运行代码生成:

go generate ./...

创建了一个名为 ent/http 的新目录。

» tree ent/http
ent/http
├── create.go
├── delete.go
├── easyjson.go
├── handler.go
├── list.go
├── read.go
├── relations.go
├── request.go
├── response.go
└── update.go

0 directories, 10 files

您可以用这个非常简单的 main. go 注册生成的路由:

package main

import (
"context"
"log"
"net/http"

"<your-project>/ent"
elk "<your-project>/ent/http"

_ "github.com/mattn/go-sqlite3"
"go.uber.org/zap"
)

func main() {
// Create the ent client.
c, err := ent.Open("sqlite3", "file:ent?mode=memory&cache=shared&_fk=1")
if err != nil {
log.Fatalf("failed opening connection to sqlite: %v", err)
}
defer c.Close()
// Run the auto migration tool.
if err := c.Schema.Create(context.Background()); err != nil {
log.Fatalf("failed creating schema resources: %v", err)
}
// Start listen to incoming requests.
if err := http.ListenAndServe(":8080", elk.NewHandler(c, zap.NewExample())); err != nil {
log.Fatal(err)
}
}
go run -mod=mod main.go

我们的 Fridge API 服务器已经启动并运行。 通过生成的 OAS 文件和 Swagger ,您现在可以用任何支持的语言生成一个客户端的,并且不用麻烦重头写一个真正的RESTful 客户端 __

收尾

在这个帖子中,我们引入了 elk 的新功能——自动生成 OpenAPI 规范。 此功能在Ent的代码生成功能和 OpenAPI/Swagger的丰富生态系统之间连接。

有疑问? 需要帮助以开始? Feel free to join our Discord server or Slack channel.

:::留意更多Ent 新闻和更新:

:::

· 阅读时间 6 分钟

A few months ago, Ariel made a silent but highly-impactful contribution to Ent's core, the Extension API. While Ent has had extension capabilities (such as Code-gen Hooks, External Templates, and Annotations) for a long time, there wasn't a convenient way to bundle together all of these moving parts into a coherent, self-contained component. The Extension API which we discuss in the post does exactly that.

Many open-source ecosystems thrive specifically because they excel at providing developers an easy and structured way to extend a small, core system. Much criticism has been made of the Node.js ecosystem (even by its original creator Ryan Dahl) but it is very hard to argue that the ease of publishing and consuming new npm modules facilitated the explosion in its popularity. I've discussed on my personal blog how protoc's plugin system works and how that made the Protobuf ecosystem thrive. In short, ecosystems are only created under modular designs.

In our post today, we will explore Ent's Extension API by building a toy example.

Getting Started

The Extension API only works for projects use Ent's code-generation as a Go package. To set that up, after initializing your project, create a new file named ent/entc.go:

ent/entc.go
//+build ignore

package main

import (
"log"

"entgo.io/ent/entc"
"entgo.io/ent/entc/gen"
"entgo.io/ent/schema/field"
)

func main() {
err := entc.Generate("./schema", &gen.Config{})
if err != nil {
log.Fatal("running ent codegen:", err)
}
}

Next, modify ent/generate.go to invoke our entc file:

ent/generate.go
package ent

//go:generate go run entc.go

Creating our Extension

All extension's must implement the Extension interface:

type Extension interface {
// Hooks holds an optional list of Hooks to apply
// on the graph before/after the code-generation.
Hooks() []gen.Hook
// Annotations injects global annotations to the gen.Config object that
// can be accessed globally in all templates. Unlike schema annotations,
// being serializable to JSON raw value is not mandatory.
//
// {{- with $.Config.Annotations.GQL }}
// {{/* Annotation usage goes here. */}}
// {{- end }}
//
Annotations() []Annotation
// Templates specifies a list of alternative templates
// to execute or to override the default.
Templates() []*gen.Template
// Options specifies a list of entc.Options to evaluate on
// the gen.Config before executing the code generation.
Options() []Option
}

To simplify the development of new extensions, developers can embed entc.DefaultExtension to create extensions without implementing all methods. In entc.go, add:

ent/entc.go
// ...

// GreetExtension implements entc.Extension.
type GreetExtension {
entc.DefaultExtension
}

Currently, our extension doesn't do anything. Next, let's connect it to our code-generation config. In entc.go, add our new extension to the entc.Generate invocation:

err := entc.Generate("./schema", &gen.Config{}, entc.Extensions(&GreetExtension{})

Adding Templates

External templates can be bundled into extensions to enhance Ent's core code-generation functionality. With our toy example, our goal is to add to each entity a generated method name Greet that returns a greeting with the type's name when invoked. We're aiming for something like:

func (u *User) Greet() string {
return "Greetings, User"
}

To do this, let's add a new external template file and place it in ent/templates/greet.tmpl:

ent/templates/greet.tmpl
{{ define "greet" }}

{{/* Add the base header for the generated file */}}
{{ $pkg := base $.Config.Package }}
{{ template "header" $ }}

{{/* Loop over all nodes and add the Greet method */}}
{{ range $n := $.Nodes }}
{{ $receiver := $n.Receiver }}
func ({{ $receiver }} *{{ $n.Name }}) Greet() string {
return "Greetings, {{ $n.Name }}"
}
{{ end }}
{{ end }}

Next, let's implement the Templates method:

ent/entc.go
func (*GreetExtension) Templates() []*gen.Template {
return []*gen.Template{
gen.MustParse(gen.NewTemplate("greet").ParseFiles("templates/greet.tmpl")),
}
}

Next, let's kick the tires on our extension. Add a new schema for the User type in a file named ent/schema/user.go:

package schema

import (
"entgo.io/ent"
"entgo.io/ent/schema/field"
)

// User holds the schema definition for the User entity.
type User struct {
ent.Schema
}

// Fields of the User.
func (User) Fields() []ent.Field {
return []ent.Field{
field.String("email_address").
Unique(),
}
}

Next, run:

go generate ./...

Observe that a new file, ent/greet.go, was created, it contains:

ent/greet.go
// Code generated by ent, DO NOT EDIT.

package ent

func (u *User) Greet() string {
return "Greetings, User"
}

Great! Our extension was invoked from Ent's code-generation and produced the code we wanted for our schema!

Adding Annotations

Annotations provide a way to supply users of our extension with an API to modify the behavior of code generation logic. To add annotations to our extension, implement the Annotations method. Suppose that for our GreetExtension we want to provide users with the ability to configure the greeting word in the generated code:

// GreetingWord implements entc.Annotation
type GreetingWord string

func (GreetingWord) Name() string {
return "GreetingWord"
}

Next, we add a word field to our GreetExtension struct:

type GreetExtension struct {
entc.DefaultExtension
Word GreetingWord
}

Next, implement the Annotations method:

func (s *GreetExtension) Annotations() []entc.Annotation {
return []entc.Annotation{
s.Word,
}
}

Now, from within your templates you can access the GreetingWord annotation. Modify ent/templates/greet.tmpl to use our new annotation:

func ({{ $receiver }} *{{ $n.Name }}) Greet() string {
return "{{ $.Annotations.GreetingWord }}, {{ $n.Name }}"
}

Next, modify the code-generation configuration to set the GreetingWord annotation:

"ent/entc.go
err := entc.Generate("./schema",
&gen.Config{},
entc.Extensions(&GreetExtension{
Word: GreetingWord("Shalom"),
}),
)

To see our annotation control the generated code, re-run:

go generate ./...

Finally, observe that the generated ent/greet.go was updated:

func (u *User) Greet() string {
return "Shalom, User"
}

Hooray! We added an option to use an annotation to control the greeting word in the generated Greet method!

More Possibilities

In addition to templates and annotations, the Extension API allows developers to bundle gen.Hooks and entc.Options in extensions to further control the behavior of your code-generation. In this post we will not discuss these possibilities, but if you are interested in using them head over to the documentation.

Wrapping Up

In this post we explored via a toy example how to use the Extension API to create new Ent code-generation extensions. As we've mentioned above, modular design that allows anyone to extend the core functionality of software is critical to the success of any ecosystem. We're seeing this claim start to realize with the Ent community, here's a list of some interesting projects that use the Extension API:

  • elk - an extension to generate REST endpoints from Ent schemas.
  • entgql - generate GraphQL servers from Ent schemas.
  • entviz - generate ER diagrams from Ent schemas.

And what about you? Do you have an idea for a useful Ent extension? I hope this post demonstrated that with the new Extension API, it is not a difficult task.

Have questions? Need help with getting started? Feel free to join our Discord server or Slack channel.

For more Ent news and updates:

· 阅读时间 3 分钟

Dear community,

I’m really happy to share something that has been in the works for quite some time. Yesterday (August 31st), a press release was issued announcing that Ent is joining the Linux Foundation.

Ent was open-sourced while I was working on it with my peers at Facebook in 2019. Since then, our community has grown, and we’ve seen the adoption of Ent explode across many organizations of different sizes and sectors.

Our goal with moving under the governance of the Linux Foundation is to provide a corporate-neutral environment in which organizations can more easily contribute code, as we’ve seen with other successful OSS projects such as Kubernetes and GraphQL. In addition, the move under the governance of the Linux Foundation positions Ent where we would like it to be, a core, infrastructure technology that organizations can trust because it is guaranteed to be here for a long time.

In terms of our community, nothing in particular changes, the repository has already moved to github.com/ent/ent a few months ago, the license remains Apache 2.0, and we are all 100% committed to the success of the project. We’re sure that the Linux Foundation’s strong brand and organizational capabilities will help to build even more confidence in Ent and further foster its adoption in the industry.

I wanted to express my deep gratitude to the amazing folks at Facebook and the Linux Foundation that have worked hard on making this change possible and showing trust in our community to keep pushing the state-of-the-art in data access frameworks. This is a big achievement for our community, and so I want to take a moment to thank all of you for your contributions, support, and trust in this project.

On a personal note, I wanted to share that Rotem (a core contributor to Ent) and I have founded a new company, Ariga. We’re on a mission to build something that we call an “operational data graph” that is heavily built using Ent, we will be sharing more details on that in the near future. You can expect to see many new exciting features contributed to the framework by our team. In addition, Ariga employees will dedicate time and resources to support and foster this wonderful community.

If you have any questions about this change or have any ideas on how to make it even better, please don’t hesitate to reach out to me on our Discord server or Slack channel.

Ariel ❤️

· 阅读时间 5 分钟

Joining an existing project with a large codebase can be a daunting task.

Understanding the data model of an application is key for developers to start working on an existing project. One commonly used tool to help overcome this challenge, and enable developers to grasp an application's data model is an ER (Entity Relation) diagram.

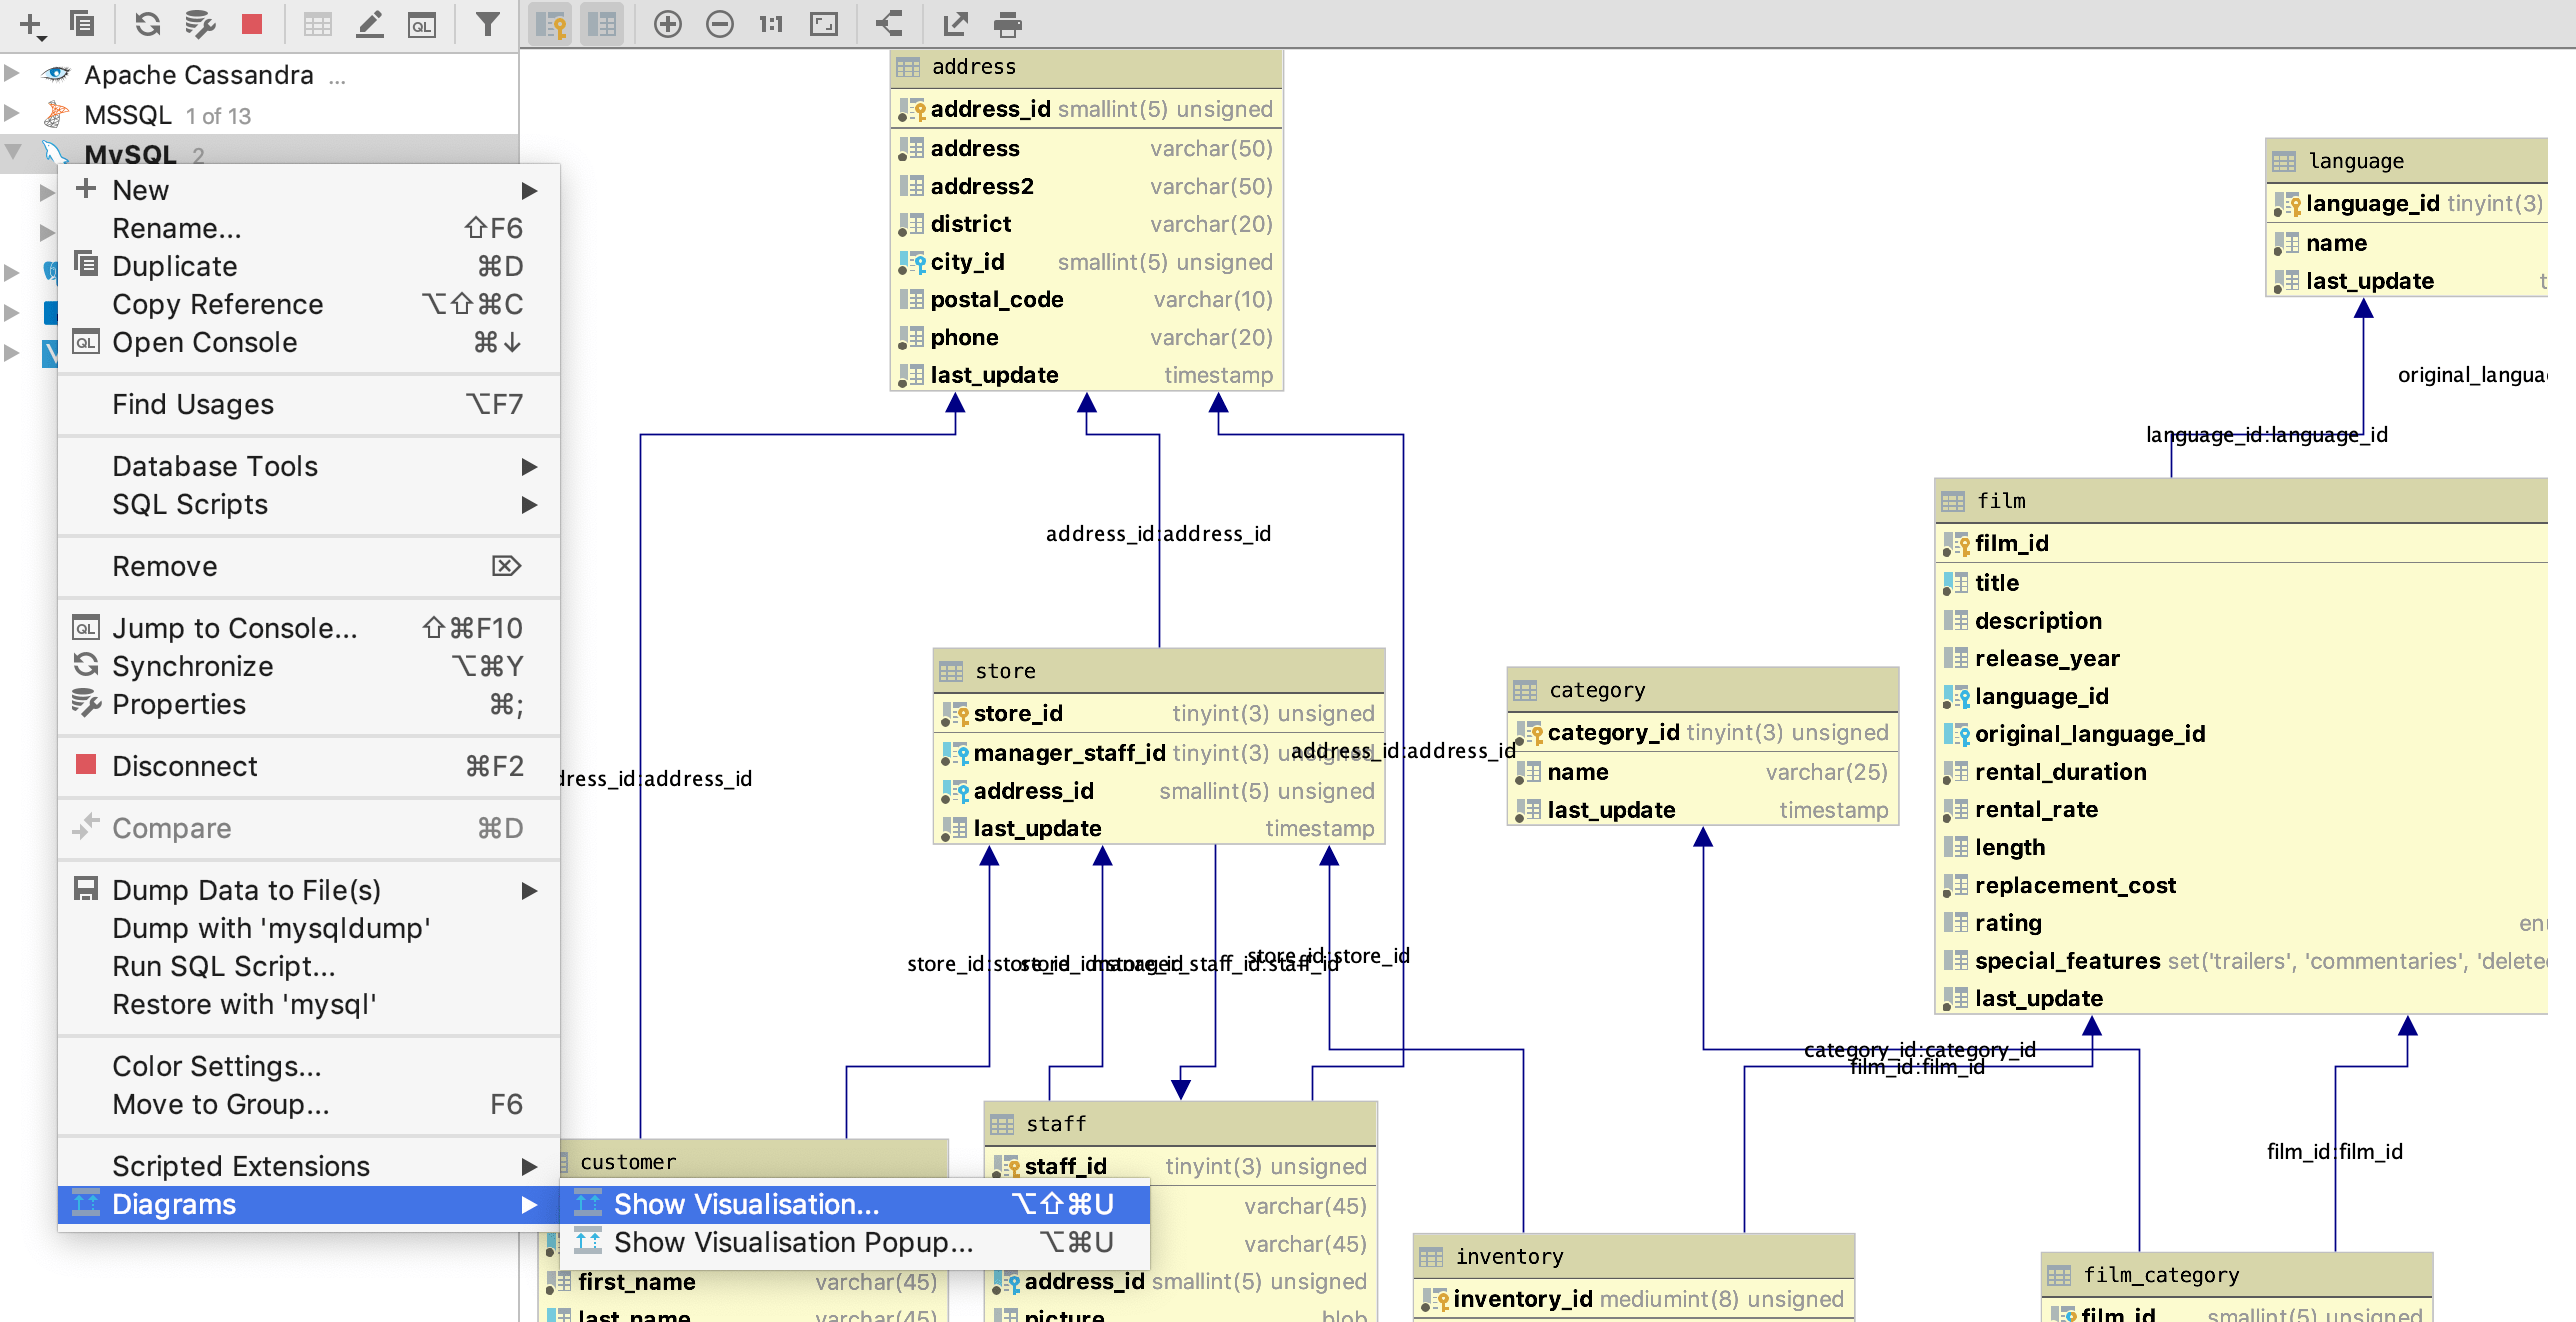
ER diagrams provide a visual representation of your data model, and details each field of the entities. Many tools can help create these, where one example is Jetbrains DataGrip, that can generate an ER diagram by connecting to and inspecting an existing database:

Datagrip ER diagram

DataGrip ER diagram example

Ent, a simple, yet powerful entity framework for Go, was originally developed inside Facebook specifically for dealing with projects with large and complex data models. This is why Ent uses code generation - it gives type-safety and code-completion out-of-the-box which helps explain the data model and improves developer velocity. On top of all of this, wouldn't it be great to automatically generate ER diagrams that maintain a high-level view of the data model in a visually appealing representation? (I mean, who doesn't love visualizations?)

Introducing entviz

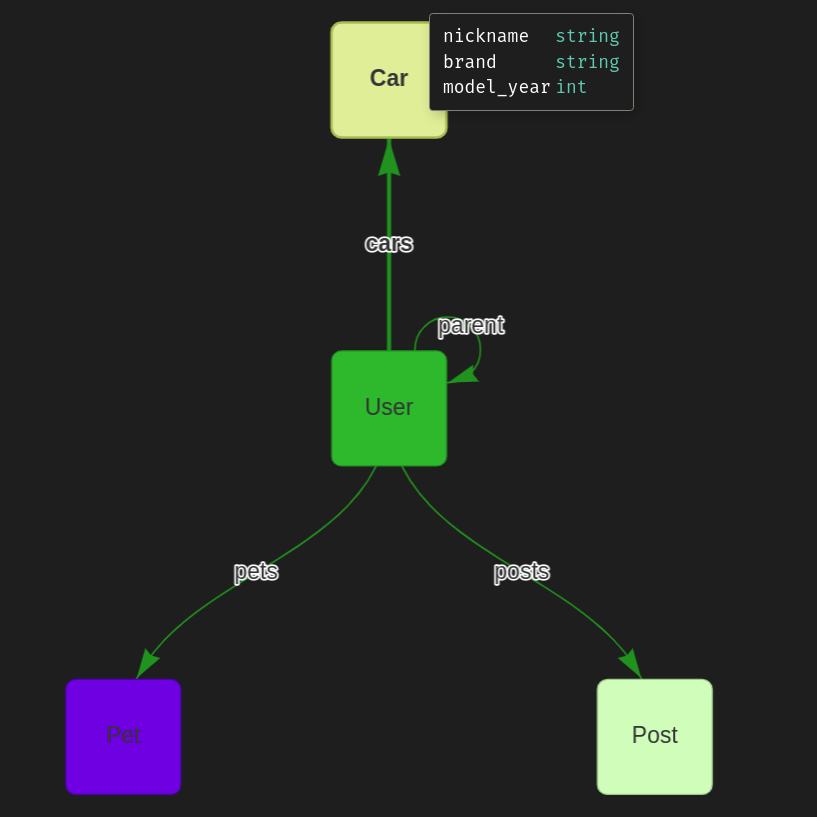
entviz is an ent extension that automatically generates a static HTML page that visualizes your data graph.

Entviz example output

Entviz example output

Most ER diagram generation tools need to connect to your database and introspect it, which makes it harder to maintain an up-to-date diagram of the database schema. Since entviz integrates directly to your Ent schema, it does not need to connect to your database, and it automatically generates fresh visualization every time you modify your schema.

If you want to know more about how entviz was implemented, checkout the implementation section.

See it in action

First, let's add the entviz extension to our entc.go file:

go get github.com/hedwigz/entviz
If you are not familiar with entc you're welcome to read entc documentation to learn more about it. :::
ent/entc.go
import (
"log"

"entgo.io/ent/entc"
"entgo.io/ent/entc/gen"
"github.com/hedwigz/entviz"
)

func main() {
err := entc.Generate("./schema", &gen.Config{}, entc.Extensions(entviz.Extension{}))
if err != nil {
log.Fatalf("running ent codegen: %v", err)
}
}

Let's say we have a simple schema with a user entity and some fields:

ent/schema/user.go
// Fields of the User.
func (User) Fields() []ent.Field {
return []ent.Field{
field.String("name"),
field.String("email"),
field.Time("created").
Default(time.Now),
}
}

Now, entviz will automatically generate a visualization of our graph everytime we run:

go generate ./...

You should now see a new file called schema-viz.html in your ent directory:

$ ll ./ent/schema-viz.html
-rw-r--r-- 1 hedwigz hedwigz 7.3K Aug 27 09:00 schema-viz.html

Open the html file with your favorite browser to see the visualization

tutorial image

Next, let's add another entity named Post, and see how our visualization changes:

ent new Post
ent/schema/post.go
// Fields of the Post.
func (Post) Fields() []ent.Field {
return []ent.Field{
field.String("content"),
field.Time("created").
Default(time.Now),
}
}

Now we add an (O2M) edge from User to Post:

ent/schema/post.go
// Edges of the User.
func (User) Edges() []ent.Edge {
return []ent.Edge{
edge.To("posts", Post.Type),
}
}

Finally, regenerate the code:

go generate ./...

Refresh your browser to see the updated result!

tutorial image 2

Implementation

Entviz was implemented by extending ent via its extension API. The Ent extension API lets you aggregate multiple templates, hooks, options and annotations. For instance, entviz uses templates to add another go file, entviz.go, which exposes the ServeEntviz method that can be used as an http handler, like so:

func main() {
http.ListenAndServe("localhost:3002", ent.ServeEntviz())
}

We define an extension struct which embeds the default extension, and we export our template via the Templates method:

//go:embed entviz.go.tmpl
var tmplfile string

type Extension struct {
entc.DefaultExtension
}

func (Extension) Templates() []*gen.Template {
return []*gen.Template{
gen.MustParse(gen.NewTemplate("entviz").Parse(tmplfile)),
}
}

The template file is the code that we want to generate:

{{ define "entviz"}}

{{ $pkg := base $.Config.Package }}
{{ template "header" $ }}
import (
_ "embed"
"net/http"
"strings"
"time"
)

//go:embed schema-viz.html
var html string

func ServeEntviz() http.Handler {
generateTime := time.Now()
return http.HandlerFunc(func(w http.ResponseWriter, req *http.Request) {
http.ServeContent(w, req, "schema-viz.html", generateTime, strings.NewReader(html))
})
}
{{ end }}

That's it! now we have a new method in ent package.

Wrapping-Up

We saw how ER diagrams help developers keep track of their data model. Next, we introduced entviz - an Ent extension that automatically generates an ER diagram for Ent schemas. We saw how entviz utilizes Ent's extension API to extend the code generation and add extra functionality. Finally, you got to see it in action by installing and use entviz in your own project. If you like the code and/or want to contribute - feel free to checkout the project on github.

Have questions? Need help with getting started? Feel free to join our Discord server or Slack channel.

:::

· 阅读时间 10 分钟

Observability is a quality of a system that refers to how well its internal state can be measured externally. As a computer program evolves into a full-blown production system this quality becomes increasingly important. One of the ways to make a software system more observable is to export metrics, that is, to report in some externally visible way a quantitative description of the running system's state. For instance, to expose an HTTP endpoint where we can see how many errors occurred since the process has started. In this post, we will explore how to build more observable Ent applications using Prometheus.

What is Ent?

Ent, is a simple, yet powerful entity framework for Go, that makes it easy to build and maintain applications with large data models.

What is Prometheus?

Prometheus is an open source monitoring system developed by engineering at SoundCloud in 2012. It includes an embedded time series database and many integrations to third-party systems. The Prometheus client exposes the process's metrics via an HTTP endpoint (usually /metrics), this endpoint is discovered by the Prometheus scraper which polls the endpoint every interval (typically 30s) and writes it into a time-series database.

Prometheus is just an example of a class of metric collection backends. Many others, such as AWS CloudWatch, InfluxDB and others exist and are in wide use in the industry. Towards the end of this post, we will discuss a possible path to a unified, standards-based integration with any such backend.

Working with Prometheus

To expose an application's metrics using Prometheus, we need to create a Prometheus Collector, a collector collects a set of metrics from your server.

In our example, we will be using two types of metrics that can be stored in a collector: Counters and Histograms. Counters are monotonically increasing cumulative metrics that represent how many times something has happened, commonly used to count the number of requests a server has processed or errors that have occurred. Histograms sample observations into buckets of configurable sizes and are commonly used to represent latency distributions (i.e how many requests returned in under 5ms, 10ms, 100ms, 1s, etc.) In addition, Prometheus allows metrics to be broken down into labels. This is useful for example for counting requests but breaking down the counter by endpoint name.

Let’s see how to create such a collector using the official Go client. To do so, we will use a package in the client called promauto that simplifies the processes of creating collectors. A simple example of a collector that counts (for example, total request or number or request error):

package example

import (
"github.com/prometheus/client_golang/prometheus"
"github.com/prometheus/client_golang/prometheus/promauto"
)

var (
// List of dynamic labels
labelNames = []string{"endpoint", "error_code"}

// Create a counter collector
exampleCollector = promauto.NewCounterVec(
prometheus.CounterOpts{
Name: "endpoint_errors",
Help: "Number of errors in endpoints",
},
labelNames,
)
)

// When using you set the values of the dynamic labels and then increment the counter
func incrementError() {
exampleCollector.WithLabelValues("/create-user", "400").Inc()
}

Ent Hooks

Hooks are a feature of Ent that allows adding custom logic before and after operations that change the data entities.

A mutation is an operation that changes something in the database. There are 5 types of mutations:

  1. Create.
  2. UpdateOne.
  3. Update.
  4. DeleteOne.
  5. Delete.

Hooks are functions that get an ent.Mutator and return a mutator back. They function similar to the popular HTTP middleware pattern.

package example

import (
"context"

"entgo.io/ent"
)

func exampleHook() ent.Hook {
//use this to init your hook
return func(next ent.Mutator) ent.Mutator {
return ent.MutateFunc(func(ctx context.Context, m ent.Mutation) (ent.Value, error) {
// Do something before mutation.
v, err := next.Mutate(ctx, m)
if err != nil {
// Do something if error after mutation.
}
// Do something after mutation.
return v, err
})
}
}

In Ent, there are two types of mutation hooks - schema hooks and runtime hooks. Schema hooks are mainly used for defining custom mutation logic on a specific entity type, for example, syncing entity creation to another system. Runtime hooks, on the other hand, are used to define more global logic for adding things like logging, metrics, tracing, etc.

For our use case, we should definitely use runtime hooks, because to be valuable we want to export metrics on all operations on all entity types:

package example

import (
"entprom/ent"
"entprom/ent/hook"
)

func main() {
client, _ := ent.Open("sqlite3", "file:ent?mode=memory&cache=shared&_fk=1")

// Add a hook only on user mutations.
client.User.Use(exampleHook())

// Add a hook only on update operations.
client.Use(hook.On(exampleHook(), ent.OpUpdate|ent.OpUpdateOne))
}

Exporting Prometheus Metrics for an Ent Application

With all of the introductions complete, let’s cut to the chase and show how to use Prometheus and Ent hooks together to create an observable application. Our goal with this example is to export these metrics using a hook:

Metric NameDescription
ent_operation_totalNumber of ent mutation operations
ent_operation_errorNumber of failed ent mutation operations
ent_operation_duration_secondsTime in seconds per operation

Each of these metrics will be broken down by labels into two dimensions:

  • mutation_type: Entity type that is being mutated (User, BlogPost, Account etc.).
  • mutation_op: The operation that is being performed (Create, Delete etc.).

Let’s start by defining our collectors:

//Ent dynamic dimensions
const (
mutationType = "mutation_type"
mutationOp = "mutation_op"
)

var entLabels = []string{mutationType, mutationOp}

// Create a collector for total operations counter
func initOpsProcessedTotal() *prometheus.CounterVec {
return promauto.NewCounterVec(
prometheus.CounterOpts{
Name: "ent_operation_total",
Help: "Number of ent mutation operations",
},
entLabels,
)
}

// Create a collector for error counter
func initOpsProcessedError() *prometheus.CounterVec {
return promauto.NewCounterVec(
prometheus.CounterOpts{
Name: "ent_operation_error",
Help: "Number of failed ent mutation operations",
},
entLabels,
)
}

// Create a collector for duration histogram collector
func initOpsDuration() *prometheus.HistogramVec {
return promauto.NewHistogramVec(
prometheus.HistogramOpts{
Name: "ent_operation_duration_seconds",
Help: "Time in seconds per operation",
},
entLabels,
)
}

Next, let’s define our new hook:

// Hook init collectors, count total at beginning error on mutation error and duration also after.
func Hook() ent.Hook {
opsProcessedTotal := initOpsProcessedTotal()
opsProcessedError := initOpsProcessedError()
opsDuration := initOpsDuration()
return func(next ent.Mutator) ent.Mutator {
return ent.MutateFunc(func(ctx context.Context, m ent.Mutation) (ent.Value, error) {
// Before mutation, start measuring time.
start := time.Now()
// Extract dynamic labels from mutation.
labels := prometheus.Labels{mutationType: m.Type(), mutationOp: m.Op().String()}
// Increment total ops counter.
opsProcessedTotal.With(labels).Inc()
// Execute mutation.
v, err := next.Mutate(ctx, m)
if err != nil {
// In case of error increment error counter.
opsProcessedError.With(labels).Inc()
}
// Stop time measure.
duration := time.Since(start)
// Record duration in seconds.
opsDuration.With(labels).Observe(duration.Seconds())
return v, err
})
}
}

Connecting the Prometheus Collector to our Service

After defining our hook, let’s see next how to connect it to our application and how to use Prometheus to serve an endpoint that exposes the metrics in our collectors:

package main

import (
"context"
"log"
"net/http"

"entprom"
"entprom/ent"

_ "github.com/mattn/go-sqlite3"
"github.com/prometheus/client_golang/prometheus/promhttp"
)

func createClient() *ent.Client {
c, err := ent.Open("sqlite3", "file:ent?mode=memory&cache=shared&_fk=1")
if err != nil {
log.Fatalf("failed opening connection to sqlite: %v", err)
}
ctx := context.Background()
// Run the auto migration tool.
if err := c.Schema.Create(ctx); err != nil {
log.Fatalf("failed creating schema resources: %v", err)
}
return c
}

func handler(client *ent.Client) func(w http.ResponseWriter, r *http.Request) {
return func(w http.ResponseWriter, r *http.Request) {
ctx := context.Background()
// Run operations.
_, err := client.User.Create().SetName("a8m").Save(ctx)
if err != nil {
http.Error(w, err.Error(), http.StatusBadRequest)
return
}
}
}

func main() {
// Create Ent client and migrate
client := createClient()
// Use the hook
client.Use(entprom.Hook())
// Simple handler to run actions on our DB.
http.HandleFunc("/", handler(client))
// This endpoint sends metrics to the prometheus to collect
http.Handle("/metrics", promhttp.Handler())
log.Println("server starting on port 8080")
// Run the server
log.Fatal(http.ListenAndServe(":8080", nil))
}

After a few times of accessing / on our server (using curl or a browser), go to /metrics. There you will see the output from the Prometheus client:

# HELP ent_operation_duration_seconds Time in seconds per operation
# TYPE ent_operation_duration_seconds histogram
ent_operation_duration_seconds_bucket{mutation_op="OpCreate",mutation_type="User",le="0.005"} 2
ent_operation_duration_seconds_bucket{mutation_op="OpCreate",mutation_type="User",le="0.01"} 2
ent_operation_duration_seconds_bucket{mutation_op="OpCreate",mutation_type="User",le="0.025"} 2
ent_operation_duration_seconds_bucket{mutation_op="OpCreate",mutation_type="User",le="0.05"} 2
ent_operation_duration_seconds_bucket{mutation_op="OpCreate",mutation_type="User",le="0.1"} 2
ent_operation_duration_seconds_bucket{mutation_op="OpCreate",mutation_type="User",le="0.25"} 2
ent_operation_duration_seconds_bucket{mutation_op="OpCreate",mutation_type="User",le="0.5"} 2
ent_operation_duration_seconds_bucket{mutation_op="OpCreate",mutation_type="User",le="1"} 2
ent_operation_duration_seconds_bucket{mutation_op="OpCreate",mutation_type="User",le="2.5"} 2
ent_operation_duration_seconds_bucket{mutation_op="OpCreate",mutation_type="User",le="5"} 2
ent_operation_duration_seconds_bucket{mutation_op="OpCreate",mutation_type="User",le="10"} 2
ent_operation_duration_seconds_bucket{mutation_op="OpCreate",mutation_type="User",le="+Inf"} 2
ent_operation_duration_seconds_sum{mutation_op="OpCreate",mutation_type="User"} 0.000265669
ent_operation_duration_seconds_count{mutation_op="OpCreate",mutation_type="User"} 2
# HELP ent_operation_error Number of failed ent mutation operations
# TYPE ent_operation_error counter
ent_operation_error{mutation_op="OpCreate",mutation_type="User"} 1
# HELP ent_operation_total Number of ent mutation operations
# TYPE ent_operation_total counter
ent_operation_total{mutation_op="OpCreate",mutation_type="User"} 2

In the top part, we can see the histogram calculated, it calculates the number of operations in each “bucket”. After that, we can see the number of total operations and the number of errors. Each metric is followed by its description that can be seen when querying with Prometheus dashboard.

The Prometheus client is only one component of the Prometheus architecture. To run a complete system including a scraper that will poll your endpoint, a Prometheus that will store your metrics and can answer queries, and a simple UI to interact with it, I recommend reading the official documentation or use the docker-compose.yaml in this example repo.

Future Work on Observability in Ent

As we’ve mentioned above, there is an abundance of metric collections backends available today, Prometheus being just one of many successful projects. While these solutions differ in many dimensions (self-hosted vs SaaS, different storage engines with different query languages, and more) - from the metric reporting client perspective, they are virtually identical.

In cases like these, good software engineering principles suggest that the concrete backend should be abstracted away from the client using an interface. This interface can then be implemented by backends so client applications can easily switch between the different implementations. Such changes are happening in recent years in our industry. Consider, for example, the Open Container Initiative or the Service Mesh Interface: both are initiatives that strive to define a standard interface for a problem space. This interface is supposed to create an ecosystem of implementations of the standard. In the observability space, the exact same convergence is occurring with OpenCensus and OpenTracing currently merging into OpenTelemetry.

As nice as it would be to publish an Ent + Prometheus extension similar to the one presented in this post, we are firm believers that observability should be solved with a standards-based approach. We invite everyone to join the discussion on what is the right way to do this for Ent.

Wrap-Up

We started this post by presenting Prometheus, a popular open-source monitoring solution. Next, we reviewed “Hooks”, a feature of Ent that allows adding custom logic before and after operations that change the data entities. We then showed how to integrate the two to create observable applications using Ent. Finally, we discussed the future of observability in Ent and invited everyone to join the discussion to shape it.

Have questions? Need help with getting started? Feel free to join our Discord server or Slack channel.

For more Ent news and updates:

· 阅读时间 7 分钟

It has been almost 4 months since our last release, and for a good reason. Version 0.9.0 which was released today is packed with some highly-anticipated features. Perhaps at the top of the list, is a feature that has been in discussion for more than a year in a half and was one of the most commonly requested features in the Ent User Survey: the Upsert API!

Version 0.9.0 adds support for "Upsert" style statements using a new feature flag: sql/upsert. Ent has a collection of feature flags that can be switched on to add more features to the code generated by Ent. This is used as both a mechanism to allow opt-in to some features that are not necessarily desired in every project and as a way to run experiments of features that may one day become part of Ent's core.

In this post, we will introduce the new feature, the places where it is useful, and demonstrate how to use it.

Upsert

"Upsert" is a commonly-used term in data systems that is a portmanteau of "update" and "insert" which usually refers to a statement that attempts to insert a record to a table, and if a uniqueness constraint is violated (e.g. a record by that ID already exists) that record is updated instead. While none of the popular relational databases have a specific UPSERT statement, most of them support ways of achieving this type of behavior.

For example, assume we have a table with this definition in an SQLite database:

CREATE TABLE users (
id integer PRIMARY KEY AUTOINCREMENT,
email varchar(255) UNIQUE,
name varchar(255)
)

If we try to execute the same insert twice:

INSERT INTO users (email, name) VALUES ('rotem@entgo.io', 'Rotem Tamir');

We get this error:

[2021-08-05 06:49:22] UNIQUE constraint failed: users.email

In many cases, it is useful to have write operations be idempotent, meaning we can run them many times in a row while leaving the system in the same state.

In other cases, it is not desirable to query if a record exists before trying to create it. For these kinds of situations, SQLite supports the ON CONFLICT clause in INSERT statements. To instruct SQLite to override an existing value with the new one we can execute:

INSERT INTO users (email, name) values ('rotem@entgo.io', 'Tamir, Rotem')
ON CONFLICT (email) DO UPDATE SET email=excluded.email, name=excluded.name;

If we prefer to keep the existing values, we can use the DO NOTHING conflict action:

INSERT INTO users (email, name) values ('rotem@entgo.io', 'Tamir, Rotem') 
ON CONFLICT DO NOTHING;

Sometimes we want to merge the two versions in some way, we can use the DO UPDATE action a little differently to achieve do something like:

INSERT INTO users (email, full_name) values ('rotem@entgo.io', 'Tamir, Rotem') 
ON CONFLICT (email) DO UPDATE SET name=excluded.name || ' (formerly: ' || users.name || ')'

In this case, after our second INSERT the value for the name column would be: Tamir, Rotem (formerly: Rotem Tamir). Not very useful, but hopefully you can see that you can do cool things this way.

Upsert with Ent

Assume we have an existing Ent project with an entity similar to the users table described above:

// User holds the schema definition for the User entity.
type User struct {
ent.Schema
}

// Fields of the User.
func (User) Fields() []ent.Field {
return []ent.Field{
field.String("email").
Unique(),
field.String("name"),
}
}

As the Upsert API is a newly released feature, make sure to update your ent version using:

go get -u entgo.io/ent@v0.9.0

Next, add the sql/upsert feature flag to your code-generation flags, in ent/generate.go:

package ent

//go:generate go run -mod=mod entgo.io/ent/cmd/ent generate --feature sql/upsert ./schema

Next, re-run code generation for your project:

go generate ./...

Observe that a new method named OnConflict was added to the ent/user_create.go file:

// OnConflict allows configuring the `ON CONFLICT` / `ON DUPLICATE KEY` clause
// of the `INSERT` statement. For example:
//
// client.User.Create().
// SetEmailAddress(v).
// OnConflict(
// // Update the row with the new values
// // the was proposed for insertion.
// sql.ResolveWithNewValues(),
// ).
// // Override some of the fields with custom
// // update values.
// Update(func(u *ent.UserUpsert) {
// SetEmailAddress(v+v)
// }).
// Exec(ctx)
//
func (uc *UserCreate) OnConflict(opts ...sql.ConflictOption) *UserUpsertOne {
uc.conflict = opts
return &UserUpsertOne{
create: uc,
}
}

This (along with more new generated code) will serve us in achieving upsert behavior for our User entity. To explore this, let's first start by writing a test to reproduce the uniqueness constraint error:

func TestUniqueConstraintFails(t *testing.T) {
client := enttest.Open(t, "sqlite3", "file:ent?mode=memory&cache=shared&_fk=1")
ctx := context.TODO()

// Create the user for the first time.
client.User.
Create().
SetEmail("rotem@entgo.io").
SetName("Rotem Tamir").
SaveX(ctx)

// Try to create a user with the same email the second time.
_, err := client.User.
Create().
SetEmail("rotem@entgo.io").
SetName("Rotem Tamir").
Save(ctx)

if !ent.IsConstraintError(err) {
log.Fatalf("expected second created to fail with constraint error")
}
log.Printf("second query failed with: %v", err)
}

The test passes:

=== RUN   TestUniqueConstraintFails
2021/08/05 07:12:11 second query failed with: ent: constraint failed: insert node to table "users": UNIQUE constraint failed: users.email
--- PASS: TestUniqueConstraintFails (0.00s)

Next, let's see how to instruct Ent to override the existing values with the new in case a conflict occurs:

func TestUpsertReplace(t *testing.T) {
client := enttest.Open(t, "sqlite3", "file:ent?mode=memory&cache=shared&_fk=1")
ctx := context.TODO()

// Create the user for the first time.
orig := client.User.
Create().
SetEmail("rotem@entgo.io").
SetName("Rotem Tamir").
SaveX(ctx)

// Try to create a user with the same email the second time.
// This time we set ON CONFLICT behavior, and use the `UpdateNewValues`
// modifier.
newID := client.User.Create().
SetEmail("rotem@entgo.io").
SetName("Tamir, Rotem").
OnConflict().
UpdateNewValues().
// we use the IDX method to receive the ID
// of the created/updated entity
IDX(ctx)

// We expect the ID of the originally created user to be the same as
// the one that was just updated.
if orig.ID != newID {
log.Fatalf("expected upsert to update an existing record")
}

current := client.User.GetX(ctx, orig.ID)
if current.Name != "Tamir, Rotem" {
log.Fatalf("expected upsert to replace with the new values")
}
}

Running our test:

=== RUN   TestUpsertReplace
--- PASS: TestUpsertReplace (0.00s)

Alternatively, we can use the Ignore modifier to instruct Ent to keep the old version when resolving the conflict. Let's write a test that shows this:

func TestUpsertIgnore(t *testing.T) {
client := enttest.Open(t, "sqlite3", "file:ent?mode=memory&cache=shared&_fk=1")
ctx := context.TODO()

// Create the user for the first time.
orig := client.User.
Create().
SetEmail("rotem@entgo.io").
SetName("Rotem Tamir").
SaveX(ctx)

// Try to create a user with the same email the second time.
// This time we set ON CONFLICT behavior, and use the `Ignore`
// modifier.
client.User.
Create().
SetEmail("rotem@entgo.io").
SetName("Tamir, Rotem").
OnConflict().
Ignore().
ExecX(ctx)

current := client.User.GetX(ctx, orig.ID)
if current.FullName != orig.FullName {
log.Fatalf("expected upsert to keep the original version")
}
}

You can read more about the feature in the Feature Flag or Upsert API documentation.

Wrapping Up

In this post, we presented the Upsert API, a long-anticipated capability, that is available by feature-flag in Ent v0.9.0. We discussed where upserts are commonly used in applications and the way they are implemented using common relational databases. Finally, we showed a simple example of how to get started with the Upsert API using Ent.

Have questions? Need help with getting started? Feel free to join our Discord server or Slack channel.

For more Ent news and updates:

· 阅读时间 11 分钟

When we say that one of the core principles of Ent is "Schema as Code", we mean by that more than "Ent's DSL for defining entities and their edges is done using regular Go code". Ent's unique approach, compared to many other ORMs, is to express all of the logic related to an entity, as code, directly in the schema definition.

With Ent, developers can write all authorization logic (called "Privacy" within Ent), and all of the mutation side-effects (called "Hooks" within Ent) directly on the schema. Having everything in the same place can be very convenient, but its true power is revealed when paired with code generation.

If schemas are defined this way, it becomes possible to generate code for fully-working production-grade servers automatically. If we move the responsibility for authorization decisions and custom side effects from the RPC layer to the data layer, the implementation of the basic CRUD (Create, Read, Update and Delete) endpoints becomes generic to the extent that it can be machine-generated. This is exactly the idea behind the popular GraphQL and gRPC Ent extensions.

Today, we would like to present a new Ent extension named elk that can automatically generate fully-working, RESTful API endpoints from your Ent schemas. elk strives to automate all of the tedious work of setting up the basic CRUD endpoints for every entity you add to your graph, including logging, validation of the request body, eager loading relations and serializing, all while leaving reflection out of sight and maintaining type-safety.

Let’s get started!

Getting Started

The final version of the code below can be found on GitHub.

Start by creating a new Go project:

mkdir elk-example
cd elk-example
go mod init elk-example

Invoke the ent code generator and create two schemas: User, Pet:

go run -mod=mod entgo.io/ent/cmd/ent new Pet User

Your project should now look like this:

.
├── ent
│ ├── generate.go
│ └── schema
│ ├── pet.go
│ └── user.go
├── go.mod
└── go.sum

Next, add the elk package to our project:

go get -u github.com/masseelch/elk

elk uses the Ent extension API to integrate with Ent’s code-generation. This requires that we use the entc (ent codegen) package as described here. Follow the next three steps to enable it and to configure Ent to work with the elk extension:

1. Create a new Go file named ent/entc.go and paste the following content:

// +build ignore

package main

import (
"log"

"entgo.io/ent/entc"
"entgo.io/ent/entc/gen"
"github.com/masseelch/elk"
)

func main() {
ex, err := elk.NewExtension(
elk.GenerateSpec("openapi.json"),
elk.GenerateHandlers(),
)
if err != nil {
log.Fatalf("creating elk extension: %v", err)
}
err = entc.Generate("./schema", &gen.Config{}, entc.Extensions(ex))
if err != nil {
log.Fatalf("running ent codegen: %v", err)
}
}

2. Edit the ent/generate.go file to execute the ent/entc.go file:

package ent

//go:generate go run -mod=mod entc.go

3/. elk uses some external packages in its generated code. Currently, you have to get those packages manually once when setting up elk:

go get github.com/mailru/easyjson github.com/masseelch/render github.com/go-chi/chi/v5 go.uber.org/zap

With these steps complete, all is set up for using our elk-powered ent! To learn more about Ent, how to connect to different types of databases, run migrations or work with entities head over to the Setup Tutorial.

Generating HTTP CRUD Handlers with elk

To generate the fully-working HTTP handlers we need first create an Ent schema definition. Open and edit ent/schema/pet.go:

package schema

import (
"entgo.io/ent"
"entgo.io/ent/schema/field"
)

// Pet holds the schema definition for the Pet entity.
type Pet struct {
ent.Schema
}

// Fields of the Pet.
func (Pet) Fields() []ent.Field {
return []ent.Field{
field.String("name"),
field.Int("age"),
}
}

We added two fields to our Pet entity: name and age. The ent.Schema just defines the fields of our entity. To generate runnable code from our schema, run:

go generate ./...

Observe that in addition to the files Ent would normally generate, another directory named ent/http was created. These files were generated by the elk extension and contain the code for the generated HTTP handlers. For example, here is some of the generated code for a read-operation on the Pet entity:

const (
PetCreate Routes = 1 << iota
PetRead
PetUpdate
PetDelete
PetList
PetRoutes = 1<<iota - 1
)

// PetHandler handles http crud operations on ent.Pet.
type PetHandler struct {
handler

client *ent.Client
log *zap.Logger
}

func NewPetHandler(c *ent.Client, l *zap.Logger) *PetHandler {
return &PetHandler{
client: c,
log: l.With(zap.String("handler", "PetHandler")),
}
}

// Read fetches the ent.Pet identified by a given url-parameter from the
// database and renders it to the client.
func (h *PetHandler) Read(w http.ResponseWriter, r *http.Request) {
l := h.log.With(zap.String("method", "Read"))
// ID is URL parameter.
id, err := strconv.Atoi(chi.URLParam(r, "id"))
if err != nil {
l.Error("error getting id from url parameter", zap.String("id", chi.URLParam(r, "id")), zap.Error(err))
render.BadRequest(w, r, "id must be an integer greater zero")
return
}
// Create the query to fetch the Pet
q := h.client.Pet.Query().Where(pet.ID(id))
e, err := q.Only(r.Context())
if err != nil {
switch {
case ent.IsNotFound(err):
msg := stripEntError(err)
l.Info(msg, zap.Error(err), zap.Int("id", id))
render.NotFound(w, r, msg)
case ent.IsNotSingular(err):
msg := stripEntError(err)
l.Error(msg, zap.Error(err), zap.Int("id", id))
render.BadRequest(w, r, msg)
default:
l.Error("could not read pet", zap.Error(err), zap.Int("id", id))
render.InternalServerError(w, r, nil)
}
return
}
l.Info("pet rendered", zap.Int("id", id))
easyjson.MarshalToHTTPResponseWriter(NewPet2657988899View(e), w)
}

Next, let’s see how to create an actual RESTful HTTP server that can manage your Pet entities. Create a file named main.go and add the following content:

package main

import (
"context"
"fmt"
"log"
"net/http"

"elk-example/ent"
elk "elk-example/ent/http"

"github.com/go-chi/chi/v5"
_ "github.com/mattn/go-sqlite3"
"go.uber.org/zap"
)

func main() {
// Create the ent client.
c, err := ent.Open("sqlite3", "./ent.db?_fk=1")
if err != nil {
log.Fatalf("failed opening connection to sqlite: %v", err)
}
defer c.Close()
// Run the auto migration tool.
if err := c.Schema.Create(context.Background()); err != nil {
log.Fatalf("failed creating schema resources: %v", err)
}
// Router and Logger.
r, l := chi.NewRouter(), zap.NewExample()
// Create the pet handler.
r.Route("/pets", func(r chi.Router) {
elk.NewPetHandler(c, l).Mount(r, elk.PetRoutes)
})
// Start listen to incoming requests.
fmt.Println("Server running")
defer fmt.Println("Server stopped")
if err := http.ListenAndServe(":8080", r); err != nil {
log.Fatal(err)
}
}

Next, start the server:

go run -mod=mod main.go

Congratulations! We now have a running server serving the Pets API. We could ask the server for a list of all pets in the database, but there are none yet. Let’s create one first:

curl -X 'POST' -H 'Content-Type: application/json' -d '{"name":"Kuro","age":3}' 'localhost:8080/pets'

You should get this response:

{
"age": 3,
"id": 1,
"name": "Kuro"
}

If you head over to the terminal where the server is running you can also see elks built in logging:

{
"level": "info",
"msg": "pet rendered",
"handler": "PetHandler",
"method": "Create",
"id": 1
}

elk uses zap for logging. To learn more about it, have a look at its documentation.

Relations

To illustrate more of elks features, let’s extend our graph. Edit ent/schema/user.go and ent/schema/pet.go:

ent/schema/pet.go
// Edges of the Pet.
func (Pet) Edges() []ent.Edge {
return []ent.Edge{
edge.From("owner", User.Type).
Ref("pets").
Unique(),
}
}

ent/schema/user.go
package schema

import (
"entgo.io/ent"
"entgo.io/ent/schema/edge"
"entgo.io/ent/schema/field"
)

// User holds the schema definition for the User entity.
type User struct {
ent.Schema
}

// Fields of the User.
func (User) Fields() []ent.Field {
return []ent.Field{
field.String("name"),
field.Int("age"),
}
}

// Edges of the User.
func (User) Edges() []ent.Edge {
return []ent.Edge{
edge.To("pets", Pet.Type),
}
}

We have now created a One-To-Many relation between the Pet and User schemas: A pet belongs to a user, and a user can have multiple pets.

Rerun the code generator:

go generate ./...

Do not forget to register the UserHandler on our router. Just add the following lines to main.go:

[...]
r.Route("/pets", func(r chi.Router) {
elk.NewPetHandler(c, l, v).Mount(r, elk.PetRoutes)
})
+ // Create the user handler.
+ r.Route("/users", func(r chi.Router) {
+ elk.NewUserHandler(c, l, v).Mount(r, elk.UserRoutes)
+ })
// Start listen to incoming requests.
fmt.Println("Server running")
[...]

After restarting the server we can create a User that owns the previously created Pet named Kuro:

curl -X 'POST' -H 'Content-Type: application/json' -d '{"name":"Elk","age":30,"owner":1}' 'localhost:8080/users'

The server returns the following response:

{
"age": 30,
"edges": {},
"id": 1,
"name": "Elk"
}

From the output we can see that the user has been created, but the edges are empty. elk does not include edges in its output by default. You can configure elk to render edges using a feature called "serialization groups". Annotate your schemas with the elk.SchemaAnnotation and elk.Annotation structs. Edit ent/schema/user.go and add those:

// Edges of the User.
func (User) Edges() []ent.Edge {
return []ent.Edge{
edge.To("pets", Pet.Type).
Annotations(elk.Groups("user")),
}
}

// Annotations of the User.
func (User) Annotations() []schema.Annotation {
return []schema.Annotation{elk.ReadGroups("user")}
}

The elk.Annotations added to the fields and edges tell elk to eager-load them and add them to the payload if the " user" group is requested. The elk.SchemaAnnotation is used to make the read-operation of the UserHandler request " user". Note, that any fields that do not have a serialization group attached are included by default. Edges, however, are excluded, unless configured otherwise.

Next, let’s regenerate the code once again, and restart the server. You should now see the pets of a user rendered if you read a resource:

curl 'localhost:8080/users/1'
{
"age": 30,
"edges": {
"pets": [
{
"id": 1,
"name": "Kuro",
"age": 3,
"edges": {}
}
]
},
"id": 1,
"name": "Elk"
}

Request validation

Our current schemas allow to set a negative age for pets or users and we can create pets without an owner (as we did with Kuro). Ent has built-in support for basic validation. In some cases you may want to validate requests made against your API before passing their payload to Ent. elk uses this package to define validation rules and validate data. We can create separate validation rules for Create and Update operations using elk.Annotation. In our example, let’s assume that we want our Pet schema to only allow ages greater than zero and to disallow creating a pet without an owner. Edit ent/schema/pet.go:

// Fields of the Pet.
func (Pet) Fields() []ent.Field {
return []ent.Field{
field.String("name"),
field.Int("age").
Positive().
Annotations(
elk.CreateValidation("required,gt=0"),
elk.UpdateValidation("gt=0"),
),
}
}

// Edges of the Pet.
func (Pet) Edges() []ent.Edge {
return []ent.Edge{
edge.From("owner", User.Type).
Ref("pets").
Unique().
Required().
Annotations(elk.Validation("required")),
}
}

Next, regenerate the code and restart the server. To test our new validation rules, let’s try to create a pet with invalid age and without an owner:

curl -X 'POST' -H 'Content-Type: application/json' -d '{"name":"Bob","age":-2}' 'localhost:8080/pets'

elk returns a detailed response that includes information about which validations failed:

{
"code": 400,
"status": "Bad Request",
"errors": {
"Age": "This value failed validation on 'gt:0'.",
"Owner": "This value is required."
}
}

Note the uppercase field names. The validator package uses the structs field name to generate its validation errors, but you can simply override this, as stated in the example .

If you do not define any validation rules, elk will not include the validation-code in its generated output. elks` request validation is especially useful if you'd wanted to do cross-field-validation.

Upcoming Features

We hope you agree that elk has some useful features already, but there are still many exciting things to come. The next version of elk will include::

  • Fully working flutter frontend to administrate your nodes
  • Integration of Ent’s validation in the current request validator
  • More transport formats (currently only JSON)

Conclusion

This post has shown just a small part of what elk can do. To see some more examples of what you can do with it, head over to the project’s README on GitHub. I hope that with elk-powered Ent, you and your fellow developers can automate some repetitive tasks that go into building RESTful APIs and focus on more meaningful work.

elk is in an early stage of development, we welcome any suggestion or feedback and if you are willing to help we'd be very glad. The GitHub Issues is a wonderful place for you to reach out for help, feedback, suggestions and contribution.

About the Author

MasseElch is a software engineer from the windy, flat, north of Germany. When not hiking with his dog Kuro (who has his own Instagram channel 😱) or playing hide-and-seek with his son, he drinks coffee and enjoys coding.

· 阅读时间 10 分钟

Locks are one of the fundamental building blocks of any concurrent computer program. When many things are happening simultaneously, programmers reach out to locks to guarantee the mutual exclusion of concurrent access to a resource. Locks (and other mutual exclusion primitives) exist in many different layers of the stack from low-level CPU instructions to application-level APIs (such as sync.Mutex in Go).

When working with relational databases, one of the common needs of application developers is the ability to acquire a lock on records. Imagine an inventory table, listing items available for sale on an e-commerce website. This table might have a column named state that could either be set to available or purchased. avoid the scenario where two users think they have successfully purchased the same inventory item, the application must prevent two operations from mutating the item from an available to a purchased state.

How can the application guarantee this? Having the server check if the desired item is available before setting it to purchased would not be good enough. Imagine a scenario where two users simultaneously try to purchase the same item. Two requests would travel from their browsers to the application server and arrive roughly at the same time. Both would query the database for the item's state, and see the item is available. Seeing this, both request handlers would issue an UPDATE query setting the state to purchased and the buyer_id to the id of the requesting user. Both queries will succeed, but the final state of the record will be that the user who issued the UPDATE query last will be considered the buyer of the item.

Over the years, different techniques have evolved to allow developers to write applications that provide these guarantees to users. Some of them involve explicit locking mechanisms provided by databases, while others rely on more general ACID properties of databases to achieve mutual exclusion. In this post we will explore the implementation of two of these techniques using Ent.

Optimistic Locking

Optimistic locking (sometimes also called Optimistic Concurrency Control) is a technique that can be used to achieve locking behavior without explicitly acquiring a lock on any record.

On a high-level, this is how optimistic locking works:

  • Each record is assigned a numeric version number. This value must be monotonically increasing. Often Unix timestamps of the latest row update are used.
  • A transaction reads a record, noting its version number from the database.
  • An UPDATE statement is issued to modify the record:
    • The statement must include a predicate requiring that the version number has not changed from its previous value. For example: WHERE id=<id> AND version=<previous version>.
    • The statement must increase the version. Some applications will increase the current value by 1, and some will set it to the current timestamp.
  • The database returns the amount of rows modified by the UPDATE statement. If the number is 0, this means someone else has modified the record between the time we read it, and the time we wanted to update it. The transaction is considered failed, rolled back and can be retried.

Optimistic locking is commonly used in "low contention" environments (situations where the likelihood of two transactions interfering with one another is relatively low) and where the locking logic can be trusted to happen in the application layer. If there are writers to the database that we cannot ensure to obey the required logic, this technique is rendered useless.

Let’s see how this technique can be employed using Ent.

We start by defining our ent.Schema for a User. The user has an online boolean field to specify whether they are currently online and an int64 field for the current version number.

// User holds the schema definition for the User entity.
type User struct {
ent.Schema
}

// Fields of the User.
func (User) Fields() []ent.Field {
return []ent.Field{
field.Bool("online"),
field.Int64("version").
DefaultFunc(func() int64 {
return time.Now().UnixNano()
}).
Comment("Unix time of when the latest update occurred")
}
}

Next, let's implement a simple optimistically locked update to our online field:

func optimisticUpdate(tx *ent.Tx, prev *ent.User, online bool) error {
// The next version number for the record must monotonically increase
// using the current timestamp is a common technique to achieve this.
nextVer := time.Now().UnixNano()

// We begin the update operation:
n := tx.User.Update().

// We limit our update to only work on the correct record and version:
Where(user.ID(prev.ID), user.Version(prev.Version)).

// We set the next version:
SetVersion(nextVer).

// We set the value we were passed by the user:
SetOnline(online).
SaveX(context.Background())

// SaveX returns the number of affected records. If this value is
// different from 1 the record must have been changed by another
// process.
if n != 1 {
return fmt.Errorf("update failed: user id=%d updated by another process", prev.ID)
}
return nil
}

Next, let's write a test to verify that if two processes try to edit the same record, only one will succeed:

func TestOCC(t *testing.T) {
client := enttest.Open(t, "sqlite3", "file:ent?mode=memory&cache=shared&_fk=1")
ctx := context.Background()

// Create the user for the first time.
orig := client.User.Create().SetOnline(true).SaveX(ctx)

// Read another copy of the same user.
userCopy := client.User.GetX(ctx, orig.ID)

// Open a new transaction:
tx, err := client.Tx(ctx)
if err != nil {
log.Fatalf("failed creating transaction: %v", err)
}

// Try to update the record once. This should succeed.
if err := optimisticUpdate(tx, userCopy, false); err != nil {
tx.Rollback()
log.Fatal("unexpected failure:", err)
}

// Try to update the record a second time. This should fail.
err = optimisticUpdate(tx, orig, false)
if err == nil {
log.Fatal("expected second update to fail")
}
fmt.Println(err)
}

Running our test:

=== RUN   TestOCC
update failed: user id=1 updated by another process
--- PASS: Test (0.00s)

Great! Using optimistic locking we can prevent two processes from stepping on each other's toes!

Pessimistic Locking

As we've mentioned above, optimistic locking isn't always appropriate. For use cases where we prefer to delegate the responsibility for maintaining the integrity of the lock to the databases, some database engines (such as MySQL, Postgres, and MariaDB, but not SQLite) offer pessimistic locking capabilities. These databases support a modifier to SELECT statements that is called SELECT ... FOR UPDATE. The MySQL documentation explains:

A SELECT ... FOR UPDATE reads the latest available data, setting exclusive locks on each row it reads. Thus, it sets the same locks a searched SQL UPDATE would set on the rows.

Alternatively, users can use SELECT ... FOR SHARE statements, as explained by the docs, SELECT ... FOR SHARE:

Sets a shared mode lock on any rows that are read. Other sessions can read the rows, but cannot modify them until your transaction commits. If any of these rows were changed by another transaction that has not yet committed, your query waits until that transaction ends and then uses the latest values.

Ent has recently added support for FOR SHARE/ FOR UPDATE statements via a feature-flag called sql/lock. To use it, modify your generate.go file to include --feature sql/lock:

//go:generate go run -mod=mod entgo.io/ent/cmd/ent generate --feature sql/lock ./schema 

Next, let's implement a function that will use pessimistic locking to make sure only a single process can update our User object's online field:

func pessimisticUpdate(tx *ent.Tx, id int, online bool) (*ent.User, error) {
ctx := context.Background()

// On our active transaction, we begin a query against the user table
u, err := tx.User.Query().

// We add a predicate limiting the lock to the user we want to update.
Where(user.ID(id)).

// We use the ForUpdate method to tell ent to ask our DB to lock
// the returned records for update.
ForUpdate(
// We specify that the query should not wait for the lock to be
// released and instead fail immediately if the record is locked.
sql.WithLockAction(sql.NoWait),
).
Only(ctx)

// If we failed to acquire the lock we do not proceed to update the record.
if err != nil {
return nil, err
}

// Finally, we set the online field to the desired value.
return u.Update().SetOnline(online).Save(ctx)
}

Now, let's write a test that verifies that if two processes try to edit the same record, only one will succeed:

func TestPessimistic(t *testing.T) {
ctx := context.Background()
client := enttest.Open(t, dialect.MySQL, "root:pass@tcp(localhost:3306)/test?parseTime=True")

// Create the user for the first time.
orig := client.User.Create().SetOnline(true).SaveX(ctx)

// Open a new transaction. This transaction will acquire the lock on our user record.
tx, err := client.Tx(ctx)
if err != nil {
log.Fatalf("failed creating transaction: %v", err)
}
defer tx.Commit()

// Open a second transaction. This transaction is expected to fail at
// acquiring the lock on our user record.
tx2, err := client.Tx(ctx)
if err != nil {
log.Fatalf("failed creating transaction: %v", err)
}
defer tx.Commit()

// The first update is expected to succeed.
if _, err := pessimisticUpdate(tx, orig.ID, true); err != nil {
log.Fatalf("unexpected error: %s", err)
}

// Because we did not run tx.Commit yet, the row is still locked when
// we try to update it a second time. This operation is expected to
// fail.
_, err = pessimisticUpdate(tx2, orig.ID, true)
if err == nil {
log.Fatal("expected second update to fail")
}
fmt.Println(err)
}

A few things are worth mentioning in this example:

  • Notice that we use a real MySQL instance to run this test against, as SQLite does not support SELECT .. FOR UPDATE.
  • For the simplicity of the example, we used the sql.NoWait option to tell the database to return an error if the lock cannot be acquired. This means that the calling application needs to retry the write after receiving the error. If we don't specify this option, we can create flows where our application blocks until the lock is released and then proceeds without retrying. This is not always desirable but it opens up some interesting design options.
  • We must always commit our transaction. Forgetting to do so can result in some serious issues. Remember that while the lock is maintained, no one can read or update this record.

Running our test:

=== RUN   TestPessimistic
Error 3572: Statement aborted because lock(s) could not be acquired immediately and NOWAIT is set.
--- PASS: TestPessimistic (0.08s)

Great! We have used MySQL's "locking reads" capabilities and Ent's new support for it to implement a locking mechanism that provides real mutual exclusion guarantees.

Conclusion

We began this post by presenting the type of business requirements that lead application developers to reach out for locking techniques when working with databases. We continued by presenting two different approaches to achieving mutual exclusion when updating database records and demonstrated how to employ these techniques using Ent.

Have questions? Need help with getting started? Feel free to join our Discord server or Slack channel.

For more Ent news and updates:

· 阅读时间 7 分钟

TL;DR

We added a new integration to the Ent GraphQL extension that generates type-safe GraphQL filters (i.e. Where predicates) from an ent/schema, and allows users to seamlessly map GraphQL queries to Ent queries.

For example, to get all COMPLETED todo items, we can execute the following:

query QueryAllCompletedTodos {
todos(
where: {
status: COMPLETED,
},
) {
edges {
node {
id
}
}
}
}

The generated GraphQL filters follow the Ent syntax. This means, the following query is also valid:

query FilterTodos {
todos(
where: {
or: [
{
hasParent: false,
status: COMPLETED,
},
{
status: IN_PROGRESS,
hasParentWith: {
priorityLT: 1,
statusNEQ: COMPLETED,
},
}
]
},
) {
edges {
node {
id
}
}
}
}

Background

Many libraries that deal with data in Go choose the path of passing around empty interface instances (interface{}) and use reflection at runtime to figure out how to map data to struct fields. Aside from the performance penalty of using reflection everywhere, the big negative impact on teams is the loss of type-safety.

When APIs are explicit, known at compile-time (or even as we type), the feedback a developer receives around a large class of errors is almost immediate. Many defects are found early, and development is also much more fun!

Ent was designed to provide an excellent developer experience for teams working on applications with large data-models. To facilitate this, we decided early on that one of the core design principles of Ent is "statically typed and explicit API using code generation". This means, that for every entity a developer defines in their ent/schema, explicit, type-safe code is generated for the developer to efficiently interact with their data. For example, In the Filesystem Example in the ent repository, you will find a schema named File:

// File holds the schema definition for the File entity.
type File struct {
ent.Schema
}
// Fields of the File.
func (File) Fields() []ent.Field {
return []ent.Field{
field.String("name"),
field.Bool("deleted").
Default(false),
field.Int("parent_id").
Optional(),
}
}

When the Ent code-gen runs, it will generate many predicate functions. For example, the following function which can be used to filter Files by their name field:

package file
// .. truncated ..

// Name applies the EQ predicate on the "name" field.
func Name(v string) predicate.File {
return predicate.File(func(s *sql.Selector) {
s.Where(sql.EQ(s.C(FieldName), v))
})
}

GraphQL is a query language for APIs originally created at Facebook. Similar to Ent, GraphQL models data in graph concepts and facilitates type-safe queries. Around a year ago, we released an integration between Ent and GraphQL. Similar to the gRPC Integration, the goal for this integration is to allow developers to easily create API servers that map to Ent, to mutate and query data in their databases.

Automatic GraphQL Filters Generation

In a recent community survey, the Ent + GraphQL integration was mentioned as one of the most loved features of the Ent project. Until today, the integration allowed users to perform useful, albeit basic queries against their data. Today, we announce the release of a feature that we think will open up many interesting new use cases for Ent users: "Automatic GraphQL Filters Generation".

As we have seen above, the Ent code-gen maintains for us a suite of predicate functions in our Go codebase that allow us to easily and explicitly filter data from our database tables. This power was, until recently, not available (at least not automatically) to users of the Ent + GraphQL integration. With automatic GraphQL filter generation, by making a single-line configuration change, developers can now add to their GraphQL schema a complete set of "Filter Input Types" that can be used as predicates in their GraphQL queries. In addition, the implementation provides runtime code that parses these predicates and maps them into Ent queries. Let's see this in action:

Generating Filter Input Types

In order to generate input filters (e.g. TodoWhereInput) for each type in your ent/schema package, edit the ent/entc.go configuration file as follows:

// +build ignore

package main

import (
"log"

"entgo.io/contrib/entgql"
"entgo.io/ent/entc"
"entgo.io/ent/entc/gen"
)

func main() {
ex, err := entgql.NewExtension(
entgql.WithWhereFilters(true),
entgql.WithConfigPath("../gqlgen.yml"),
entgql.WithSchemaPath("<PATH-TO-GRAPHQL-SCHEMA>"),
)
if err != nil {
log.Fatalf("creating entgql extension: %v", err)
}
err = entc.Generate("./schema", &gen.Config{}, entc.Extensions(ex))
if err != nil {
log.Fatalf("running ent codegen: %v", err)
}
}

If you're new to Ent and GraphQL, please follow the Getting Started Tutorial.

Next, run go generate ./ent/.... Observe that Ent has generated <T>WhereInput for each type in your schema. Ent will update the GraphQL schema as well, so you don't need to autobind them to gqlgen manually. For example:

ent/where_input.go
// TodoWhereInput represents a where input for filtering Todo queries.
type TodoWhereInput struct {
Not *TodoWhereInput `json:"not,omitempty"`
Or []*TodoWhereInput `json:"or,omitempty"`
And []*TodoWhereInput `json:"and,omitempty"`

// "created_at" field predicates.
CreatedAt *time.Time `json:"createdAt,omitempty"`
CreatedAtNEQ *time.Time `json:"createdAtNEQ,omitempty"`
CreatedAtIn []time.Time `json:"createdAtIn,omitempty"`
CreatedAtNotIn []time.Time `json:"createdAtNotIn,omitempty"`
CreatedAtGT *time.Time `json:"createdAtGT,omitempty"`
CreatedAtGTE *time.Time `json:"createdAtGTE,omitempty"`
CreatedAtLT *time.Time `json:"createdAtLT,omitempty"`
CreatedAtLTE *time.Time `json:"createdAtLTE,omitempty"`

// "status" field predicates.
Status *todo.Status `json:"status,omitempty"`
StatusNEQ *todo.Status `json:"statusNEQ,omitempty"`
StatusIn []todo.Status `json:"statusIn,omitempty"`
StatusNotIn []todo.Status `json:"statusNotIn,omitempty"`

// .. truncated ..
}
todo.graphql
"""
TodoWhereInput is used for filtering Todo objects.
Input was generated by ent.
"""
input TodoWhereInput {
not: TodoWhereInput
and: [TodoWhereInput!]
or: [TodoWhereInput!]

"""created_at field predicates"""
createdAt: Time
createdAtNEQ: Time
createdAtIn: [Time!]
createdAtNotIn: [Time!]
createdAtGT: Time
createdAtGTE: Time
createdAtLT: Time
createdAtLTE: Time

"""status field predicates"""
status: Status
statusNEQ: Status
statusIn: [Status!]
statusNotIn: [Status!]

# .. truncated ..
}

Next, to complete the integration we need to make two more changes:

1. Edit the GraphQL schema to accept the new filter types:

type Query {
todos(
after: Cursor,
first: Int,
before: Cursor,
last: Int,
orderBy: TodoOrder,
where: TodoWhereInput,
): TodoConnection!
}

2. Use the new filter types in GraphQL resolvers:

func (r *queryResolver) Todos(ctx context.Context, after *ent.Cursor, first *int, before *ent.Cursor, last *int, orderBy *ent.TodoOrder, where *ent.TodoWhereInput) (*ent.TodoConnection, error) {
return r.client.Todo.Query().
Paginate(ctx, after, first, before, last,
ent.WithTodoOrder(orderBy),
ent.WithTodoFilter(where.Filter),
)
}

Filter Specification

As mentioned above, with the new GraphQL filter types, you can express the same Ent filters you use in your Go code.

Conjunction, disjunction and negation

The Not, And and Or operators can be added using the not, and and or fields. For example:

{
or: [
{
status: COMPLETED,
},
{
not: {
hasParent: true,
status: IN_PROGRESS,
}
}
]
}

When multiple filter fields are provided, Ent implicitly adds the And operator.

{
status: COMPLETED,
textHasPrefix: "GraphQL",
}

The above query will produce the following Ent query:

client.Todo.
Query().
Where(
todo.And(
todo.StatusEQ(todo.StatusCompleted),
todo.TextHasPrefix("GraphQL"),
)
).
All(ctx)

Edge/Relation filters

Edge (relation) predicates can be expressed in the same Ent syntax:

{
hasParent: true,
hasChildrenWith: {
status: IN_PROGRESS,
}
}

The above query will produce the following Ent query:

client.Todo.
Query().
Where(
todo.HasParent(),
todo.HasChildrenWith(
todo.StatusEQ(todo.StatusInProgress),
),
).
All(ctx)

Implementation Example

A working example exists in github.com/a8m/ent-graphql-example.

Wrapping Up

As we've discussed earlier, Ent has set creating a "statically typed and explicit API using code generation" as a core design principle. With automatic GraphQL filter generation, we are doubling down on this idea to provide developers with the same explicit, type-safe development experience on the RPC layer as well.

Have questions? Need help with getting started? Feel free to join our Discord server or Slack channel.

For more Ent news and updates:

· 阅读时间 3 分钟

A few months ago, we announced the experimental support for generating gRPC services from Ent Schema definitions. The implementation was not complete yet but we wanted to get it out the door for the community to experiment with and provide us with feedback.

Today, after much feedback from the community, we are happy to announce that the Ent + gRPC integration is "Ready for Usage", this means all of the basic features are complete and we anticipate that most Ent applications can utilize this integration.

What have we added since our initial announcement?

  • Support for "Optional Fields" - A common issue with Protobufs is that the way that nil values are represented: a zero-valued primitive field isn't encoded into the binary representation. This means that applications cannot distinguish between zero and not-set for primitive fields. To support this, the Protobuf project supports some "Well-Known-Types" called "wrapper types" that wrap the primitive value with a struct. This wasn't previously supported but now when entproto generates a Protobuf message definition, it uses these wrapper types to represent "Optional" ent fields:

    // Code generated by entproto. DO NOT EDIT.
    syntax = "proto3";

    package entpb;

    import "google/protobuf/wrappers.proto";

    message User {
    int32 id = 1;

    string name = 2;

    string email_address = 3;

    google.protobuf.StringValue alias = 4;
    }
  • Multi-edge support - when we released the initial version of
    protoc-gen-entgrpc, we only supported generating gRPC service implementations for "Unique" edges (i.e reference at most one entity). Since a recent version, the plugin supports the generation of gRPC methods to read and write entities with O2M and M2M relationships.

  • Partial responses - By default, edge information is not returned by the Get method of the service. This is done deliberately because the amount of entities related to an entity is unbound.

    To allow the caller of to specify whether or not to return the edge information or not, the generated service adheres to Google AIP-157 (Partial Responses). In short, the Get<T>Request message includes an enum named View, this enum allows the caller to control whether or not this information should be retrieved from the database or not.

    message GetUserRequest {
    int32 id = 1;

    View view = 2;

    enum View {
    VIEW_UNSPECIFIED = 0;

    BASIC = 1;

    WITH_EDGE_IDS = 2;
    }
    }

Getting Started

For more Ent news and updates: