跳到主要内容

· 阅读时间 11 分钟

In the end of 2021 we announced that Ent got a new official extension to generate a fully compliant OpenAPI Specification document: entoas.

Today, we are very happy to announce that there is a new extension built to work with entoas: ogent. It utilizes the power of ogen (website) to provide a type-safe, reflection-free implementation of the OpenAPI Specification document generated by entoas.

ogen is an opinionated Go code generator for OpenAPI Specification v3 documents. ogen generates both server and client implementations for a given OpenAPI Specification document. The only thing left to do for the user is to implement an interface to access the data layer of any application. ogen has many cool features, one of which is integration with OpenTelemetry. Make sure to check it out and leave some love.

The extension presented in this post serves as a bridge between Ent and the code generated by ogen. It uses the configuration of entoas to generate the missing parts of the ogen code.

The following diagram shows how Ent interacts with both the extensions entoas and ogent and how ogen is involved.

Diagram

Diagram

If you are new to Ent and want to learn more about it, how to connect to different types of databases, run migrations or work with entities, then head over to the Setup Tutorial

The code in this post is available in the modules examples.

Getting Started

While Ent does support Go versions 1.16+ ogen requires you to have at least version 1.17. :::

To use the ogent extension use the entc (ent codegen) package as described here. First install both entoas and ogent extensions to your Go module:

go get ariga.io/ogent@main

Now follow the next two steps to enable them and to configure Ent to work with the extensions:

1. Create a new Go file named ent/entc.go and paste the following content:

ent/entc.go
//go:build ignore

package main

import (
"log"

"ariga.io/ogent"
"entgo.io/contrib/entoas"
"entgo.io/ent/entc"
"entgo.io/ent/entc/gen"
"github.com/ogen-go/ogen"
)

func main() {
spec := new(ogen.Spec)
oas, err := entoas.NewExtension(entoas.Spec(spec))
if err != nil {
log.Fatalf("creating entoas extension: %v", err)
}
ogent, err := ogent.NewExtension(spec)
if err != nil {
log.Fatalf("creating ogent extension: %v", err)
}
err = entc.Generate("./schema", &gen.Config{}, entc.Extensions(ogent, oas))
if err != nil {
log.Fatalf("running ent codegen: %v", err)
}
}

2. Edit the ent/generate.go file to execute the ent/entc.go file:

ent/generate.go
package ent

//go:generate go run -mod=mod entc.go

With these steps complete, all is set up for generating an OAS document and implementing server code from your schema!

Generate a CRUD HTTP API Server

The first step on our way to the HTTP API server is to create an Ent schema graph. For the sake of brevity, here is an example schema to use:

ent/schema/todo.go
package schema

import (
"entgo.io/ent"
"entgo.io/ent/schema/field"
)

// Todo holds the schema definition for the Todo entity.
type Todo struct {
ent.Schema
}

// Fields of the Todo.
func (Todo) Fields() []ent.Field {
return []ent.Field{
field.String("title"),
field.Bool("done"),
}
}

The code above is the "Ent way" to describe a schema-graph. In this particular case we created a todo entity.

Now run the code generator:

go generate ./...

You should see a bunch of files generated by the Ent code generator. The file named ent/openapi.json has been generated by the entoas extension. Here is a sneak peek into it:

ent/openapi.json
{
"info": {
"title": "Ent Schema API",
"description": "This is an auto generated API description made out of an Ent schema definition",
"termsOfService": "",
"contact": {},
"license": {
"name": ""
},
"version": "0.0.0"
},
"paths": {
"/todos": {
"get": {
[...]
Swagger Editor Example

Swagger Editor Example

However, this post focuses on the server implementation part therefore we are interested in the directory named ent/ogent. All the files ending in _gen.go are generated by ogen. The file named oas_server_gen.go contains the interface ogen-users need to implement in order to run the server.

ent/ogent/oas_server_gen.go
// Handler handles operations described by OpenAPI v3 specification.
type Handler interface {
// CreateTodo implements createTodo operation.
//
// Creates a new Todo and persists it to storage.
//
// POST /todos
CreateTodo(ctx context.Context, req CreateTodoReq) (CreateTodoRes, error)
// DeleteTodo implements deleteTodo operation.
//
// Deletes the Todo with the requested ID.
//
// DELETE /todos/{id}
DeleteTodo(ctx context.Context, params DeleteTodoParams) (DeleteTodoRes, error)
// ListTodo implements listTodo operation.
//
// List Todos.
//
// GET /todos
ListTodo(ctx context.Context, params ListTodoParams) (ListTodoRes, error)
// ReadTodo implements readTodo operation.
//
// Finds the Todo with the requested ID and returns it.
//
// GET /todos/{id}
ReadTodo(ctx context.Context, params ReadTodoParams) (ReadTodoRes, error)
// UpdateTodo implements updateTodo operation.
//
// Updates a Todo and persists changes to storage.
//
// PATCH /todos/{id}
UpdateTodo(ctx context.Context, req UpdateTodoReq, params UpdateTodoParams) (UpdateTodoRes, error)
}

ogent adds an implementation for that handler in the file ogent.go. To see how you can define what routes to generate and what edges to eager load please head over to the entoas documentation.

The following shows an example for a generated READ route:

// ReadTodo handles GET /todos/{id} requests.
func (h *OgentHandler) ReadTodo(ctx context.Context, params ReadTodoParams) (ReadTodoRes, error) {
q := h.client.Todo.Query().Where(todo.IDEQ(params.ID))
e, err := q.Only(ctx)
if err != nil {
switch {
case ent.IsNotFound(err):
return &R404{
Code: http.StatusNotFound,
Status: http.StatusText(http.StatusNotFound),
Errors: rawError(err),
}, nil
case ent.IsNotSingular(err):
return &R409{
Code: http.StatusConflict,
Status: http.StatusText(http.StatusConflict),
Errors: rawError(err),
}, nil
default:
// Let the server handle the error.
return nil, err
}
}
return NewTodoRead(e), nil
}

Run the server

The next step is to create a main.go file and wire up all the ends to create an application-server to serve the Todo-API. The following main function initializes a SQLite in-memory database, runs the migrations to create all the tables needed and serves the API as described in the ent/openapi.json file on localhost:8080:

main.go
package main

import (
"context"
"log"
"net/http"

"entgo.io/ent/dialect"
"entgo.io/ent/dialect/sql/schema"
"<your-project>/ent"
"<your-project>/ent/ogent"
_ "github.com/mattn/go-sqlite3"
)

func main() {
// Create ent client.
client, err := ent.Open(dialect.SQLite, "file:ent?mode=memory&cache=shared&_fk=1")
if err != nil {
log.Fatal(err)
}
// Run the migrations.
if err := client.Schema.Create(context.Background(), schema.WithAtlas(true)); err != nil {
log.Fatal(err)
}
// Start listening.
srv, err := ogent.NewServer(ogent.NewOgentHandler(client))
if err != nil {
log.Fatal(err)
}
if err := http.ListenAndServe(":8080", srv); err != nil {
log.Fatal(err)
}
}

After you run the server with go run -mod=mod main.go you can work with the API.

First, let's create a new Todo. For demonstration purpose we do not send a request body:

curl -X POST -H "Content-Type: application/json" localhost:8080/todos
{
"error_message": "body required"
}

As you can see ogen handles that case for you since entoas marked the body as required when attempting to create a new resource. Let's try again, but this time provide a request body:

curl -X POST -H "Content-Type: application/json" -d '{"title":"Give ogen and ogent a Star on GitHub"}'  localhost:8080/todos
{
"error_message": "decode CreateTodo:application/json request: invalid: done (field required)"
}

Ooops! What went wrong? ogen has your back: the field done is required. To fix this head over to your schema definition and mark the done field as optional:

ent/schema/todo.go
package schema

import (
"entgo.io/ent"
"entgo.io/ent/schema/field"
)

// Todo holds the schema definition for the Todo entity.
type Todo struct {
ent.Schema
}

// Fields of the Todo.
func (Todo) Fields() []ent.Field {
return []ent.Field{
field.String("title"),
field.Bool("done").
Optional(),
}
}

Since we made a change to our configuration, we have to re-run code generation and restart the server:

go generate ./...
go run -mod=mod main.go

Now, if we attempt to create the Todo again, see what happens:

curl -X POST -H "Content-Type: application/json" -d '{"title":"Give ogen and ogent a Star on GitHub"}'  localhost:8080/todos
{
"id": 1,
"title": "Give ogen and ogent a Star on GitHub",
"done": false
}

Voila, there is a new Todo item in the database!

Assume you have completed your Todo and starred both ogen and ogent (you really should!), mark the todo as done by raising a PATCH request:

curl -X PATCH -H "Content-Type: application/json" -d '{"done":true}'  localhost:8080/todos/1
{
"id": 1,
"title": "Give ogen and ogent a Star on GitHub",
"done": true
}

Add custom endpoints

As you can see the Todo is now marked as done. Though it would be cooler to have an extra route for marking a Todo as done: PATCH todos/:id/done. To make this happen we have to do two things: document the new route in our OAS document and implement the route. We can tackle the first by using the entoas mutation builder. Edit your ent/entc.go file and add the route description:

ent/entc.go
//go:build ignore

package main

import (
"log"

"entgo.io/contrib/entoas"
"entgo.io/ent/entc"
"entgo.io/ent/entc/gen"
"github.com/ariga/ogent"
"github.com/ogen-go/ogen"
)

func main() {
spec := new(ogen.Spec)
oas, err := entoas.NewExtension(
entoas.Spec(spec),
entoas.Mutations(func(_ *gen.Graph, spec *ogen.Spec) error {
spec.AddPathItem("/todos/{id}/done", ogen.NewPathItem().
SetDescription("Mark an item as done").
SetPatch(ogen.NewOperation().
SetOperationID("markDone").
SetSummary("Marks a todo item as done.").
AddTags("Todo").
AddResponse("204", ogen.NewResponse().SetDescription("Item marked as done")),
).
AddParameters(ogen.NewParameter().
InPath().
SetName("id").
SetRequired(true).
SetSchema(ogen.Int()),
),
)
return nil
}),
)
if err != nil {
log.Fatalf("creating entoas extension: %v", err)
}
ogent, err := ogent.NewExtension(spec)
if err != nil {
log.Fatalf("creating ogent extension: %v", err)
}
err = entc.Generate("./schema", &gen.Config{}, entc.Extensions(ogent, oas))
if err != nil {
log.Fatalf("running ent codegen: %v", err)
}
}

After running the code generator (go generate ./...) there should be a new entry in the ent/openapi.json file:

"/todos/{id}/done": {
"description": "Mark an item as done",
"patch": {
"tags": [
"Todo"
],
"summary": "Marks a todo item as done.",
"operationId": "markDone",
"responses": {
"204": {
"description": "Item marked as done"
}
}
},
"parameters": [
{
"name": "id",
"in": "path",
"schema": {
"type": "integer"
},
"required": true
}
]
}
Custom Endpoint

Custom Endpoint

The above mentioned ent/ogent/oas_server_gen.go file generated by ogen will reflect the changes as well:

ent/ogent/oas_server_gen.go
// Handler handles operations described by OpenAPI v3 specification.
type Handler interface {
// CreateTodo implements createTodo operation.
//
// Creates a new Todo and persists it to storage.
//
// POST /todos
CreateTodo(ctx context.Context, req CreateTodoReq) (CreateTodoRes, error)
// DeleteTodo implements deleteTodo operation.
//
// Deletes the Todo with the requested ID.
//
// DELETE /todos/{id}
DeleteTodo(ctx context.Context, params DeleteTodoParams) (DeleteTodoRes, error)
// ListTodo implements listTodo operation.
//
// List Todos.
//
// GET /todos
ListTodo(ctx context.Context, params ListTodoParams) (ListTodoRes, error)
// MarkDone implements markDone operation.
//
// PATCH /todos/{id}/done
MarkDone(ctx context.Context, params MarkDoneParams) (MarkDoneNoContent, error)
// ReadTodo implements readTodo operation.
//
// Finds the Todo with the requested ID and returns it.
//
// GET /todos/{id}
ReadTodo(ctx context.Context, params ReadTodoParams) (ReadTodoRes, error)
// UpdateTodo implements updateTodo operation.
//
// Updates a Todo and persists changes to storage.
//
// PATCH /todos/{id}
UpdateTodo(ctx context.Context, req UpdateTodoReq, params UpdateTodoParams) (UpdateTodoRes, error)
}

If you'd try to run the server now, the Go compiler will complain about it, because the ogent code generator does not know how to implement the new route. You have to do this by hand. Replace the current main.go with the following file to implement the new method.

main.go
package main

import (
"context"
"log"
"net/http"

"entgo.io/ent/dialect"
"entgo.io/ent/dialect/sql/schema"
"github.com/ariga/ogent/example/todo/ent"
"github.com/ariga/ogent/example/todo/ent/ogent"
_ "github.com/mattn/go-sqlite3"
)

type handler struct {
*ogent.OgentHandler
client *ent.Client
}

func (h handler) MarkDone(ctx context.Context, params ogent.MarkDoneParams) (ogent.MarkDoneNoContent, error) {
return ogent.MarkDoneNoContent{}, h.client.Todo.UpdateOneID(params.ID).SetDone(true).Exec(ctx)
}

func main() {
// Create ent client.
client, err := ent.Open(dialect.SQLite, "file:ent?mode=memory&cache=shared&_fk=1")
if err != nil {
log.Fatal(err)
}
// Run the migrations.
if err := client.Schema.Create(context.Background(), schema.WithAtlas(true)); err != nil {
log.Fatal(err)
}
// Create the handler.
h := handler{
OgentHandler: ogent.NewOgentHandler(client),
client: client,
}
// Start listening.
srv := ogent.NewServer(h)
if err := http.ListenAndServe(":8180", srv); err != nil {
log.Fatal(err)
}
}

If you restart your server you can then raise the following request to mark a todo item as done:

curl -X PATCH localhost:8180/todos/1/done

Yet to come

There are some improvements planned for ogent, most notably a code generated, type-safe way to add filtering capabilities to the LIST routes. We want to hear your feedback first.

Wrapping Up

In this post we announced ogent, the official implementation generator for entoas generated OpenAPI Specification documents. This extension uses the power of ogen, a very powerful and feature-rich Go code generator for OpenAPI v3 documents, to provide a ready-to-use, extensible server RESTful HTTP API servers.

Please note, that both ogen and entoas/ogent have not reached their first major release yet, and it is work in progress. Nevertheless, the API can be considered stable.

Have questions? Need help with getting started? Feel free to join our Discord server or Slack channel.

:::

· 阅读时间 6 分钟

Dear community,

I'm very happy to announce the release of the next version of Ent: v0.10. It has been almost six months since v0.9.1, so naturally there's a ton of new stuff in this release. Still, I wanted to take the time to discuss one major improvement we have been working on for the past few months: a brand-new migration engine.

Enter: Atlas

Ent's current migration engine is great, and it does some pretty neat stuff which our community has been using in production for years now, but as time went on issues which we could not resolve with the existing architecture started piling up. In addition, we feel that existing database migration frameworks leave much to be desired. We have learned so much as an industry about safely managing changes to production systems in the past decade with principles such as Infrastructure-as-Code and declarative configuration management, that simply did not exist when most of these projects were conceived.

Seeing that these problems were fairly generic and relevant to application regardless of the framework or programming language it was written in, we saw the opportunity to fix them as common infrastructure that any project could use. For this reason, instead of just rewriting Ent's migration engine, we decided to extract the solution to a new open-source project, Atlas (GitHub).

Atlas is distributed as a CLI tool that uses a new DDL based on HCL (similar to Terraform), but can also be used as a Go package. Just as Ent, Atlas is licensed under the Apache License 2.0.

Finally, after much work and testing, the Atlas integration for Ent is finally ready to use. This is great news to many of our users who opened issues (such as #1652, #1631, #1625, #1546 and #1845) that could not be well addressed using the existing migration system, but are now resolved using the Atlas engine.

As with any substantial change, using Atlas as the migration engine for your project is currently opt-in. In the near future, we will switch to an opt-out mode, and finally deprecate the existing engine. Naturally, this transition will be made slowly, and we will progress as we get positive indications from the community.

Getting started with Atlas migrations for Ent

First, upgrade to the latest version of Ent:

go get entgo.io/ent@v0.10.0

Next, in order to execute a migration with the Atlas engine, use the WithAtlas(true) option.

package main
import (
"context"
"log"
"<project>/ent"
"<project>/ent/migrate"
"entgo.io/ent/dialect/sql/schema"
)
func main() {
client, err := ent.Open("mysql", "root:pass@tcp(localhost:3306)/test")
if err != nil {
log.Fatalf("failed connecting to mysql: %v", err)
}
defer client.Close()
ctx := context.Background()
// Run migration.
err = client.Schema.Create(ctx, schema.WithAtlas(true))
if err != nil {
log.Fatalf("failed creating schema resources: %v", err)
}
}

And that's it!

One of the great improvements of the Atlas engine over the existing Ent code, is it's layered structure, that cleanly separates between inspection (understanding the current state of a database), diffing (calculating the difference between the current and desired state), planning (calculating a concrete plan for remediating the diff), and applying. This diagram demonstrates the way Ent uses Atlas:

atlas-migration-process

In addition to the standard options (e.g. WithDropColumn, WithGlobalUniqueID), the Atlas integration provides additional options for hooking into schema migration steps.

Here are two examples that show how to hook into the Atlas Diff and Apply steps.

package main
import (
"context"
"log"
"<project>/ent"
"<project>/ent/migrate"
"ariga.io/atlas/sql/migrate"
atlas "ariga.io/atlas/sql/schema"
"entgo.io/ent/dialect"
"entgo.io/ent/dialect/sql/schema"
)
func main() {
client, err := ent.Open("mysql", "root:pass@tcp(localhost:3306)/test")
if err != nil {
log.Fatalf("failed connecting to mysql: %v", err)
}
defer client.Close()
ctx := context.Background()
// Run migration.
err := client.Schema.Create(
ctx,
// Hook into Atlas Diff process.
schema.WithDiffHook(func(next schema.Differ) schema.Differ {
return schema.DiffFunc(func(current, desired *atlas.Schema) ([]atlas.Change, error) {
// Before calculating changes.
changes, err := next.Diff(current, desired)
if err != nil {
return nil, err
}
// After diff, you can filter
// changes or return new ones.
return changes, nil
})
}),
// Hook into Atlas Apply process.
schema.WithApplyHook(func(next schema.Applier) schema.Applier {
return schema.ApplyFunc(func(ctx context.Context, conn dialect.ExecQuerier, plan *migrate.Plan) error {
// Example to hook into the apply process, or implement
// a custom applier. For example, write to a file.
//
// for _, c := range plan.Changes {
// fmt.Printf("%s: %s", c.Comment, c.Cmd)
// if err := conn.Exec(ctx, c.Cmd, c.Args, nil); err != nil {
// return err
// }
// }
//
return next.Apply(ctx, conn, plan)
})
}),
)
if err != nil {
log.Fatalf("failed creating schema resources: %v", err)
}
}

What's next: v0.11

I know we took a while to get this release out the door, but the next one is right around the corner. Here's what's in store for v0.11:

  • Add support for edge/relation schemas - supporting attaching metadata fields to relations.
  • Reimplementing the GraphQL integration to be fully compatible with the Relay spec. Supporting generating GraphQL assets (schemas or full servers) from Ent schemas.
  • Adding support for "Migration Authoring": the Atlas libraries have infrastructure for creating "versioned" migration directories, as is commonly used in many migration frameworks (such as Flyway, Liquibase, go-migrate, etc.). Many users have built solutions for integrating with these kinds of systems, and we plan to use Atlas to provide solid infrastructure for these flows.
  • Query hooks (interceptors) - currently hooks are only supported for Mutations. Many users have requested adding support for read operations as well.
  • Polymorphic edges - The issue about adding support for polymorphism has been open for over a year. With Go Generic Types support landing in 1.18, we want to re-open the discussion about a possible implementation using them.

Wrapping up

Aside from the exciting announcement about the new migration engine, this release is huge in size and contents, featuring 199 commits from 42 unique contributors. Ent is a community effort and keeps getting better every day thanks to all of you. So here's huge thanks and infinite kudos to everyone who took part in this release (alphabetically sorted):

attackordie, bbkane, bodokaiser, cjraa, dakimura, dependabot, EndlessIdea, ernado, evanlurvey, freb, genevieve, giautm, grevych, hedwigz, heliumbrain, hilakashai, HurSungYun, idc77, isoppp, JeremyV2014, Laconty, lenuse, masseelch, mattn, mookjp, msal4, naormatania, odeke-em, peanut-cc, posener, RiskyFeryansyahP, rotemtam, s-takehana, sadmansakib, sashamelentyev, seiichi1101, sivchari, storyicon, tarrencev, ThinkontrolSY, timoha, vecpeng, yonidavidson, and zeevmoney.

Best, Ariel

For more Ent news and updates:

· 阅读时间 16 分钟

GraphQL is a query language for HTTP APIs, providing a statically-typed interface to conveniently represent today's complex data hierarchies. One way to use GraphQL is to import a library implementing a GraphQL server to which one registers custom resolvers implementing the database interface. An alternative way is to use a GraphQL cloud service to implement the GraphQL server and register serverless cloud functions as resolvers. Among the many benefits of cloud services, one of the biggest practical advantages is the resolvers' independence and composability. For example, we can write one resolver to a relational database and another to a search database.

We consider such a kind of setup using Amazon Web Services (AWS) in the following. In particular, we use AWS AppSync as the GraphQL cloud service and AWS Lambda to run a relational database resolver, which we implement using Go with Ent as the entity framework. Compared to Nodejs, the most popular runtime for AWS Lambda, Go offers faster start times, higher performance, and, from my point of view, an improved developer experience. As an additional complement, Ent presents an innovative approach towards type-safe access to relational databases, which, in my opinion, is unmatched in the Go ecosystem. In conclusion, running Ent with AWS Lambda as AWS AppSync resolvers is an extremely powerful setup to face today's demanding API requirements.

In the next sections, we set up GraphQL in AWS AppSync and the AWS Lambda function running Ent. Subsequently, we propose a Go implementation integrating Ent and the AWS Lambda event handler, followed by performing a quick test of the Ent function. Finally, we register it as a data source to our AWS AppSync API and configure the resolvers, which define the mapping from GraphQL requests to AWS Lambda events. Be aware that this tutorial requires an AWS account and the URL to a publicly-accessible Postgres database, which may incur costs.

Setting up AWS AppSync schema

To set up the GraphQL schema in AWS AppSync, sign in to your AWS account and select the AppSync service through the navbar. The landing page of the AppSync service should render you a "Create API" button, which you may click to arrive at the "Getting Started" page:

Screenshot of getting started with AWS AppSync from scratch

Getting started from scratch with AWS AppSync

In the top panel reading "Customize your API or import from Amazon DynamoDB" select the option "Build from scratch" and click the "Start" button belonging to the panel. You should now see a form where you may insert the API name. For the present tutorial, we type "Todo", see the screenshot below, and click the "Create" button.

Screenshot of creating a new AWS AppSync API resource

Creating a new API resource in AWS AppSync

After creating the AppSync API, you should see a landing page showing a panel to define the schema, a panel to query the API, and a panel on integrating AppSync into your app as captured in the screenshot below.

Screenshot of the landing page of the AWS AppSync API

Landing page of the AWS AppSync API

Click the "Edit Schema" button in the first panel and replace the previous schema with the following GraphQL schema:

input AddTodoInput {
title: String!
}

type AddTodoOutput {
todo: Todo!
}

type Mutation {
addTodo(input: AddTodoInput!): AddTodoOutput!
removeTodo(input: RemoveTodoInput!): RemoveTodoOutput!
}

type Query {
todos: [Todo!]!
todo(id: ID!): Todo
}

input RemoveTodoInput {
todoId: ID!
}

type RemoveTodoOutput {
todo: Todo!
}

type Todo {
id: ID!
title: String!
}

schema {
query: Query
mutation: Mutation
}

After replacing the schema, a short validation runs and you should be able to click the "Save Schema" button on the top right corner and find yourself with the following view:

Screenshot AWS AppSync: Final GraphQL schema for AWS AppSync API

Final GraphQL schema of AWS AppSync API

If we sent GraphQL requests to our AppSync API, the API would return errors as no resolvers have been attached to the schema. We will configure the resolvers after deploying the Ent function via AWS Lambda.

Explaining the present GraphQL schema in detail is beyond the scope of this tutorial. In short, the GraphQL schema implements a list todos operation via Query.todos, a single read todo operation via Query.todo, a create todo operation via Mutation.createTodo, and a delete operation via Mutation.deleteTodo. The GraphQL API is similar to a simple REST API design of an /todos resource, where we would use GET /todos, GET /todos/:id, POST /todos, and DELETE /todos/:id. For details on the GraphQL schema design, e.g., the arguments and returns from the Query and Mutation objects, I follow the practices from the GitHub GraphQL API.

Setting up AWS Lambda

With the AppSync API in place, our next stop is the AWS Lambda function to run Ent. For this, we navigate to the AWS Lambda service through the navbar, which leads us to the landing page of the AWS Lambda service listing our functions:

Screenshot of AWS Lambda landing page listing functions

AWS Lambda landing page showing functions.

We click the "Create function" button on the top right and select "Author from scratch" in the upper panel. Furthermore, we name the function "ent", set the runtime to "Go 1.x", and click the "Create function" button at the bottom. We should then find ourselves viewing the landing page of our "ent" function:

Screenshot of AWS Lambda landing page listing functions

AWS Lambda function overview of the Ent function.

Before reviewing the Go code and uploading the compiled binary, we need to adjust some default settings of the "ent" function. First, we change the default handler name from hello to main, which equals the filename of the compiled Go binary:

Screenshot of AWS Lambda landing page listing functions

AWS Lambda runtime settings of Ent function.

Second, we add an environment the variable DATABASE_URL encoding the database network parameters and credentials:

Screenshot of AWS Lambda landing page listing functions

AWS Lambda environment variables settings of Ent function.

To open a connection to the database, pass in a DSN, e.g., postgres://username:password@hostname/dbname. By default, AWS Lambda encrypts the environment variables, making them a fast and safe mechanism to supply database connection parameters. Alternatively, one can use the AWS Secretsmanager service and dynamically request credentials during the Lambda function's cold start, allowing, among others, rotating credentials. A third option is to use AWS IAM to handle the database authorization.

If you created your Postgres database in AWS RDS, the default username and database name is postgres. The password can be reset by modifying the AWS RDS instance.

Setting up Ent and deploying AWS Lambda

We now review, compile and deploy the database Go binary to the "ent" function. You can find the complete source code in bodokaiser/entgo-aws-appsync.

First, we create an empty directory to which we change:

mkdir entgo-aws-appsync
cd entgo-aws-appsync

Second, we initiate a new Go module to contain our project:

go mod init entgo-aws-appsync

Third, we create the Todo schema while pulling in the ent dependencies:

go run -mod=mod entgo.io/ent/cmd/ent new Todo

and add the title field:

ent/schema/todo.go
package schema

import (
"entgo.io/ent"
"entgo.io/ent/schema/field"
)

// Todo holds the schema definition for the Todo entity.
type Todo struct {
ent.Schema
}

// Fields of the Todo.
func (Todo) Fields() []ent.Field {
return []ent.Field{
field.String("title"),
}
}

// Edges of the Todo.
func (Todo) Edges() []ent.Edge {
return nil
}

Finally, we perform the Ent code generation:

go generate ./ent

Using Ent, we write a set of resolver functions, which implement the create, read, and delete operations on the todos:

internal/handler/resolver.go
package resolver

import (
"context"
"fmt"
"strconv"

"entgo-aws-appsync/ent"
"entgo-aws-appsync/ent/todo"
)

// TodosInput is the input to the Todos query.
type TodosInput struct{}

// Todos queries all todos.
func Todos(ctx context.Context, client *ent.Client, input TodosInput) ([]*ent.Todo, error) {
return client.Todo.
Query().
All(ctx)
}

// TodoByIDInput is the input to the TodoByID query.
type TodoByIDInput struct {
ID string `json:"id"`
}

// TodoByID queries a single todo by its id.
func TodoByID(ctx context.Context, client *ent.Client, input TodoByIDInput) (*ent.Todo, error) {
tid, err := strconv.Atoi(input.ID)
if err != nil {
return nil, fmt.Errorf("failed parsing todo id: %w", err)
}
return client.Todo.
Query().
Where(todo.ID(tid)).
Only(ctx)
}

// AddTodoInput is the input to the AddTodo mutation.
type AddTodoInput struct {
Title string `json:"title"`
}

// AddTodoOutput is the output to the AddTodo mutation.
type AddTodoOutput struct {
Todo *ent.Todo `json:"todo"`
}

// AddTodo adds a todo and returns it.
func AddTodo(ctx context.Context, client *ent.Client, input AddTodoInput) (*AddTodoOutput, error) {
t, err := client.Todo.
Create().
SetTitle(input.Title).
Save(ctx)
if err != nil {
return nil, fmt.Errorf("failed creating todo: %w", err)
}
return &AddTodoOutput{Todo: t}, nil
}

// RemoveTodoInput is the input to the RemoveTodo mutation.
type RemoveTodoInput struct {
TodoID string `json:"todoId"`
}

// RemoveTodoOutput is the output to the RemoveTodo mutation.
type RemoveTodoOutput struct {
Todo *ent.Todo `json:"todo"`
}

// RemoveTodo removes a todo and returns it.
func RemoveTodo(ctx context.Context, client *ent.Client, input RemoveTodoInput) (*RemoveTodoOutput, error) {
t, err := TodoByID(ctx, client, TodoByIDInput{ID: input.TodoID})
if err != nil {
return nil, fmt.Errorf("failed querying todo with id %q: %w", input.TodoID, err)
}
err = client.Todo.
DeleteOne(t).
Exec(ctx)
if err != nil {
return nil, fmt.Errorf("failed deleting todo with id %q: %w", input.TodoID, err)
}
return &RemoveTodoOutput{Todo: t}, nil
}

Using input structs for the resolver functions allows for mapping the GraphQL request arguments. Using output structs allows for returning multiple objects for more complex operations.

To map the Lambda event to a resolver function, we implement a Handler, which performs the mapping according to an action field in the event:

internal/handler/handler.go
package handler

import (
"context"
"encoding/json"
"fmt"
"log"

"entgo-aws-appsync/ent"
"entgo-aws-appsync/internal/resolver"
)

// Action specifies the event type.
type Action string

// List of supported event actions.
const (
ActionMigrate Action = "migrate"

ActionTodos = "todos"
ActionTodoByID = "todoById"
ActionAddTodo = "addTodo"
ActionRemoveTodo = "removeTodo"
)

// Event is the argument of the event handler.
type Event struct {
Action Action `json:"action"`
Input json.RawMessage `json:"input"`
}

// Handler handles supported events.
type Handler struct {
client *ent.Client
}

// Returns a new event handler.
func New(c *ent.Client) *Handler {
return &Handler{
client: c,
}
}

// Handle implements the event handling by action.
func (h *Handler) Handle(ctx context.Context, e Event) (interface{}, error) {
log.Printf("action %s with payload %s\n", e.Action, e.Input)

switch e.Action {
case ActionMigrate:
return nil, h.client.Schema.Create(ctx)
case ActionTodos:
var input resolver.TodosInput
return resolver.Todos(ctx, h.client, input)
case ActionTodoByID:
var input resolver.TodoByIDInput
if err := json.Unmarshal(e.Input, &input); err != nil {
return nil, fmt.Errorf("failed parsing %s params: %w", ActionTodoByID, err)
}
return resolver.TodoByID(ctx, h.client, input)
case ActionAddTodo:
var input resolver.AddTodoInput
if err := json.Unmarshal(e.Input, &input); err != nil {
return nil, fmt.Errorf("failed parsing %s params: %w", ActionAddTodo, err)
}
return resolver.AddTodo(ctx, h.client, input)
case ActionRemoveTodo:
var input resolver.RemoveTodoInput
if err := json.Unmarshal(e.Input, &input); err != nil {
return nil, fmt.Errorf("failed parsing %s params: %w", ActionRemoveTodo, err)
}
return resolver.RemoveTodo(ctx, h.client, input)
}

return nil, fmt.Errorf("invalid action %q", e.Action)
}

In addition to the resolver actions, we also added a migration action, which is a convenient way to expose database migrations.

Finally, we need to register an instance of the Handler type to the AWS Lambda library.

lambda/main.go
package main

import (
"database/sql"
"log"
"os"

"entgo.io/ent/dialect"
entsql "entgo.io/ent/dialect/sql"

"github.com/aws/aws-lambda-go/lambda"
_ "github.com/jackc/pgx/v4/stdlib"

"entgo-aws-appsync/ent"
"entgo-aws-appsync/internal/handler"
)

func main() {
// open the database connection using the pgx driver
db, err := sql.Open("pgx", os.Getenv("DATABASE_URL"))
if err != nil {
log.Fatalf("failed opening database connection: %v", err)
}

// initiate the ent database client for the Postgres database
client := ent.NewClient(ent.Driver(entsql.OpenDB(dialect.Postgres, db)))
defer client.Close()

// register our event handler to listen on Lambda events
lambda.Start(handler.New(client).Handle)
}

The function body of main is executed whenever an AWS Lambda performs a cold start. After the cold start, a Lambda function is considered "warm," with only the event handler code being executed, making Lambda executions very efficient.

To compile and deploy the Go code, we run:

GOOS=linux go build -o main ./lambda
zip function.zip main
aws lambda update-function-code --function-name ent --zip-file fileb://function.zip

The first command creates a compiled binary named main. The second command compresses the binary to a ZIP archive, required by AWS Lambda. The third command replaces the function code of the AWS Lambda named ent with the new ZIP archive. If you work with multiple AWS accounts you want to use the --profile <your aws profile> switch.

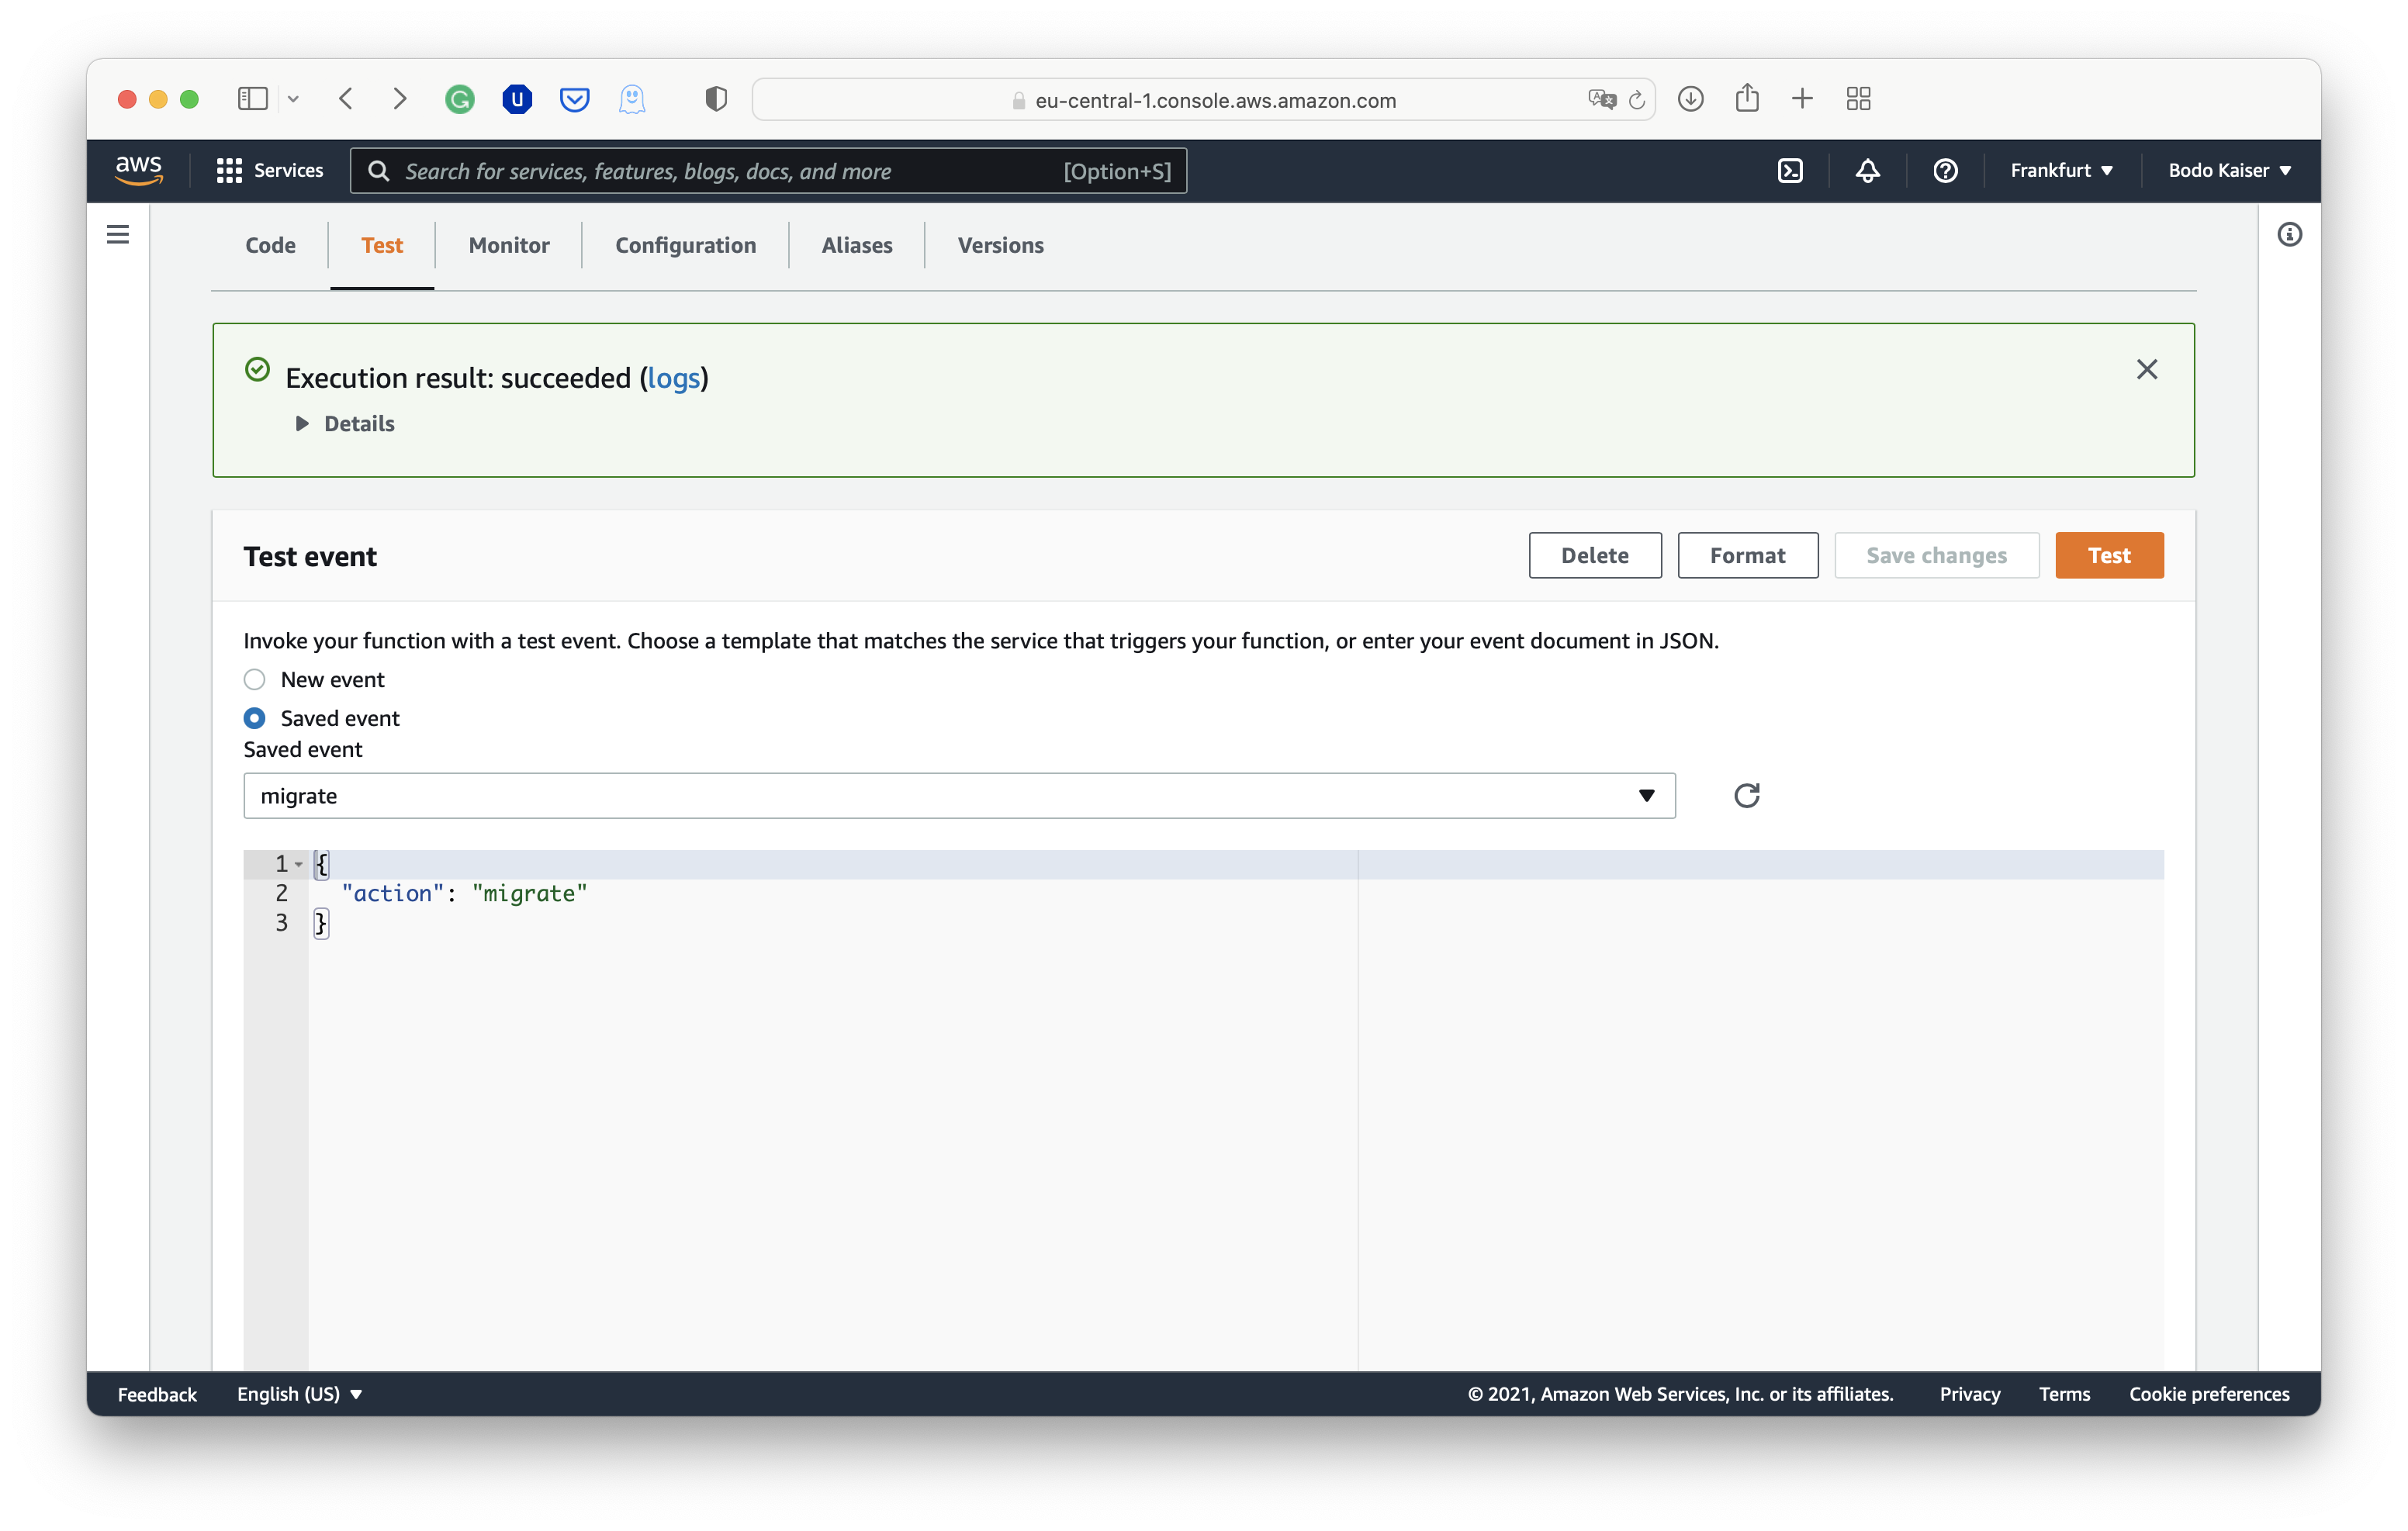
After you successfully deployed the AWS Lambda, open the "Test" tab of the "ent" function in the web console and invoke it with a "migrate" action:

Screenshot of invoking the Ent Lambda with a migrate action

Invoking Lambda with a "migrate" action

On success, you should get a green feedback box and test the result of a "todos" action:

Screenshot of invoking the Ent Lambda with a todos action

Invoking Lambda with a "todos" action

In case the test executions fail, you most probably have an issue with your database connection.

Configuring AWS AppSync resolvers

With the "ent" function successfully deployed, we are left to register the ent Lambda as a data source to our AppSync API and configure the schema resolvers to map the AppSync requests to Lambda events. First, open our AWS AppSync API in the web console and move to "Data Sources", which you find in the navigation pane on the left.

Screenshot of the list of data sources registered to the AWS AppSync API

List of data sources registered to the AWS AppSync API

Click the "Create data source" button in the top right to start registering the "ent" function as data source:

Screenshot registering the ent Lambda as data source to the AWS AppSync API

Registering the ent Lambda as data source to the AWS AppSync API

Now, open the GraphQL schema of the AppSync API and search for the Query type in the sidebar to the right. Click the "Attach" button next to the Query.Todos type:

Screenshot attaching a resolver to Query type in the AWS AppSync API

Attaching a resolver for the todos Query in the AWS AppSync API

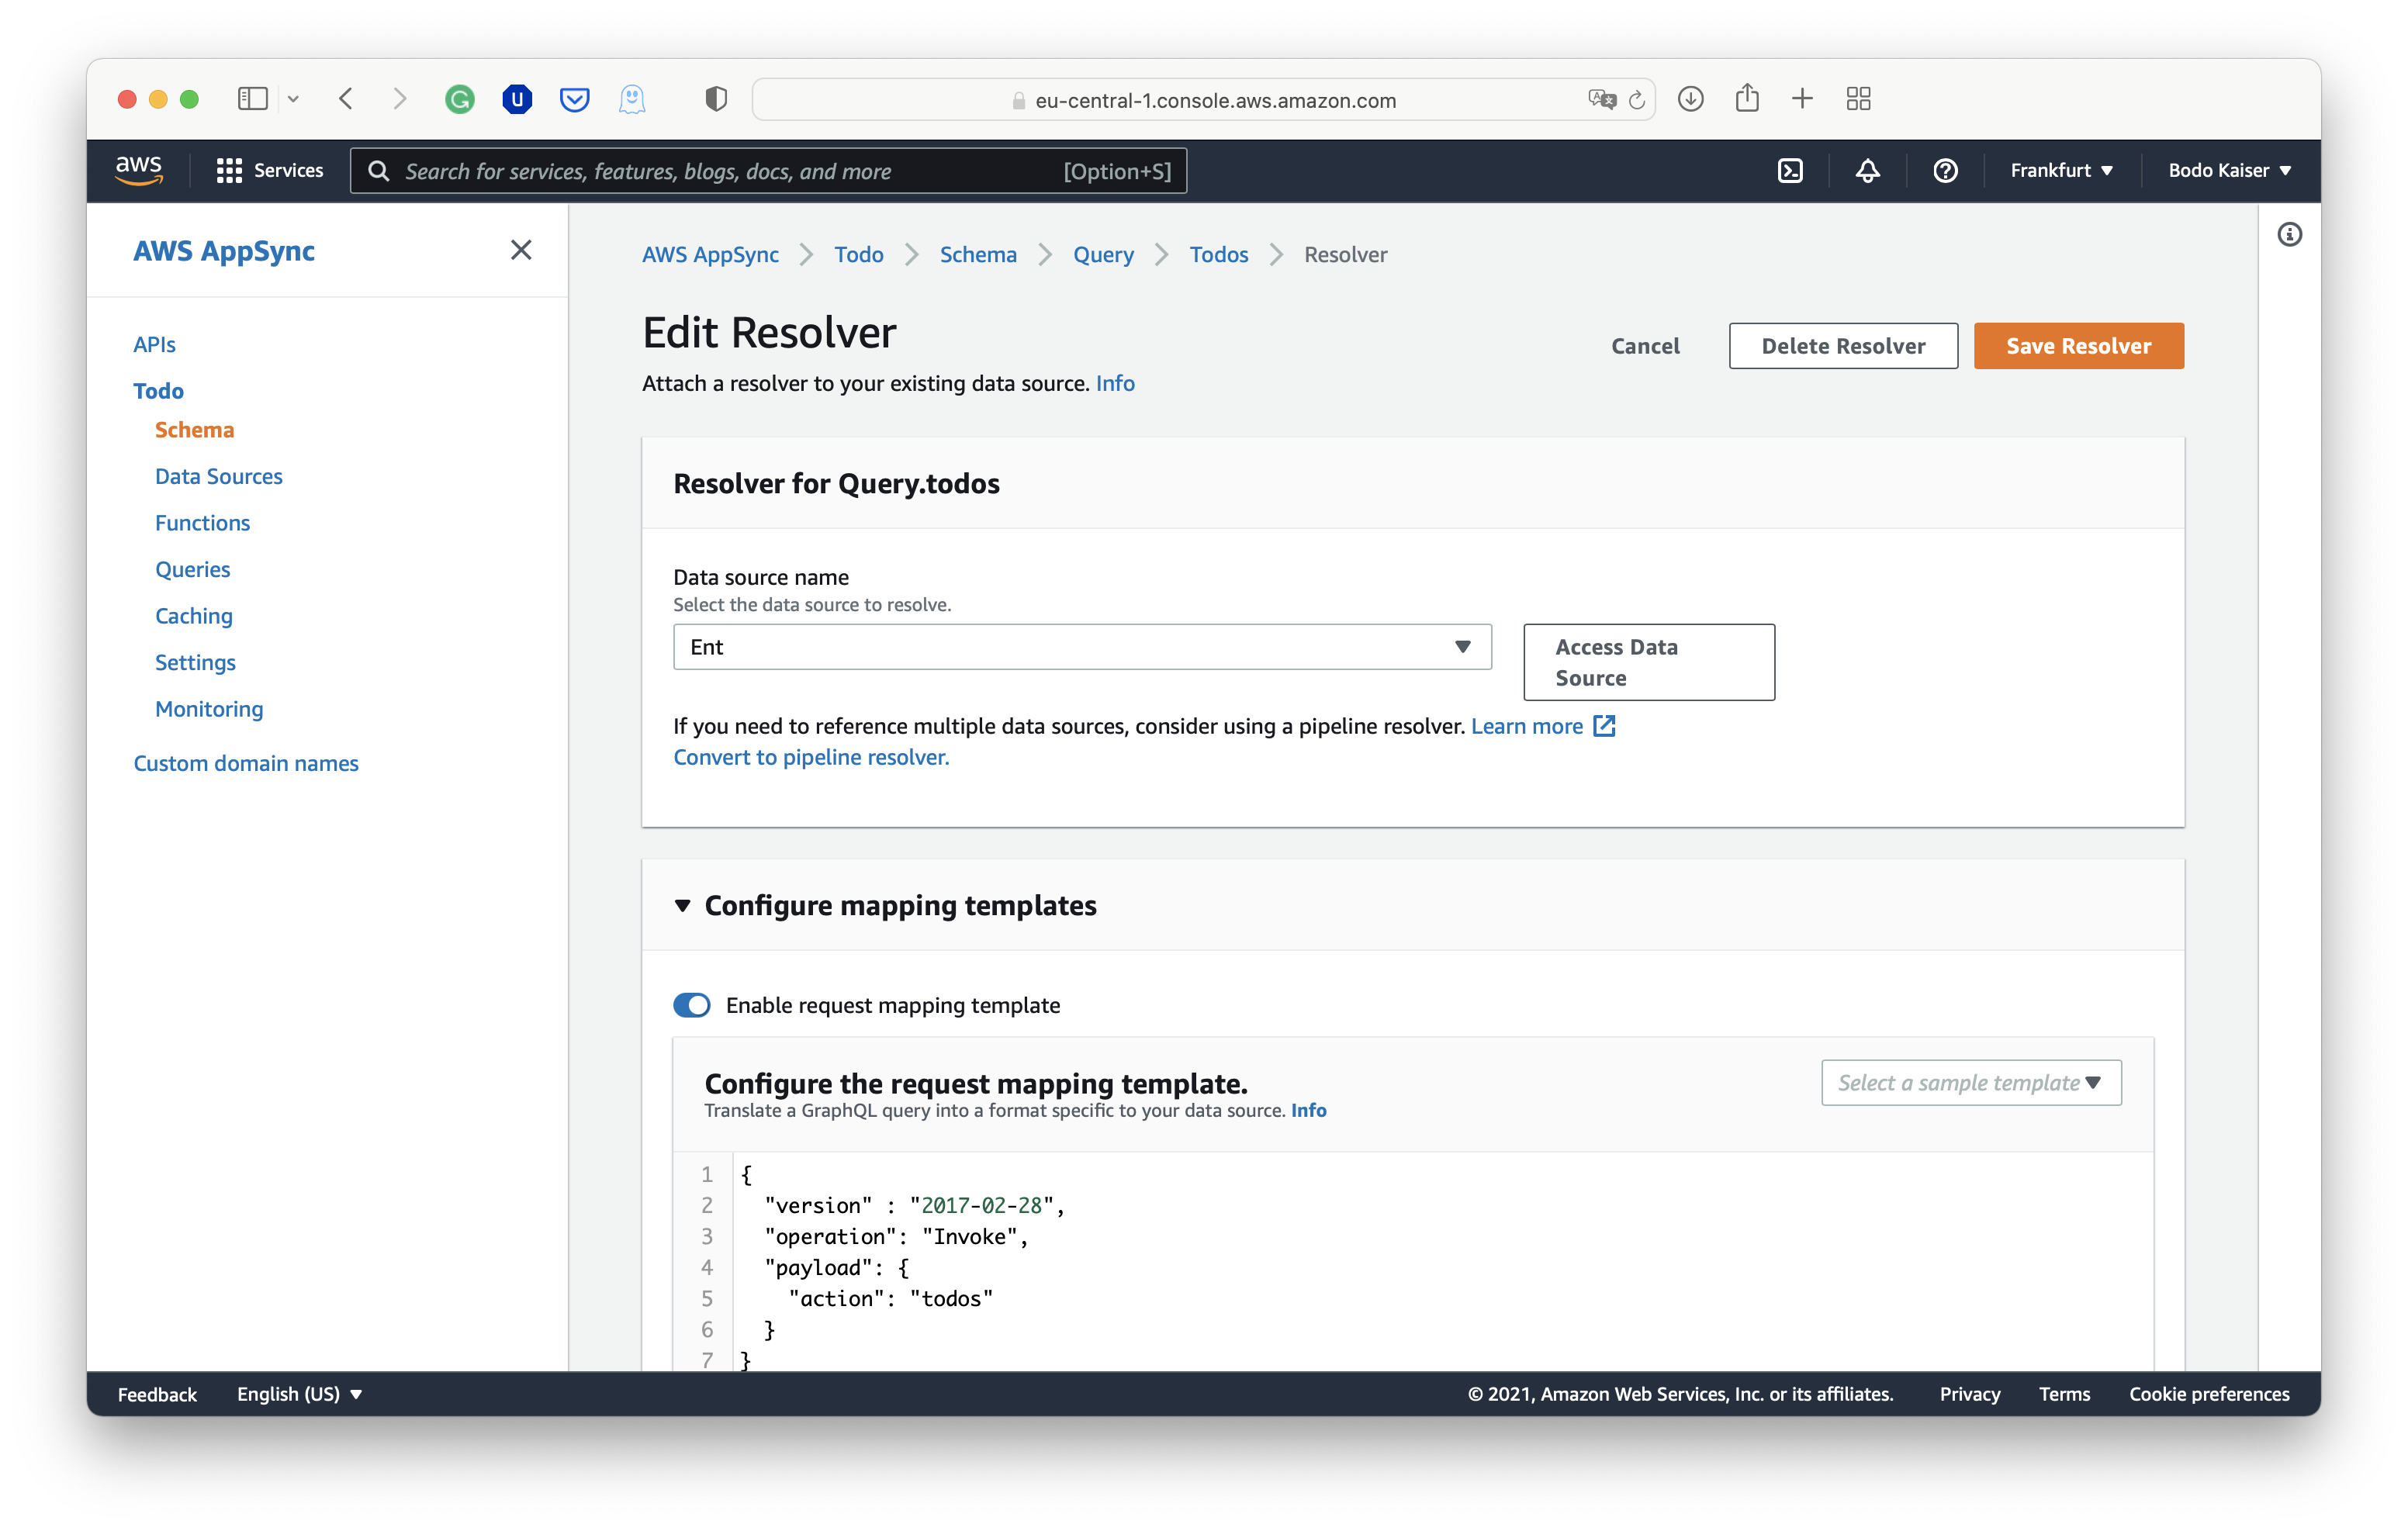
In the resolver view for Query.todos, select the Lambda function as data source, enable the request mapping template option,

Screenshot configuring the resolver mapping for the todos Query in the AWS AppSync API

Configuring the resolver mapping for the todos Query in the AWS AppSync API

and copy the following template:

Query.todos
{
"version" : "2017-02-28",
"operation": "Invoke",
"payload": {
"action": "todos"
}
}

Repeat the same procedure for the remaining Query and Mutation types:

Query.todo
{
"version" : "2017-02-28",
"operation": "Invoke",
"payload": {
"action": "todo",
"input": $util.toJson($context.args.input)
}
}
Mutation.addTodo
{
"version" : "2017-02-28",
"operation": "Invoke",
"payload": {
"action": "addTodo",
"input": $util.toJson($context.args.input)
}
}
Mutation.removeTodo
{
"version" : "2017-02-28",
"operation": "Invoke",
"payload": {
"action": "removeTodo",
"input": $util.toJson($context.args.input)
}
}

The request mapping templates let us construct the event objects with which we invoke the Lambda functions. Through the $context object, we have access to the GraphQL request and the authentication session. In addition, it is possible to arrange multiple resolvers sequentially and reference the respective outputs via the $context object. In principle, it is also possible to define response mapping templates. However, in most cases it is sufficient enough to return the response object "as is".

Testing AppSync using the Query explorer

The easiest way to test the API is to use the Query Explorer in AWS AppSync. Alternatively, one can register an API key in the settings of their AppSync API and use any standard GraphQL client.

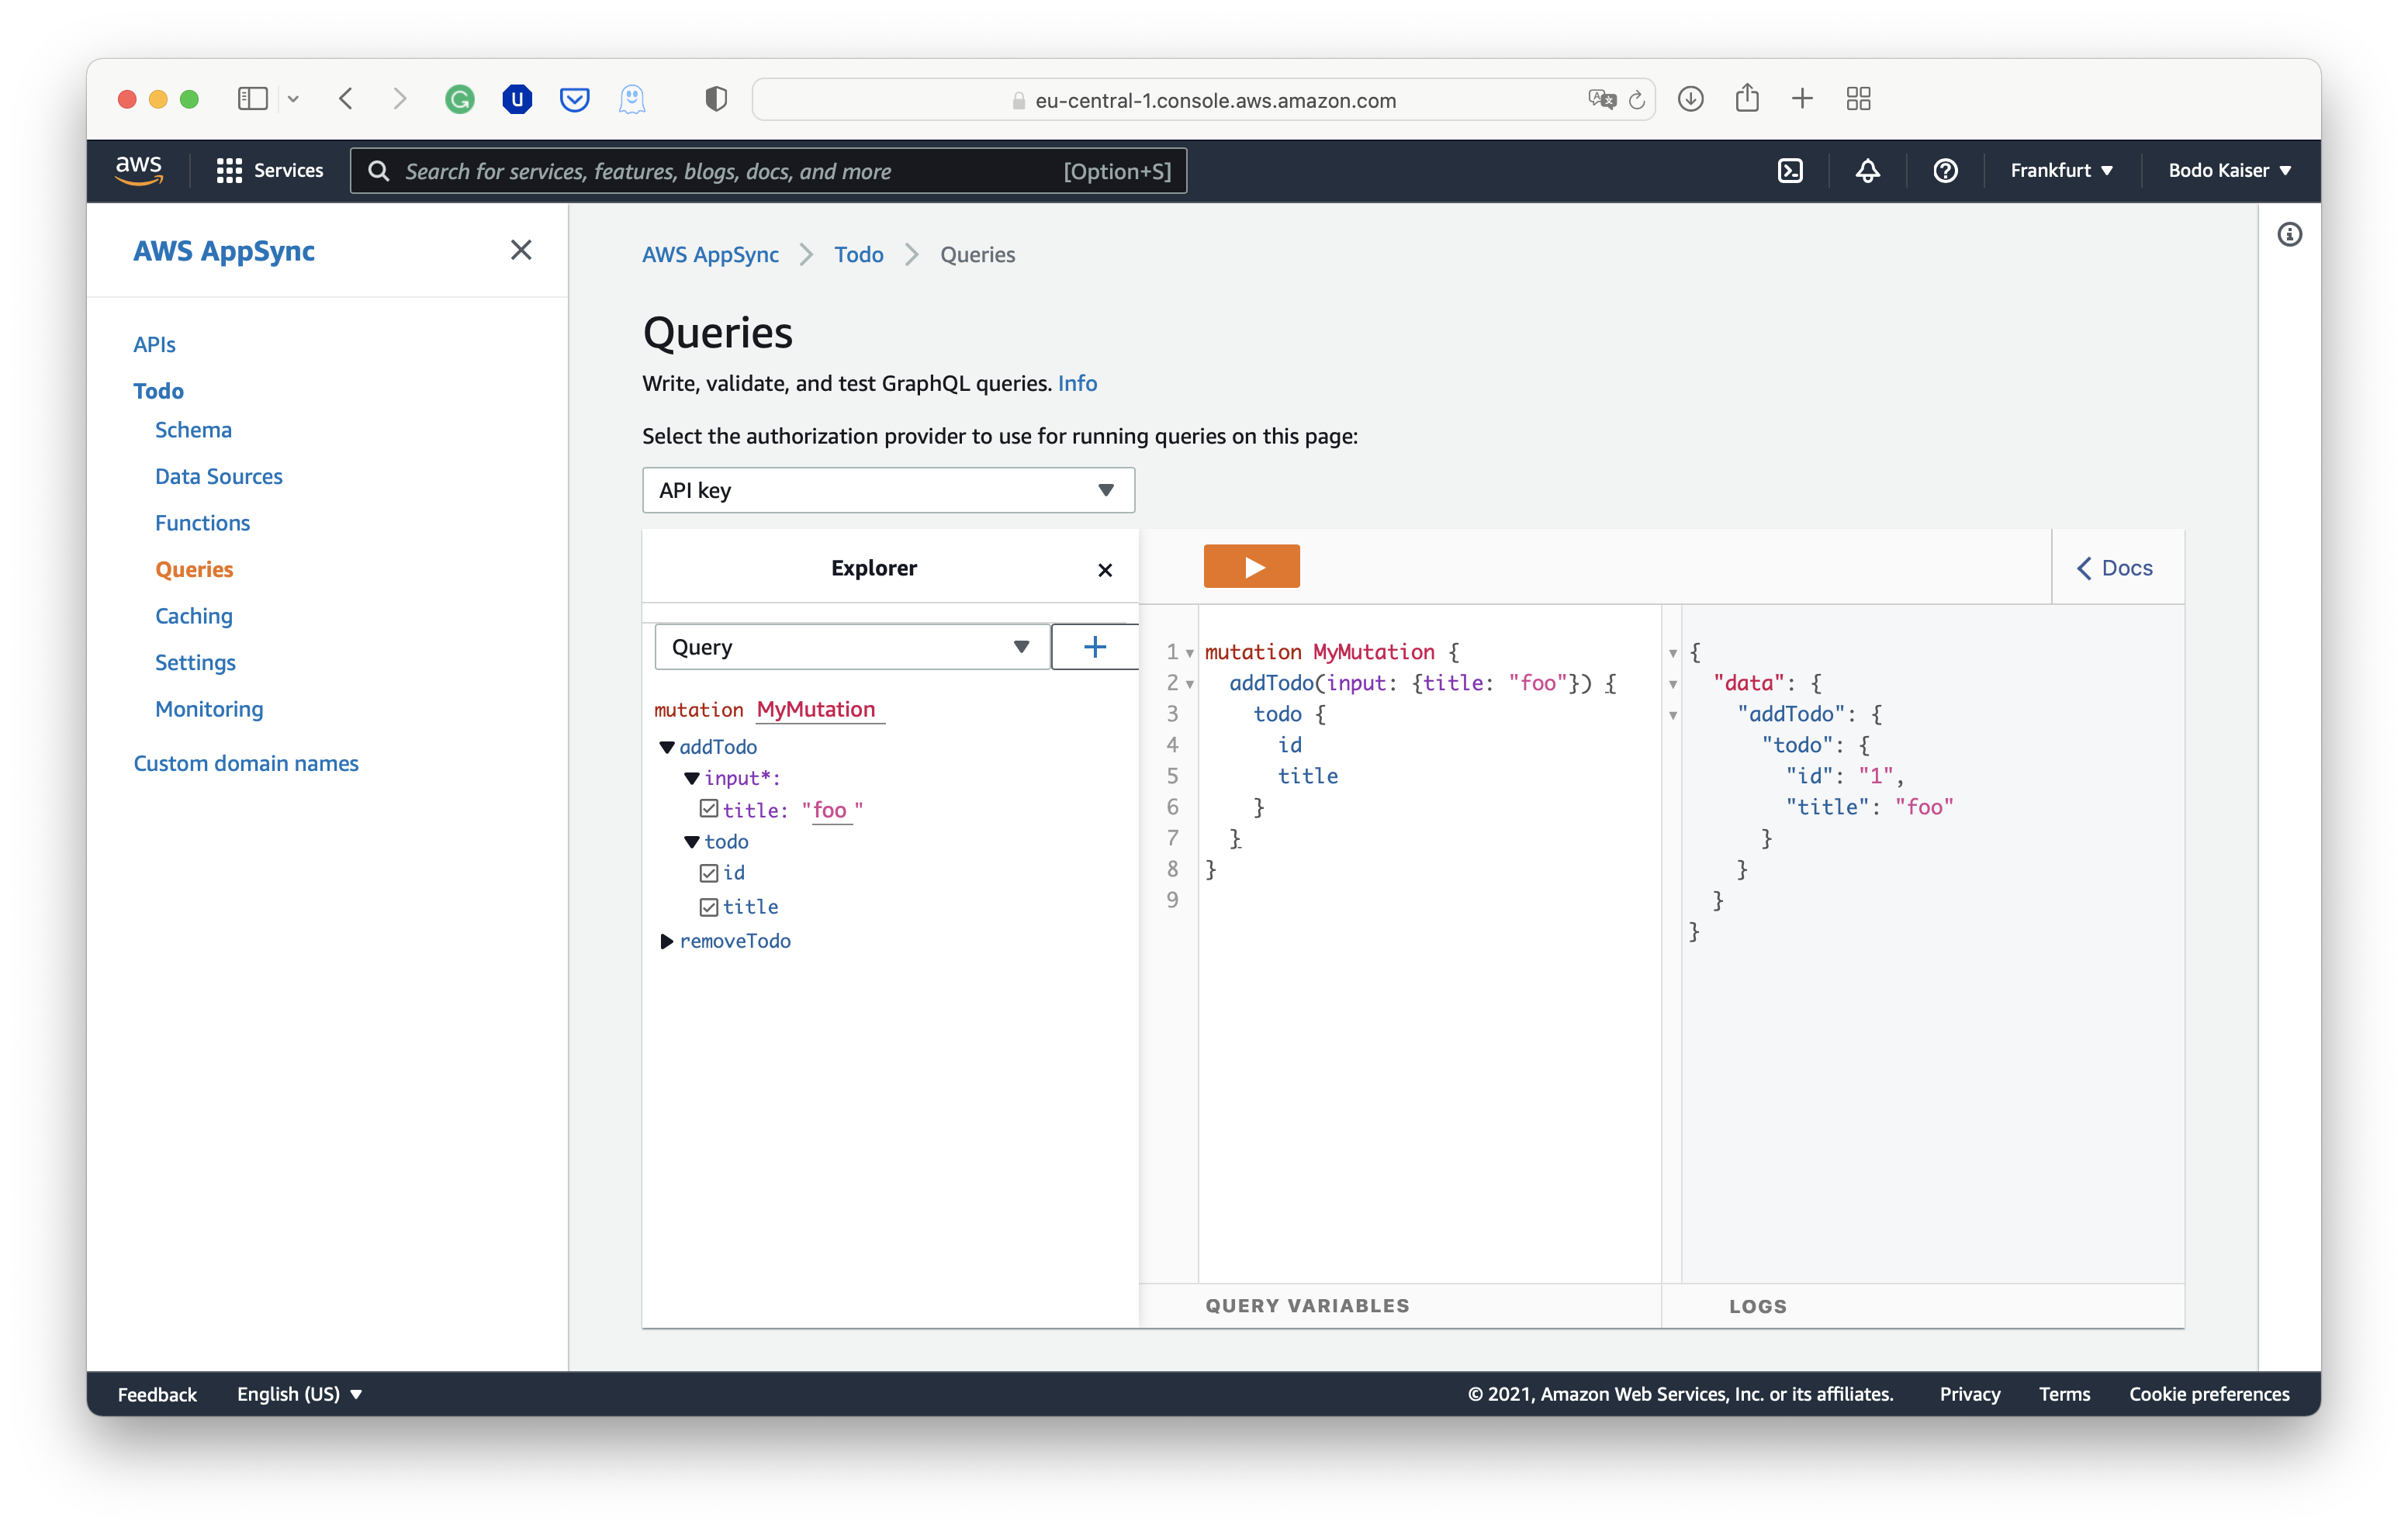
Let us first create a todo with the title foo:

mutation MyMutation {
addTodo(input: {title: "foo"}) {
todo {
id
title
}
}
}
Screenshot of an executed addTodo Mutation using the AppSync Query Explorer

"addTodo" Mutation using the AppSync Query Explorer

Requesting a list of the todos should return a single todo with title foo:

query MyQuery {
todos {
title
id
}
}
Screenshot of an executed addTodo Mutation using the AppSync Query Explorer

"addTodo" Mutation using the AppSync Query Explorer

Requesting the foo todo by id should work too:

query MyQuery {
todo(id: "1") {
title
id
}
}
Screenshot of an executed addTodo Mutation using the AppSync Query Explorer

"addTodo" Mutation using the AppSync Query Explorer

Wrapping Up

We successfully deployed a serverless GraphQL API for managing simple todos using AWS AppSync, AWS Lambda, and Ent. In particular, we provided step-by-step instructions on configuring AWS AppSync and AWS Lambda through the web console. In addition, we discussed a proposal for how to structure our Go code.

We did not cover testing and setting up a database infrastructure in AWS. These aspects become more challenging in the serverless than the traditional paradigm. For example, when many Lambda functions are cold started in parallel, we quickly exhaust the database's connection pool and need some database proxy. In addition, we need to rethink testing as we only have access to local and end-to-end tests because we cannot run cloud services easily in isolation.

Nevertheless, the proposed GraphQL server scales well into the complex demands of real-world applications benefiting from the serverless infrastructure and Ent's pleasurable developer experience.

Have questions? Need help with getting started? Feel free to join our Discord server or Slack channel](https://entgo.io/docs/slack/).

For more Ent news and updates:

· 阅读时间 10 分钟

I've been writing software for years, but, until recently, I didn't know what an ORM was. I learned many things obtaining my B.S. in Computer Engineering, but Object-Relational Mapping was not one of those; I was too focused on building things out of bits and bytes to be bothered with something that high-level. It shouldn't be too surprising then, that when I found myself tasked with helping to build a distributed web application, I ended up outside my comfort zone.

One of the difficulties with developing software for someone else is, that you aren't able to see inside their head. The requirements aren't always clear and asking questions only helps you understand so much of what they are looking for. Sometimes, you just have to build a prototype and demonstrate it to get useful feedback.

The issue with this approach, of course, is that it takes time to develop prototypes, and you need to pivot frequently. If you were like me and didn't know what an ORM was, you would waste a lot of time doing simple, but time-consuming tasks:

  1. Re-define the data model with new customer feedback.
  2. Re-create the test database.
  3. Re-write the SQL statements for interfacing with the database.
  4. Re-define the gRPC interface between the backend and frontend services.
  5. Re-design the frontend and web interface.
  6. Demonstrate to customer and get feedback
  7. Repeat

Hundreds of hours of work only to find out that everything needs to be re-written. So frustrating! I think you can imagine my relief (and also embarrassment), when a senior developer asked me why I wasn't using an ORM like Ent.

Discovering Ent

It only took one day to re-implement our current data model with Ent. I couldn't believe I had been doing all this work by hand when such a framework existed! The gRPC integration through entproto was the icing on the cake! I could perform basic CRUD operations over gRPC just by adding a few annotations to my schema. This allows me to skip all the steps between data model definition and re-designing the web interface! There was, however, just one problem for my use case: How do you get the details of entities over the gRPC interface if you don't know their IDs ahead of time? I see that Ent can query all, but where is the GetAll method for entproto?

Becoming an Open-Source Contributor

I was surprised to find it didn't exist! I could have added it to my project by implementing the feature in a separate service, but it seemed like a generic enough method to be generally useful. For years, I had wanted to find an open-source project that I could meaningfully contribute to; this seemed like the perfect opportunity!

So, after poking around entproto's source into the early morning hours, I managed to hack the feature in! Feeling accomplished, I opened a pull request and headed off to sleep, not realizing the learning experience I had just signed myself up for.

In the morning, I awoke to the disappointment of my pull request being closed by Rotem, but with an invitation to collaborate further to refine the idea. The reason for closing the request was obvious, my implementation of GetAll was dangerous. Returning an entire table's worth of data is only feasible if the table is small. Exposing this interface on a large table could have disastrous results!

Optional Service Method Generation

My solution was to make the GetAll method optional by passing an argument into entproto.Service(). This provides control over whether this feature is exposed. We decided that this was a desirable feature, but that it should be more generic. Why should GetAll get special treatment just because it was added last? It would be better if all methods could be optionally generated. Something like:

entproto.Service(entproto.Methods(entproto.Create | entproto.Get))

However, to keep everything backwards-compatible, an empty entproto.Service() annotation would also need to generate all methods. I'm not a Go expert, so the only way I knew of to do this was with a variadic function:

func Service(methods ...Method)

The problem with this approach is that you can only have one argument type that is variable length. What if we wanted to add additional options to the service annotation later on? This is where I was introduced to the powerful design pattern of functional options:

// ServiceOption configures the entproto.Service annotation.
type ServiceOption func(svc *service)

// Service annotates an ent.Schema to specify that protobuf service generation is required for it.
func Service(opts ...ServiceOption) schema.Annotation {
s := service{
Generate: true,
}
for _, apply := range opts {
apply(&s)
}
// Default to generating all methods
if s.Methods == 0 {
s.Methods = MethodAll
}
return s
}

This approach takes in a variable number of functions that are called to set options on a struct, in this case, our service annotation. With this approach, we can implement any number of other options functions aside from Methods. Very cool!

List: The Superior GetAll

With optional method generation out of the way, we could return our focus to adding GetAll. How could we implement this method in a safe fashion? Rotem suggested we base the method off of Google's API Improvement Proposal (AIP) for List, AIP-132. This approach allows a client to retrieve all entities, but breaks the retrieval up into pages. As an added bonus, it also sounds better than "GetAll"!

List Request

With this design, a request message would look like:

message ListUserRequest {
int32 page_size = 1;

string page_token = 2;

View view = 3;

enum View {
VIEW_UNSPECIFIED = 0;

BASIC = 1;

WITH_EDGE_IDS = 2;
}
}

Page Size

The page_size field allows the client to specify the maximum number of entries they want to receive in the response message, subject to a maximum page size of 1000. This eliminates the issue of returning more results than the client can handle in the initial GetAll implementation. Additionally, the maximum page size was implemented to prevent a client from overburdening the server.

Page Token

The page_token field is a base64-encoded string utilized by the server to determine where the next page begins. An empty token means that we want the first page.

View

The view field is used to specify whether the response should return the edge IDs associated with the entities.

List Response

The response message would look like:

message ListUserResponse {
repeated User user_list = 1;

string next_page_token = 2;
}

List

The user_list field contains page entities.

Next Page Token

The next_page_token field is a base64-encoded string that can be utilized in another List request to retrieve the next page of entities. An empty token means that this response contains the last page of entities.

Pagination

With the gRPC interface determined, the challenge of implementing it began. One of the most critical design decisions was how to implement the pagination. The naive approach would be to use LIMIT/OFFSET pagination to skip over the entries we've already seen. However, this approach has massive drawbacks; the most problematic being that the database has to fetch all the rows it is skipping to get the rows we want.

Keyset Pagination

Rotem proposed a much better approach: keyset pagination. This approach is slightly more complicated since it requires the use of a unique column (or combination of columns) to order the rows. But in exchange we gain a significant performance improvement. This is because we can take advantage of the sorted rows to select only entries with unique column(s) values that are greater (ascending order) or less (descending order) than / equal to the value(s) in the client-provided page token. Thus, the database doesn't have to fetch the rows we want to skip over, significantly speeding up queries on large tables!

With keyset pagination selected, the next step was to determine how to order the entities. The most straightforward approach for Ent was to use the id field; every schema will have this, and it is guaranteed to be unique for the schema. This is the approach we chose to use for the initial implementation. Additionally, a decision needed to be made regarding whether ascending or descending order should be employed. Descending order was chosen for the initial release.

Usage

Let's take a look at how to actually use the new List feature:

package main

import (
"context"
"log"

"ent-grpc-example/ent/proto/entpb"
"google.golang.org/grpc"
"google.golang.org/grpc/status"
)

func main() {
// Open a connection to the server.
conn, err := grpc.Dial(":5000", grpc.WithInsecure())
if err != nil {
log.Fatalf("failed connecting to server: %s", err)
}
defer conn.Close()
// Create a User service Client on the connection.
client := entpb.NewUserServiceClient(conn)
ctx := context.Background()
// Initialize token for first page.
pageToken := ""
// Retrieve all pages of users.
for {
// Ask the server for the next page of users, limiting entries to 100.
users, err := client.List(ctx, &entpb.ListUserRequest{
PageSize: 100,
PageToken: pageToken,
})
if err != nil {
se, _ := status.FromError(err)
log.Fatalf("failed retrieving user list: status=%s message=%s", se.Code(), se.Message())
}
// Check if we've reached the last page of users.
if users.NextPageToken == "" {
break
}
// Update token for next request.
pageToken = users.NextPageToken
log.Printf("users retrieved: %v", users)
}
}

Looking Ahead

The current implementation of List has a few limitations that can be addressed in future revisions. First, sorting is limited to the id column. This makes List compatible with any schema, but it isn't very flexible. Ideally, the client should be able to specify what columns to sort by. Alternatively, the sort column(s) could be defined in the schema. Additionally, List is restricted to descending order. In the future, this could be an option specified in the request. Finally, List currently only works with schemas that use int32, uuid, or string type id fields. This is because a separate conversion method to/from the page token must be defined for each type that Ent supports in the code generation template (I'm only one person!).

Wrap-up

I was pretty nervous when I first embarked on my quest to contribute this functionality to entproto; as a newbie open-source contributor, I didn't know what to expect. I'm happy to share that working on the Ent project was a ton of fun! I got to work with awesome, knowledgeable people while helping out the open-source community. From functional options and keyset pagination to smaller insights gained through PR review, I learned so much about Go (and software development in general) in the process! I'd highly encourage anyone thinking they might want to contribute something to take that leap! You'll be surprised with how much you gain from the experience.

Have questions? Need help with getting started? Feel free to join our Discord server or Slack channel.

For more Ent news and updates:

· 阅读时间 6 分钟

The OpenAPI Specification (OAS, formerly known as Swagger Specification) is a technical specification defining a standard, language-agnostic interface description for REST APIs. This allows both humans and automated tools to understand the described service without the actual source code or additional documentation. Combined with the Swagger Tooling you can generate both server and client boilerplate code for more than 20 languages, just by passing in the OAS document.

In a previous blogpost, we presented to you a new feature of the Ent extension elk: a fully compliant OpenAPI Specification document generator.

Today, we are very happy to announce, that the specification generator is now an official extension to the Ent project and has been moved to the ent/contrib repository. In addition, we have listened to the feedback of the community and have made some changes to the generator, that we hope you will like.

Getting Started

To use the entoas extension use the entc (ent codegen) package as described here. First install the extension to your Go module:

go get entgo.io/contrib/entoas

Now follow the next two steps to enable it and to configure Ent to work with the entoas extension:

1. Create a new Go file named ent/entc.go and paste the following content:

// +build ignore

package main

import (
"log"

"entgo.io/contrib/entoas"
"entgo.io/ent/entc"
"entgo.io/ent/entc/gen"
)

func main() {
ex, err := entoas.NewExtension()
if err != nil {
log.Fatalf("creating entoas extension: %v", err)
}
err = entc.Generate("./schema", &gen.Config{}, entc.Extensions(ex))
if err != nil {
log.Fatalf("running ent codegen: %v", err)
}
}

2. Edit the ent/generate.go file to execute the ent/entc.go file:

package ent

//go:generate go run -mod=mod entc.go

With these steps complete, all is set up for generating an OAS document from your schema! If you are new to Ent and want to learn more about it, how to connect to different types of databases, run migrations or work with entities, then head over to the Setup Tutorial.

Generate an OAS document

The first step on our way to the OAS document is to create an Ent schema graph. For the sake of brevity here is an example schema to use:

ent/schema/schema.go
package schema

import (
"entgo.io/ent"
"entgo.io/ent/schema/edge"
"entgo.io/ent/schema/field"
)

// Fridge holds the schema definition for the Fridge entity.
type Fridge struct {
ent.Schema
}

// Fields of the Fridge.
func (Fridge) Fields() []ent.Field {
return []ent.Field{
field.String("title"),
}
}

// Edges of the Fridge.
func (Fridge) Edges() []ent.Edge {
return []ent.Edge{
edge.To("compartments", Compartment.Type),
}
}

// Compartment holds the schema definition for the Compartment entity.
type Compartment struct {
ent.Schema
}

// Fields of the Compartment.
func (Compartment) Fields() []ent.Field {
return []ent.Field{
field.String("name"),
}
}

// Edges of the Compartment.
func (Compartment) Edges() []ent.Edge {
return []ent.Edge{
edge.From("fridge", Fridge.Type).
Ref("compartments").
Unique(),
edge.To("contents", Item.Type),
}
}

// Item holds the schema definition for the Item entity.
type Item struct {
ent.Schema
}

// Fields of the Item.
func (Item) Fields() []ent.Field {
return []ent.Field{
field.String("name"),
}
}

// Edges of the Item.
func (Item) Edges() []ent.Edge {
return []ent.Edge{
edge.From("compartment", Compartment.Type).
Ref("contents").
Unique(),
}
}

The code above is the Ent-way to describe a schema-graph. In this particular case we created three Entities: Fridge, Compartment and Item. Additionally, we added some edges to the graph: A Fridge can have many Compartments and a Compartment can contain many Items.

Now run the code generator:

go generate ./...

In addition to the files Ent normally generates, another file named ent/openapi.json has been created. Here is a sneak peek into the file:

ent/openapi.json
{
"info": {
"title": "Ent Schema API",
"description": "This is an auto generated API description made out of an Ent schema definition",
"termsOfService": "",
"contact": {},
"license": {
"name": ""
},
"version": "0.0.0"
},
"paths": {
"/compartments": {
"get": {
[...]

If you feel like it, copy its contents and paste them into the Swagger Editor. It should look like this:

Swagger Editor

Swagger Editor

Basic Configuration

The description of our API does not yet reflect what it does, but entoas lets you change that! Open up ent/entc.go and pass in the updated title and description of our Fridge API:

ent/entc.go
//go:build ignore
// +build ignore

package main

import (
"log"

"entgo.io/contrib/entoas"
"entgo.io/ent/entc"
"entgo.io/ent/entc/gen"
)

func main() {
ex, err := entoas.NewExtension(
entoas.SpecTitle("Fridge CMS"),
entoas.SpecDescription("API to manage fridges and their cooled contents. **ICY!**"),
entoas.SpecVersion("0.0.1"),
)
if err != nil {
log.Fatalf("creating entoas extension: %v", err)
}
err = entc.Generate("./schema", &gen.Config{}, entc.Extensions(ex))
if err != nil {
log.Fatalf("running ent codegen: %v", err)
}
}

Rerunning the code generator will create an updated OAS document.

ent/openapi.json
{
"info": {
"title": "Fridge CMS",
"description": "API to manage fridges and their cooled contents. **ICY!**",
"termsOfService": "",
"contact": {},
"license": {
"name": ""
},
"version": "0.0.1"
},
"paths": {
"/compartments": {
"get": {
[...]

Operation configuration

There are times when you do not want to generate endpoints for every operation for every node. Fortunately, entoas lets us configure what endpoints to generate and which to ignore. entoas' default policy is to expose all routes. You can either change this behaviour to not expose any route but those explicitly asked for, or you can just tell entoas to exclude a specific operation by using an entoas.Annotation. Policies are used to enable / disable the generation of sub-resource operations as well:

ent/schema/fridge.go
// Edges of the Fridge.
func (Fridge) Edges() []ent.Edge {
return []ent.Edge{
edge.To("compartments", Compartment.Type).
// Do not generate an endpoint for POST /fridges/{id}/compartments
Annotations(
entoas.CreateOperation(
entoas.OperationPolicy(entoas.PolicyExclude),
),
),
}
}

// Annotations of the Fridge.
func (Fridge) Annotations() []schema.Annotation {
return []schema.Annotation{
// Do not generate an endpoint for DELETE /fridges/{id}
entoas.DeleteOperation(entoas.OperationPolicy(entoas.PolicyExclude)),
}
}

And voilà! the operations are gone.

For more information about how entoas's policies work and what you can do with it, have a look at the godoc.

Simple Models

By default entoas generates one response-schema per endpoint. To learn about the naming strategy have a look at the godoc.

One Schema per Endpoint

One Schema per Endpoint

Many users have requested to change this behaviour to simply map the Ent schema to the OAS document. Therefore, you now can configure entoas to do that:

ex, err := entoas.NewExtension(
entoas.SpecTitle("Fridge CMS"),
entoas.SpecDescription("API to manage fridges and their cooled contents. **ICY!**"),
entoas.SpecVersion("0.0.1"),
entoas.SimpleModels(),
)
Simple Schemas

Simple Schemas

Wrapping Up

In this post we announced entoas, the official integration of the former elk OpenAPI Specification generation into Ent. This feature connects between Ent's code-generation capabilities and OpenAPI/Swagger's rich tooling ecosystem.

Have questions? Need help with getting started? Feel free to join our Discord server or Slack channel.

For more Ent news and updates:

· 阅读时间 8 分钟

One of the common questions we get from the Ent community is how to synchronize objects or references between the database backing an Ent application (e.g. MySQL or PostgreSQL) with external services. For example, users would like to create or delete a record from within their CRM when a user is created or deleted in Ent, publish a message to a Pub/Sub system when an entity is updated, or verify references to blobs in object storage such as AWS S3 or Google Cloud Storage.

Ensuring consistency between two separate data systems is not a simple task. When we want to propagate, for example, the deletion of a record in one system to another, there is no obvious way to guarantee that the two systems will end in a synchronized state, since one of them may fail, and the network link between them may be slow or down. Having said that, and especially with the prominence of microservices-architectures, these problems have become more common, and distributed systems researchers have come up with patterns to solve them, such as the Saga Pattern.

The application of these patterns is usually complex and difficult, and so in many cases architects do not go after a "perfect" design, and instead go after simpler solutions that involve either the acceptance of some inconsistency between the systems or background reconciliation procedures.

In this post, we will not discuss how to solve distributed transactions or implement the Saga pattern with Ent. Instead, we will limit our scope to study how to hook into Ent mutations before and after they occur, and run our custom logic there.

Propagating Mutations to External Systems

In our example, we are going to create a simple User schema with 2 immutable string fields, "name" and "avatar_url". Let's run the ent init command for creating a skeleton schema for our User:

go run entgo.io/ent/cmd/ent new User

Then, add the name and the avatar_url fields and run go generate to generate the assets.

ent/schema/user.go
type User struct {
ent.Schema
}

func (User) Fields() []ent.Field {
return []ent.Field{
field.String("name").
Immutable(),
field.String("avatar_url").
Immutable(),
}
}
go generate ./ent

The Problem

The avatar_url field defines a URL to an image in a bucket on our object storage (e.g. AWS S3). For the purpose of this discussion we want to make sure that:

  • When a user is created, an image with the URL stored in "avatar_url" exists in our bucket.
  • Orphan images are deleted from the bucket. This means that when a user is deleted from our system, its avatar image is deleted as well.

For interacting with blobs, we will use the gocloud.dev/blob package. This package provides abstraction for reading, writing, deleting and listing blobs in a bucket. Similar to the database/sql package, it allows interacting with variety of object storages with the same API by configuring its driver URL. For example:

// Open an in-memory bucket. 
if bucket, err := blob.OpenBucket(ctx, "mem://photos/"); err != nil {
log.Fatal("failed opening in-memory bucket:", err)
}

// Open an S3 bucket named photos.
if bucket, err := blob.OpenBucket(ctx, "s3://photos"); err != nil {
log.Fatal("failed opening s3 bucket:", err)
}

// Open a bucket named photos in Google Cloud Storage.
if bucket, err := blob.OpenBucket(ctx, "gs://my-bucket"); err != nil {
log.Fatal("failed opening gs bucket:", err)
}

Schema Hooks

Hooks are a powerful feature of Ent that allows adding custom logic before and after operations that mutate the graph.

Hooks can be either defined dynamically using client.Use (called "Runtime Hooks"), or explicitly on the schema (called "Schema Hooks") as follows:

// Hooks of the User.
func (User) Hooks() []ent.Hook {
return []ent.Hook{
EnsureImageExists(),
DeleteOrphans(),
}
}

As you can imagine, the EnsureImageExists hook will be responsible for ensuring that when a user is created, their avatar URL exists in the bucket, and the DeleteOrphans will ensure that orphan images are deleted. Let's start writing them.

ent/schema/hooks.go
func EnsureImageExists() ent.Hook {
hk := func(next ent.Mutator) ent.Mutator {
return hook.UserFunc(func(ctx context.Context, m *ent.UserMutation) (ent.Value, error) {
avatarURL, exists := m.AvatarURL()
if !exists {
return nil, errors.New("avatar field is missing")
}
// TODO:
// 1. Verify that "avatarURL" points to a real object in the bucket.
// 2. Otherwise, fail.
return next.Mutate(ctx, m)
})
}
// Limit the hook only to "Create" operations.
return hook.On(hk, ent.OpCreate)
}

func DeleteOrphans() ent.Hook {
hk := func(next ent.Mutator) ent.Mutator {
return hook.UserFunc(func(ctx context.Context, m *ent.UserMutation) (ent.Value, error) {
id, exists := m.ID()
if !exists {
return nil, errors.New("id field is missing")
}
// TODO:
// 1. Get the AvatarURL field of the deleted user.
// 2. Cascade the deletion to object storage.
return next.Mutate(ctx, m)
})
}
// Limit the hook only to "DeleteOne" operations.
return hook.On(hk, ent.OpDeleteOne)
}

Now, you may ask yourself, how do we access the blob client from the mutations hooks? You are going to find out in the next section.

Injecting Dependencies

The entc.Dependency option allows extending the generated builders with external dependencies as struct fields, and provides options for injecting them on client initialization.

To inject a blob.Bucket to be available inside our hooks, we can follow the tutorial about external dependencies in the website, and define the gocloud.dev/blob.Bucket as a dependency.

ent/entc.go
func main() {
opts := []entc.Option{
entc.Dependency(
entc.DependencyName("Bucket"),
entc.DependencyType(&blob.Bucket{}),
),
}
if err := entc.Generate("./schema", &gen.Config{}, opts...); err != nil {
log.Fatalf("running ent codegen: %v", err)
}
}

Next, re-run code generation:

go generate ./ent

We can now access the Bucket API from all generated builders. Let's finish the implementations of the above hooks.

ent/schema/hooks.go
// EnsureImageExists ensures the avatar_url points
// to a real object in the bucket.
func EnsureImageExists() ent.Hook {
hk := func(next ent.Mutator) ent.Mutator {
return hook.UserFunc(func(ctx context.Context, m *ent.UserMutation) (ent.Value, error) {
avatarURL, exists := m.AvatarURL()
if !exists {
return nil, errors.New("avatar field is missing")
}
switch exists, err := m.Bucket.Exists(ctx, avatarURL); {
case err != nil:
return nil, fmt.Errorf("check key existence: %w", err)
case !exists:
return nil, fmt.Errorf("key %q does not exist in the bucket", avatarURL)
default:
return next.Mutate(ctx, m)
}
})
}
return hook.On(hk, ent.OpCreate)
}

// DeleteOrphans cascades the user deletion to the bucket.
// Hence, when a user is deleted, its avatar image is deleted
// as well.
func DeleteOrphans() ent.Hook {
hk := func(next ent.Mutator) ent.Mutator {
return hook.UserFunc(func(ctx context.Context, m *ent.UserMutation) (ent.Value, error) {
id, exists := m.ID()
if !exists {
return nil, errors.New("id field is missing")
}
u, err := m.Client().User.Get(ctx, id)
if err != nil {
return nil, fmt.Errorf("getting deleted user: %w", err)
}
if err := m.Bucket.Delete(ctx, u.AvatarURL); err != nil {
return nil, fmt.Errorf("deleting user avatar from bucket: %w", err)
}
return next.Mutate(ctx, m)
})
}
return hook.On(hk, ent.OpDeleteOne)
}

Now, it's time to test our hooks! Let's write a testable example that verifies that our 2 hooks work as expected.

package main

import (
"context"
"fmt"
"log"

"github.com/a8m/ent-sync-example/ent"
_ "github.com/a8m/ent-sync-example/ent/runtime"

"entgo.io/ent/dialect"
_ "github.com/mattn/go-sqlite3"
"gocloud.dev/blob"
_ "gocloud.dev/blob/memblob"
)

func Example_SyncCreate() {
ctx := context.Background()
// Open an in-memory bucket.
bucket, err := blob.OpenBucket(ctx, "mem://photos/")
if err != nil {
log.Fatal("failed opening bucket:", err)
}
client, err := ent.Open(
dialect.SQLite,
"file:ent?mode=memory&cache=shared&_fk=1",
// Inject the blob.Bucket on client initialization.
ent.Bucket(bucket),
)
if err != nil {
log.Fatal("failed opening connection to sqlite:", err)
}
defer client.Close()
if err := client.Schema.Create(ctx); err != nil {
log.Fatal("failed creating schema resources:", err)
}
if err := client.User.Create().SetName("a8m").SetAvatarURL("a8m.png").Exec(ctx); err == nil {
log.Fatal("expect user creation to fail because the image does not exist in the bucket")
}
if err := bucket.WriteAll(ctx, "a8m.png", []byte{255, 255, 255}, nil); err != nil {
log.Fatalf("failed uploading image to the bucket: %v", err)
}
fmt.Printf("%q\n", keys(ctx, bucket))

// User creation should pass as image was uploaded to the bucket.
u := client.User.Create().SetName("a8m").SetAvatarURL("a8m.png").SaveX(ctx)

// Deleting a user, should delete also its image from the bucket.
client.User.DeleteOne(u).ExecX(ctx)
fmt.Printf("%q\n", keys(ctx, bucket))

// Output:
// ["a8m.png"]
// []
}

Wrapping Up

Great! We have configured Ent to extend our generated code and inject the blob.Bucket as an External Dependency. Next, we defined two mutation hooks and used the blob.Bucket API to ensure our product constraints are satisfied.

The code for this example is available at github.com/a8m/ent-sync-example.

For more Ent news and updates:

· 阅读时间 4 分钟

Ent is a powerful Entity framework that helps developers write neat code that is translated into (possibly complex) database queries. As the usage of your application grows, it doesn’t take long until you stumble upon performance issues with your database. Troubleshooting database performance issues is notoriously hard, especially when you’re not equipped with the right tools.

The following example shows how Ent query code is translated into an SQL query.

ent example 1

Example 1 - ent code is translated to SQL query

Traditionally, it has been very difficult to correlate between poorly performing database queries and the application code that is generating them. Database performance analysis tools could help point out slow queries by analyzing database server logs, but how could they be traced back to the application?

Sqlcommenter

Earlier this year, Google introduced Sqlcommenter. Sqlcommenter is

an open source library that addresses the gap between the ORM libraries and understanding database performance. Sqlcommenter gives application developers visibility into which application code is generating slow queries and maps application traces to database query plansIn other words, Sqlcommenter adds application context metadata to SQL queries. This information can then be used to provide meaningful insights. It does so by adding [SQL comments](https://en.wikipedia.org/wiki/SQL_syntax#Comments) to the query that carry metadata but are ignored by the database during query execution. For example, the following query contains a comment that carries metadata about the application that issued it (`users-mgr`), which controller and route triggered it (`users` and `user_rename`, respectively), and the database driver that was used (`ent:v0.9.1`):
update users set username = ‘hedwigz’ where id = 88
/*application='users-mgr',controller='users',route='user_rename',db_driver='ent:v0.9.1'*/

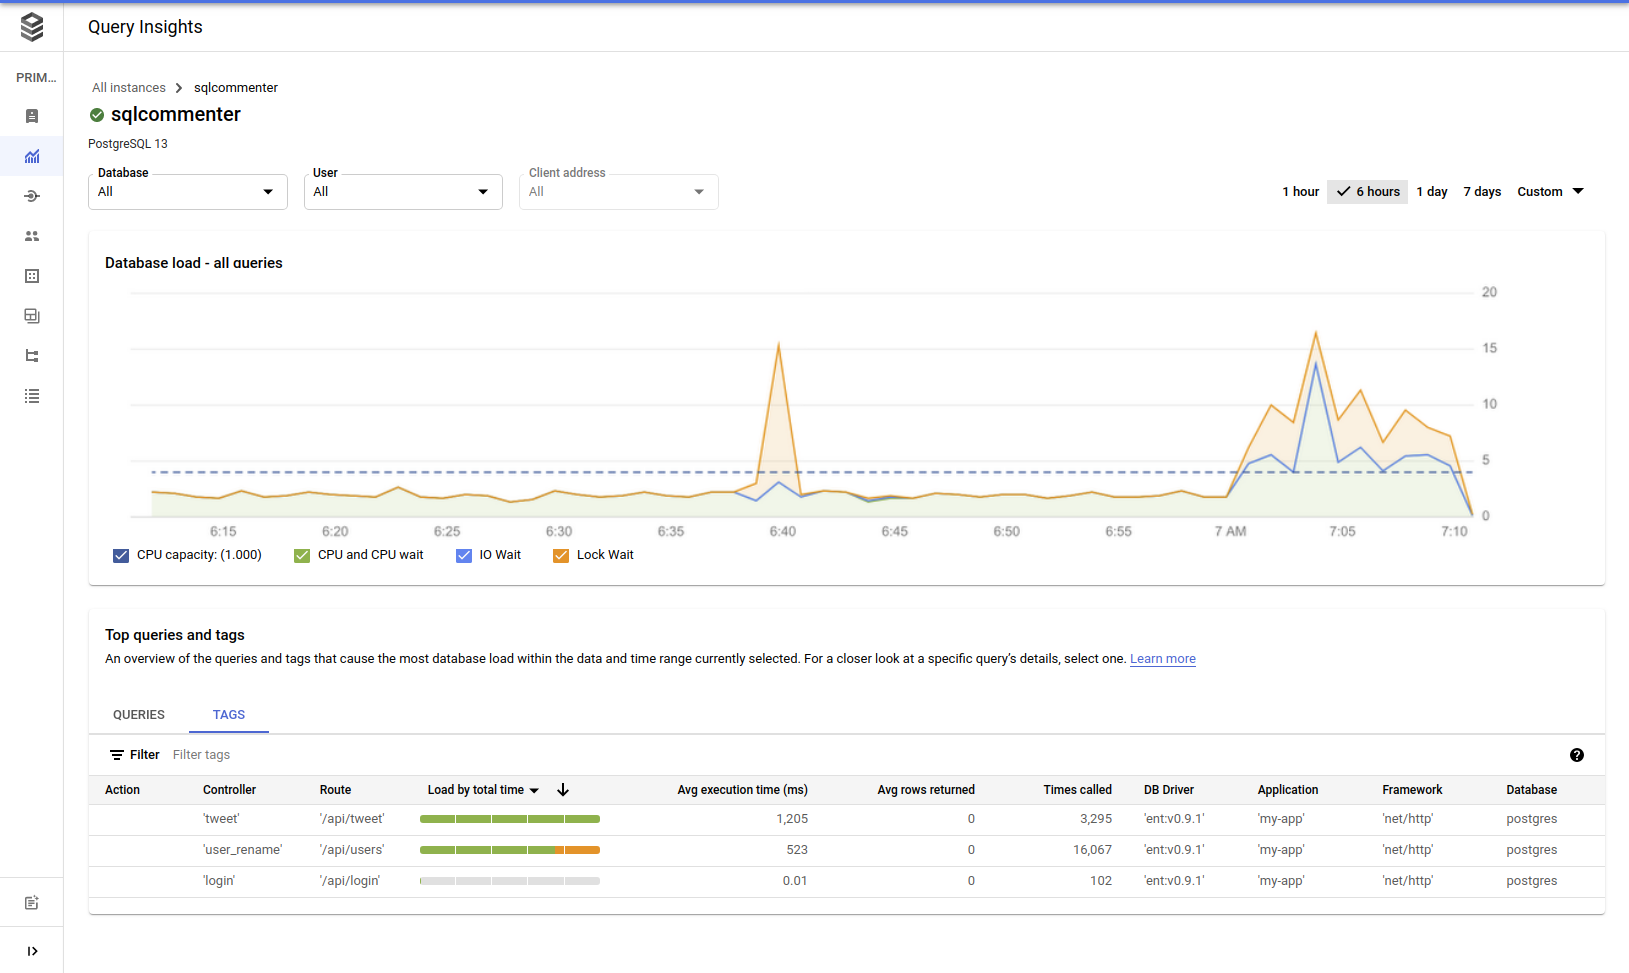
To get a taste of how the analysis of metadata collected from Sqlcommenter metadata can help us better understand performance issues of our application, consider the following example: Google Cloud recently launched Cloud SQL Insights, a cloud-based SQL performance analysis product. In the image below, we see a screenshot from the Cloud SQL Insights Dashboard that shows that the HTTP route 'api/users' is causing many locks on the database. We can also see that this query got called 16,067 times in the last 6 hours.

Cloud SQL insights

Screenshot from Cloud SQL Insights Dashboard

This is the power of SQL tags - they provide you correlation between your application-level information and your Database monitors.

sqlcomment

sqlcomment is an Ent driver that adds metadata to SQL queries using comments following the sqlcommenter specification. By wrapping an existing Ent driver with sqlcomment, users can leverage any tool that supports the standard to triage query performance issues. Without further ado, let’s see sqlcomment in action.

First, to install sqlcomment run:

go get ariga.io/sqlcomment

sqlcomment is wrapping an underlying SQL driver, therefore, we need to open our SQL connection using ent’s sql module, instead of Ent's popular helper ent.Open.

Make sure to import entgo.io/ent/dialect/sql in the following snippet :::
// Create db driver.
db, err := sql.Open("sqlite3", "file:ent?mode=memory&cache=shared&_fk=1")
if err != nil {
log.Fatalf("Failed to connect to database: %v", err)
}

// Create sqlcomment driver which wraps sqlite driver.
drv := sqlcomment.NewDriver(db,
sqlcomment.WithDriverVerTag(),
sqlcomment.WithTags(sqlcomment.Tags{
sqlcomment.KeyApplication: "my-app",
sqlcomment.KeyFramework: "net/http",
}),
)

// Create and configure ent client.
client := ent.NewClient(ent.Driver(drv))

Now, whenever we execute a query, sqlcomment will suffix our SQL query with the tags we set up. If we were to run the following query:

client.User.
Update().
Where(
user.Or(
user.AgeGT(30),
user.Name("bar"),
),
user.HasFollowers(),
).
SetName("foo").
Save()

Ent would output the following commented SQL query:

UPDATE `users`
SET `name` = ?
WHERE (
`users`.`age` > ?
OR `users`.`name` = ?
)
AND `users`.`id` IN (
SELECT `user_following`.`follower_id`
FROM `user_following`
)
/*application='my-app',db_driver='ent:v0.9.1',framework='net%2Fhttp'*/

As you can see, Ent outputted an SQL query with a comment at the end, containing all the relevant information associated with that query.

sqlcomment supports more tags, and has integrations with OpenTelemetry and OpenCensus. To see more examples and scenarios, please visit the github repo.

Wrapping-Up

In this post I showed how adding metadata to queries using SQL comments can help correlate between source code and database queries. Next, I introduced sqlcomment - an Ent driver that adds SQL tags to all of your queries. Finally, I got to see sqlcomment in action, by installing and configuring it with Ent. If you like the code and/or want to contribute - feel free to checkout the project on GitHub.

Have questions? Need help with getting started? Feel free to join our Discord server or Slack channel.

:::

· 阅读时间 7 分钟

While working on Ariga's operational data graph query engine, we saw the opportunity to greatly improve the performance of many use cases by building a robust caching library. As heavy users of Ent, it was only natural for us to implement this layer as an extension to Ent. In this post, I will briefly explain what caches are, how they fit into software architectures, and present entcache - a cache driver for Ent.

Caching is a popular strategy for improving application performance. It is based on the observation that the speed for retrieving data using different types of media can vary within many orders of magnitude. Jeff Dean famously presented the following numbers in a lecture about "Software Engineering Advice from Building Large-Scale Distributed Systems":

cache numbers

These numbers show things that experienced software engineers know intuitively: reading from memory is faster than reading from disk, retrieving data from the same data center is faster than going out to the internet to fetch it. We add to that, that some calculations are expensive and slow, and that fetching a precomputed result can be much faster (and less expensive) than recomputing it every time.

The collective intelligence of Wikipedia tells us that a Cache is "a hardware or software component that stores data so that future requests for that data can be served faster". In other words, if we can store a query result in RAM, we can fulfill a request that depends on it much faster than if we need to go over the network to our database, have it read data from disk, run some computation on it, and only then send it back to us (over a network).

However, as software engineers, we should remember that caching is a notoriously complicated topic. As the phrase coined by early-day Netscape engineer Phil Karlton says: "There are only two hard things in Computer Science: cache invalidation and naming things". For instance, in systems that rely on strong consistency, a cache entry may be stale, therefore causing the system to behave incorrectly. For this reason, take great care and pay attention to detail when you are designing caches into your system architectures.

Presenting entcache

The entcache package provides its users with a new Ent driver that can wrap one of the existing SQL drivers available for Ent. On a high level, it decorates the Query method of the given driver, and for each call:

  1. Generates a cache key (i.e. hash) from its arguments (i.e. statement and parameters).

  2. Checks the cache to see if the results for this query are already available. If they are (this is called a cache-hit), the database is skipped and results are returned to the caller from memory.

  3. If the cache does not contain an entry for the query, the query is passed to the database.

  4. After the query is executed, the driver records the raw values of the returned rows (sql.Rows), and stores them in the cache with the generated cache key.

The package provides a variety of options to configure the TTL of the cache entries, control the hash function, provide custom and multi-level cache stores, evict and skip cache entries. See the full documentation in https://pkg.go.dev/ariga.io/entcache.

As we mentioned above, correctly configuring caching for an application is a delicate task, and so entcache provides developers with different caching levels that can be used with it:

  1. A context.Context-based cache. Usually, attached to a request and does not work with other cache levels. It is used to eliminate duplicate queries that are executed by the same request.

  2. A driver-level cache used by the ent.Client. An application usually creates a driver per database, and therefore, we treat it as a process-level cache.

  3. A remote cache. For example, a Redis database that provides a persistence layer for storing and sharing cache entries between multiple processes. A remote cache layer is resistant to application deployment changes or failures, and allows reducing the number of identical queries executed on the database by different process.

  4. A cache hierarchy, or multi-level cache allows structuring the cache in hierarchical way. The hierarchy of cache stores is mostly based on access speeds and cache sizes. For example, a 2-level cache that composed of an LRU-cache in the application memory, and a remote-level cache backed by a Redis database.

Let's demonstrate this by explaining the context.Context based cache.

Context-Level Cache

The ContextLevel option configures the driver to work with a context.Context level cache. The context is usually attached to a request (e.g. *http.Request) and is not available in multi-level mode. When this option is used as a cache store, the attached context.Context carries an LRU cache (can be configured differently), and the driver stores and searches entries in the LRU cache when queries are executed.

This option is ideal for applications that require strong consistency, but still want to avoid executing duplicate database queries on the same request. For example, given the following GraphQL query:

query($ids: [ID!]!) {
nodes(ids: $ids) {
... on User {
id
name
todos {
id
owner {
id
name
}
}
}
}
}

A naive solution for resolving the above query will execute, 1 for getting N users, another N queries for getting the todos of each user, and a query for each todo item for getting its owner (read more about the N+1 Problem).

However, Ent provides a unique approach for resolving such queries(read more in Ent website) and therefore, only 3 queries will be executed in this case. 1 for getting N users, 1 for getting the todo items of all users, and 1 query for getting the owners of all todo items.

With entcache, the number of queries may be reduced to 2, as the first and last queries are identical (see code example).

context-level-cache

The different levels are explained in depth in the repository README.

Getting Started

If you are not familiar with how to set up a new Ent project, complete Ent Setting Up tutorial first.

First, go get the package using the following command.

go get ariga.io/entcache

After installing entcache, you can easily add it to your project with the snippet below:

// Open the database connection.
db, err := sql.Open(dialect.SQLite, "file:ent?mode=memory&cache=shared&_fk=1")
if err != nil {
log.Fatal("opening database", err)
}
// Decorates the sql.Driver with entcache.Driver.
drv := entcache.NewDriver(db)
// Create an ent.Client.
client := ent.NewClient(ent.Driver(drv))

// Tell the entcache.Driver to skip the caching layer
// when running the schema migration.
if client.Schema.Create(entcache.Skip(ctx)); err != nil {
log.Fatal("running schema migration", err)
}

// Run queries.
if u, err := client.User.Get(ctx, id); err != nil {
log.Fatal("querying user", err)
}
// The query below is cached.
if u, err := client.User.Get(ctx, id); err != nil {
log.Fatal("querying user", err)
}

To see more advanced examples, head over to the repo's examples directory.

Wrapping Up

In this post, I presented “entcache” a new cache driver for Ent that I developed while working on Ariga's Operational Data Graph query engine. We started the discussion by briefly mentioning the motivation for including caches in software systems. Following that, we described the features and capabilities of entcache and concluded with a short example of how you can set it up in your application.

There are a few features we are working on, and wish to work on, but need help from the community to design them properly (solving cache invalidation, anyone? ;)). If you are interested to contribute, reach out to me on the Ent Slack channel.

For more Ent news and updates:

· 阅读时间 9 分钟

A few months ago the Ent project announced the Schema Import Initiative, its goal is to help support many use cases for generating Ent schemas from external resources. Today, I'm happy to share a project I’ve been working on: entimport - an importent (pun intended) command line tool designed to create Ent schemas from existing SQL databases. This is a feature that has been requested by the community for some time, so I hope many people find it useful. It can help ease the transition of an existing setup from another language or ORM to Ent. It can also help with use cases where you would like to access the same data from different platforms (such as to automatically sync between them).
The first version supports both MySQL and PostgreSQL databases, with some limitations described below. Support for other relational databases such as SQLite is in the works.

Getting Started

To give you an idea of how entimport works, I want to share a quick example of end to end usage with a MySQL database. On a high-level, this is what we’re going to do:

  1. Create a Database and Schema - we want to show how entimport can generate an Ent schema for an existing database. We will first create a database, then define some tables in it that we can import into Ent.
  2. Initialize an Ent Project - we will use the Ent CLI to create the needed directory structure and an Ent schema generation script.
  3. Install entimport
  4. Run entimport against our demo database - next, we will import the database schema that we’ve created into our Ent project.
  5. Explain how to use Ent with our generated schemas.

Let's get started.

Create a Database

We’re going to start by creating a database. The way I prefer to do it is to use a Docker container. We will use a docker-compose which will automatically pass all needed parameters to the MySQL container.

Start the project in a new directory called entimport-example. Create a file named docker-compose.yaml and paste the following content inside:

version: "3.7"

services:

mysql8:
platform: linux/amd64
image: mysql
environment:
MYSQL_DATABASE: entimport
MYSQL_ROOT_PASSWORD: pass
healthcheck:
test: mysqladmin ping -ppass
ports:
- "3306:3306"

This file contains the service configuration for a MySQL docker container. Run it with the following command:

docker-compose up -d

Next, we will create a simple schema. For this example we will use a relation between two entities:

  • User
  • Car

Connect to the database using MySQL shell, you can do it with the following command:

Make sure you run it from the root project directory

docker-compose exec mysql8 mysql --database=entimport -ppass
create table users
(
id bigint auto_increment primary key,
age bigint not null,
name varchar(255) not null,
last_name varchar(255) null comment 'surname'
);

create table cars
(
id bigint auto_increment primary key,
model varchar(255) not null,
color varchar(255) not null,
engine_size mediumint not null,
user_id bigint null,
constraint cars_owners foreign key (user_id) references users (id) on delete set null
);

Let's validate that we've created the tables mentioned above, in your MySQL shell, run:

show tables;
+---------------------+
| Tables_in_entimport |
+---------------------+
| cars |
| users |
+---------------------+

We should see two tables: users & cars

Initialize Ent Project

Now that we've created our database, and a baseline schema to demonstrate our example, we need to create a Go project with Ent. In this phase I will explain how to do it. Since eventually we would like to use our imported schema, we need to create the Ent directory structure.

Initialize a new Go project inside a directory called entimport-example

go mod init entimport-example

Run Ent Init:

go run -mod=mod entgo.io/ent/cmd/ent new 

The project should look like this:

├── docker-compose.yaml
├── ent
│ ├── generate.go
│ └── schema
└── go.mod

Install entimport

OK, now the fun begins! We are finally ready to install entimport and see it in action.
Let’s start by running entimport:

go run -mod=mod ariga.io/entimport/cmd/entimport -h

entimport will be downloaded and the command will print:

Usage of entimport:
-dialect string
database dialect (default "mysql")
-dsn string
data source name (connection information)
-schema-path string
output path for ent schema (default "./ent/schema")
-tables value
comma-separated list of tables to inspect (all if empty)

Run entimport

We are now ready to import our MySQL schema to Ent!

We will do it with the following command:

This command will import all tables in our schema, you can also limit to specific tables using -tables flag.

go run ariga.io/entimport/cmd/entimport -dialect mysql -dsn "root:pass@tcp(localhost:3306)/entimport"

Like many unix tools, entimport doesn't print anything on a successful run. To verify that it ran properly, we will check the file system, and more specifically ent/schema directory.

├── docker-compose.yaml
├── ent
│ ├── generate.go
│ └── schema
│ ├── car.go
│ └── user.go
├── go.mod
└── go.sum

Let’s see what this gives us - remember that we had two schemas: the users schema and the cars schema with a one to many relationship. Let’s see how entimport performed.

entimport-example/ent/schema/user.go
type User struct {
ent.Schema
}

func (User) Fields() []ent.Field {
return []ent.Field{field.Int("id"), field.Int("age"), field.String("name"), field.String("last_name").Optional().Comment("surname")}
}
func (User) Edges() []ent.Edge {
return []ent.Edge{edge.To("cars", Car.Type)}
}
func (User) Annotations() []schema.Annotation {
return nil
}
entimport-example/ent/schema/car.go
type Car struct {
ent.Schema
}

func (Car) Fields() []ent.Field {
return []ent.Field{field.Int("id"), field.String("model"), field.String("color"), field.Int32("engine_size"), field.Int("user_id").Optional()}
}
func (Car) Edges() []ent.Edge {
return []ent.Edge{edge.From("user", User.Type).Ref("cars").Unique().Field("user_id")}
}
func (Car) Annotations() []schema.Annotation {
return nil
}

entimport successfully created entities and their relation!

So far looks good, now let’s actually try them out. First we must generate the Ent schema. We do it because Ent is a schema first ORM that generates Go code for interacting with different databases.

To run the Ent code generation:

go generate ./ent

Let's see our ent directory:

...
├── ent
│ ├── car
│ │ ├── car.go
│ │ └── where.go
...
│ ├── schema
│ │ ├── car.go
│ │ └── user.go
...
│ ├── user
│ │ ├── user.go
│ │ └── where.go
...

Ent Example

Let’s run a quick example to verify that our schema works:

Create a file named example.go in the root of the project, with the following content:

This part of the example can be found here

entimport-example/example.go
package main

import (
"context"
"fmt"
"log"

"entimport-example/ent"

"entgo.io/ent/dialect"
_ "github.com/go-sql-driver/mysql"
)

func main() {
client, err := ent.Open(dialect.MySQL, "root:pass@tcp(localhost:3306)/entimport?parseTime=True")
if err != nil {
log.Fatalf("failed opening connection to mysql: %v", err)
}
defer client.Close()
ctx := context.Background()
example(ctx, client)
}

Let's try to add a user, write the following code at the end of the file:

entimport-example/example.go
func example(ctx context.Context, client *ent.Client) {
// Create a User.
zeev := client.User.
Create().
SetAge(33).
SetName("Zeev").
SetLastName("Manilovich").
SaveX(ctx)
fmt.Println("User created:", zeev)
}

Then run:

go run example.go

This should output:

# User created: User(id=1, age=33, name=Zeev, last_name=Manilovich)

Let's check with the database if the user was really added

SELECT *
FROM users
WHERE name = 'Zeev';

+--+---+----+----------+
|id|age|name|last_name |
+--+---+----+----------+
|1 |33 |Zeev|Manilovich|
+--+---+----+----------+

Great! now let's play a little more with Ent and add some relations, add the following code at the end of the example() func:

make sure you add "entimport-example/ent/user" to the import() declaration

entimport-example/example.go
// Create Car.
vw := client.Car.
Create().
SetModel("volkswagen").
SetColor("blue").
SetEngineSize(1400).
SaveX(ctx)
fmt.Println("First car created:", vw)

// Update the user - add the car relation.
client.User.Update().Where(user.ID(zeev.ID)).AddCars(vw).SaveX(ctx)

// Query all cars that belong to the user.
cars := zeev.QueryCars().AllX(ctx)
fmt.Println("User cars:", cars)

// Create a second Car.
delorean := client.Car.
Create().
SetModel("delorean").
SetColor("silver").
SetEngineSize(9999).
SaveX(ctx)
fmt.Println("Second car created:", delorean)

// Update the user - add another car relation.
client.User.Update().Where(user.ID(zeev.ID)).AddCars(delorean).SaveX(ctx)

// Traverse the sub-graph.
cars = delorean.
QueryUser().
QueryCars().
AllX(ctx)
fmt.Println("User cars:", cars)

This part of the example can be found here

Now do: go run example.go.
After Running the code above, the database should hold a user with 2 cars in a O2M relation.

SELECT *
FROM users;

+--+---+----+----------+
|id|age|name|last_name |
+--+---+----+----------+
|1 |33 |Zeev|Manilovich|
+--+---+----+----------+

SELECT *
FROM cars;

+--+----------+------+-----------+-------+
|id|model |color |engine_size|user_id|
+--+----------+------+-----------+-------+
|1 |volkswagen|blue |1400 |1 |
|2 |delorean |silver|9999 |1 |
+--+----------+------+-----------+-------+

Syncing DB changes

Since we want to keep the database in sync, we want entimport to be able to change the schema after the database was changed. Let's see how it works.

Run the following SQL code to add a phone column with a unique index to the users table:

alter table users
add phone varchar(255) null;

create unique index users_phone_uindex
on users (phone);

The table should look like this:

describe users;
+-----------+--------------+------+-----+---------+----------------+
| Field | Type | Null | Key | Default | Extra |
+-----------+--------------+------+-----+---------+----------------+
| id | bigint | NO | PRI | NULL | auto_increment |
| age | bigint | NO | | NULL | |
| name | varchar(255) | NO | | NULL | |
| last_name | varchar(255) | YES | | NULL | |
| phone | varchar(255) | YES | UNI | NULL | |
+-----------+--------------+------+-----+---------+----------------+

Now let's run entimport again to get the latest schema from our database:

go run -mod=mod ariga.io/entimport/cmd/entimport -dialect mysql -dsn "root:pass@tcp(localhost:3306)/entimport"

We can see that the user.go file was changed:

entimport-example/ent/schema/user.go
func (User) Fields() []ent.Field {
return []ent.Field{field.Int("id"), ..., field.String("phone").Optional().Unique()}
}

Now we can run go generate ./ent again and use the new schema to add a phone to the User entity.

Future Plans

As mentioned above this initial version supports MySQL and PostgreSQL databases.
It also supports all types of SQL relations. I have plans to further upgrade the tool and add features such as missing PostgreSQL fields, default values, and more.

Wrapping Up

In this post, I presented entimport, a tool that was anticipated and requested many times by the Ent community. I showed an example of how to use it with Ent. This tool is another addition to Ent schema import tools, which are designed to make the integration of ent even easier. For discussion and support, open an issue. The full example can be found in here. I hope you found this blog post useful!

For more Ent news and updates:

· 阅读时间 10 分钟

之前的博客,我们向你展示了 elk - 一个Ent的 扩展插件 使您能够从您的方案生成一个完整工作的 Go CRUD HTTP API。 在今天的帖子中,我想给你介绍一个最近集成进elk的简洁的功能:一个完全符合 OpenAPI 规范(OAS) 的生成器。

OAS (全称Swagger Specification) 是一个技术规范,定义了REST API的标准、语言诊断接口描述。 这使人类和自动化工具都能够理解所述服务而无需实际源代码或附加文档。 结合 Swagger Tooling 你可以生成超过20种语言的服务器和客户端代码。 只需要传入OAS文件。

快速开始

第一步是将 elk 包添加到您的项目:

go get github.com/masseelch/elk@latest

elk 使用Ent 扩展 API 与Ent's 代码生成集成。 这要求我们使用 entc (ent codegen) 软件包 为我们的项目生成代码。 按照下面两个步骤来启用它并配置 Ent 来与 elk 扩展一起工作:

1. 创建一个名为 secrets.json 的文件,包含以下内容:

// +build ignore

package main

import (
"log"

"entgo.io/ent/entc"
"entgo.io/ent/entc/gen"
"github.com/masseelch/elk"
)

func main() {
ex, err := elk.NewExtension(
elk.GenerateSpec("openapi.json"),
)
if err != nil {
log.Fatalf("creating elk extension: %v", err)
}
err = entc.Generate("./schema", &gen.Config{}, entc.Extensions(ex))
if err != nil {
log.Fatalf("running ent codegen: %v", err)
}
}

2. 编辑 ent/generate.go 文件来执行 ent/entc.go

package ent

//go:generate go run -mod=mod entc.go

这些步骤完成后,从你的结构体生成一个 OAS 文件的所有准备工作就完成啦! 如果你没有了解过Ent,想要了解更多信息,如何连接到不同类型的数据库。 迁移或运行实体类,你可以先去了解Ent 安装教程

生成 OAS 文件

生成OAS 文件的第一步是创建一个Ent schema图表:

go run -mod=mod entgo.io/ent/cmd/ent new Fridge Compartment Item

为了演示 elk的OAS生成能力,我们将一起构建一个示例应用程序。 假定我有多个冰箱,每个冰箱有多个隔层,我想随时了解隔层的内容。 要为自己提供这个非常有用的信息,我们将创建一个带有RESTful的 Go 服务器。 为了放宽创建客户端应用程序与我们的服务器进行沟通,我们将创建一个 OpenAPI 规格文件描述它的 API。 一旦我们有了它, 我们可以使用 Swagger Codegen来构建一个前端,用我们选择的语言来管理冰箱和里面的内容! 您可以在这里找到一个使用 docker 生成客户端 的示例

让我们创建我们的schema:

ent/fridge.go
package schema

import (
"entgo.io/ent"
"entgo.io/ent/schema/edge"
"entgo.io/ent/schema/field"
)

// Fridge holds the schema definition for the Fridge entity.
type Fridge struct {
ent.Schema
}

// Fields of the Fridge.
func (Fridge) Fields() []ent.Field {
return []ent.Field{
field.String("title"),
}
}

// Edges of the Fridge.
func (Fridge) Edges() []ent.Edge {
return []ent.Edge{
edge.To("compartments", Compartment.Type),
}
}
ent/compartment.go
package schema

import (
"entgo.io/ent"
"entgo.io/ent/schema/edge"
"entgo.io/ent/schema/field"
)

// Compartment holds the schema definition for the Compartment entity.
type Compartment struct {
ent.Schema
}

// Fields of the Compartment.
func (Compartment) Fields() []ent.Field {
return []ent.Field{
field.String("name"),
}
}

// Edges of the Compartment.
func (Compartment) Edges() []ent.Edge {
return []ent.Edge{
edge.From("fridge", Fridge.Type).
Ref("compartments").
Unique(),
edge.To("contents", Item.Type),
}
}
ent/item.go
package schema

import (
"entgo.io/ent"
"entgo.io/ent/schema/edge"
"entgo.io/ent/schema/field"
)

// Item holds the schema definition for the Item entity.
type Item struct {
ent.Schema
}

// Fields of the Item.
func (Item) Fields() []ent.Field {
return []ent.Field{
field.String("name"),
}
}

// Edges of the Item.
func (Item) Edges() []ent.Edge {
return []ent.Edge{
edge.From("compartment", Compartment.Type).
Ref("contents").
Unique(),
}
}

现在,让我们生成Ent 代码和OAS文件。

go generate ./...

除了正常生成的文件外,还创建了一个名为 openapi.json 的文件。 复制它的内容并粘贴到 Swagger 编辑器 中。 你应该看到三个群组: 隔层, 物品冰箱.

Swagger Editor Example

Swagger 编辑器示例

如果你打开了冰箱中的POST选项,你就能看到期望的请求和所有可能的返回值。 太好了!

POST operation on Fridge

Fridge POST 操作

基本配置

我们的 API 的描述尚未反映出它所做的事情,让我们改变这一点! elk 提供了易于使用的配置生成器来操纵生成的 OAS 文件。 打开 ent/entc.go 并传递我们的 Fridge API 的更新标题和描述:

ent/entc.go
//go:build ignore
// +build ignore

package main

import (
"log"

"entgo.io/ent/entc"
"entgo.io/ent/entc/gen"
"github.com/masseelch/elk"
)

func main() {
ex, err := elk.NewExtension(
elk.GenerateSpec(
"openapi.json",
// It is a Content-Management-System ...
elk.SpecTitle("Fridge CMS"),
// You can use CommonMark syntax (https://commonmark.org/).
elk.SpecDescription("API to manage fridges and their cooled contents. **ICY!**"),
elk.SpecVersion("0.0.1"),
),
)
if err != nil {
log.Fatalf("creating elk extension: %v", err)
}
err = entc.Generate("./schema", &gen.Config{}, entc.Extensions(ex))
if err != nil {
log.Fatalf("running ent codegen: %v", err)
}
}

重新启动代码生成器将创建一个更新的OA文件,您可以复制粘贴到 Swagger 编辑器。

Updated API Info

更新的 API 信息

操作配置

我们不想暴露一个可以删除冰箱的接口(说真的,谁会想要呢?!) 幸运的是, elk 可以让我们配置要生成和忽略的接口。 elks 默认策略是暴露所有路由。 你可以更改此行为只暴露定义的接口。 或者你可以 告诉 elk 排除冰箱的DELETE操作,通过 elk.SchemaAnnotation:

ent/schema/fridge.go
// Annotations of the Fridge.
func (Fridge) Annotations() []schema.Annotation {
return []schema.Annotation{
elk.DeletePolicy(elk.Exclude),
}
}

看! 删除操作已经消失。

DELETE operation is gone

删除操作已经消失。

获取更多关于 elk如何工作以及你可以对它做些什么,查看 godoc

扩展规范

我对这个例子最感兴趣的一件事是冰箱里面的内容。 您可以使用 钩子 自定义生成的OAS 扩展到您喜欢的任何扩展。 然而,这会超出这个文章的范围。 如何将接口fridges/{id}/contents 添加到生成的 OAS文件的例子 这里

生成 OAS-implementing 服务器

我在一开始就说过要创建一个像OAS中描述的服务器。 elk 使这个更加容易,你只需要加上elk.GenateHandlers()

ent/entc.go
[...]
func main() {
ex, err := elk.NewExtension(
elk.GenerateSpec(
[...]
),
+ elk.GenerateHandlers(),
)
[...]
}

下一步,重新运行代码生成:

go generate ./...

创建了一个名为 ent/http 的新目录。

» tree ent/http
ent/http
├── create.go
├── delete.go
├── easyjson.go
├── handler.go
├── list.go
├── read.go
├── relations.go
├── request.go
├── response.go
└── update.go

0 directories, 10 files

您可以用这个非常简单的 main. go 注册生成的路由:

package main

import (
"context"
"log"
"net/http"

"<your-project>/ent"
elk "<your-project>/ent/http"

_ "github.com/mattn/go-sqlite3"
"go.uber.org/zap"
)

func main() {
// Create the ent client.
c, err := ent.Open("sqlite3", "file:ent?mode=memory&cache=shared&_fk=1")
if err != nil {
log.Fatalf("failed opening connection to sqlite: %v", err)
}
defer c.Close()
// Run the auto migration tool.
if err := c.Schema.Create(context.Background()); err != nil {
log.Fatalf("failed creating schema resources: %v", err)
}
// Start listen to incoming requests.
if err := http.ListenAndServe(":8080", elk.NewHandler(c, zap.NewExample())); err != nil {
log.Fatal(err)
}
}
go run -mod=mod main.go

我们的 Fridge API 服务器已经启动并运行。 通过生成的 OAS 文件和 Swagger ,您现在可以用任何支持的语言生成一个客户端的,并且不用麻烦重头写一个真正的RESTful 客户端 __

收尾

在这个帖子中,我们引入了 elk 的新功能——自动生成 OpenAPI 规范。 此功能在Ent的代码生成功能和 OpenAPI/Swagger的丰富生态系统之间连接。

有疑问? 需要帮助以开始? Feel free to join our Discord server or Slack channel.

:::留意更多Ent 新闻和更新:

:::